

There's something magical about Christmas crochet projects, especially when they turn a simple ball of yarn into an adorable little holiday character!
If you love handmade Christmas decorations, cozy winter crafts, and soft amigurumi toys, you're going to adore this Christmas Gingerbread Amigurumi Crochet Pattern.
With his sweet smiling face, chunky gingerbread-colored stitches, fluffy white frosting, bright red buttons, green bow tie, and tiny holly decoration, this little gingerbread man is full of Christmas charm.
And the best part? Unlike a real gingerbread cookie, this one will last for many Christmas seasons!
This crochet gingerbread plushie is inspired by traditional gingerbread cookies decorated with white icing and colorful Christmas candies. However, instead of baking a cookie, we'll crochet a soft, cuddly amigurumi character using plush yarn.
The finished design has a rounded head, a small body, short arms and legs, and adorable festive details.
We'll make the head, body, arms, and legs separately before assembling them into one character. Then we'll add the white frosting, little red buttons, green bow tie, and festive holly decoration.
In this complete free tutorial, you'll learn everything you need to create your own Christmas gingerbread amigurumi, including materials, crochet abbreviations, round-by-round instructions, color changes, stuffing, assembly, decorative details, and finishing techniques.
You'll also discover helpful tips for working with chenille yarn, creative color variations, troubleshooting advice, and answers to frequently asked questions.
Whether you're making a Christmas gift, decorating your home, or building a collection of adorable holiday amigurumi, this cheerful gingerbread man is a wonderful project to add to your crochet list.
So grab your favorite crochet hook, some soft gingerbread-colored yarn, and a warm drink.
Let's bring this sweet little Christmas character to life!
What Is Christmas Gingerbread Amigurumi?
Christmas gingerbread amigurumi is a crocheted stuffed character inspired by the traditional gingerbread man cookie.
The word amigurumi refers to the Japanese art of crocheting or knitting small stuffed characters and objects.
Gingerbread amigurumi combines this popular craft technique with classic Christmas decorating traditions.
Our design includes several recognizable gingerbread features:
- A soft caramel-brown crocheted body.
- A large rounded head with a cheerful smile.
- Two small black eyes.
- White frosting around the top of the head.
- A Christmas holly decoration with green leaves and a red berry.
- A little green bow tie beneath the head.
- Two bright red buttons on the chest.
- Short arms with white icing details.
- Rounded legs with decorative white icing around the ankles.
Unlike flat gingerbread ornaments, this pattern creates a three-dimensional stuffed toy.
The soft yarn and rounded proportions make it look like a miniature Christmas plushie.
It's especially charming when photographed beside wrapped presents, evergreen branches, Christmas ornaments, and warm fairy lights.
Why You'll Love This Gingerbread Crochet Pattern
There are so many reasons to make this adorable Christmas character.
It's full of holiday personality. The smiling face and festive decorations instantly give the gingerbread man a cheerful appearance.
It's wonderfully soft. Chunky chenille yarn creates a plush texture that looks and feels cozy.
It's customizable. Change the button colors, make different expressions, or add a festive scarf.
It's a memorable handmade gift. A soft gingerbread character makes a thoughtful seasonal present for crochet lovers and Christmas enthusiasts.
It uses familiar crochet techniques. Most pieces are made with single crochet, increases, and decreases.
It's perfect for a Christmas amigurumi collection. Make matching gingerbread characters, snowmen, reindeer, and Santa-inspired crochet toys.
And because the pattern uses separate pieces, you can work on the head, arms, legs, and decorations over several cozy crochet sessions.
Christmas Gingerbread Amigurumi Pattern Details
| Project Detail | Information |
|---|---|
| Pattern Name | Christmas Gingerbread Amigurumi Crochet |
| Project Type | Stuffed amigurumi character |
| Skill Level | Intermediate |
| Crochet Terms | US terminology |
| Recommended Yarn | Bulky chenille or plush yarn |
| Suggested Hook | 5.0–6.0 mm, adjusted to your yarn |
| Estimated Height | Approximately 8–11 inches |
| Estimated Time | 5–8 hours |
| Construction | Separate pieces sewn together |
| Main Color | Caramel or gingerbread brown |
| Accent Colors | White, green, red, black |
| Stuffing | Polyester fiberfill |
| Main Techniques | Magic ring, single crochet, increases, decreases, sewing, embroidery |
The finished size and time are estimates. Your exact results will depend on yarn weight, hook size, gauge, and experience.
Materials and Supplies You'll Need
Before starting, gather all your materials.
Using consistent yarn thickness across the main pieces will help maintain the character's proportions.
Yarn Colors
Color A – Gingerbread Brown
Choose a soft caramel, light cinnamon, or warm cookie-brown yarn.
Use it for the head, torso, arms, and legs.
Estimated amount: 120–180 grams.
Color B – Frosting White
Choose bright white or warm ivory yarn.
This will create the scalloped icing decoration on the head and the white accents on the arms and legs.
Estimated amount: 20–35 grams.
Color C – Christmas Green
Use a rich evergreen shade.
You'll need it for the bow tie and holly leaves.
Estimated amount: 10–20 grams.
Color D – Bright Red
Choose festive red yarn for the buttons and holly berry.
Estimated amount: 10–15 grams.
Color E – Black
Use a small amount of smooth black yarn or embroidery floss for the smile and optional embroidered eyes.
These quantities are planning estimates rather than amounts measured from a finished sample.
Tools
You'll also need:
- Crochet hook suitable for your yarn.
- Polyester fiberfill stuffing.
- Yarn needle.
- Scissors.
- Stitch markers.
- Straight pins for positioning parts.
- Optional 10–12 mm black safety eyes.
- Optional smaller crochet hook for decorative pieces.
Safety note: Plastic safety eyes can detach and become choking hazards. For toys intended for babies or young children, use securely embroidered eyes and ensure the entire toy meets applicable age-appropriate safety requirements.
Choosing the Best Yarn
Yarn selection is especially important for this project because the character's fluffy texture is one of its most recognizable features.
Chenille Yarn
Chenille is a great option for a soft, cuddly gingerbread plushie.
Its velvety texture creates rounded stitches and a charming stuffed-animal appearance.
However, it can be harder to see individual stitches, particularly when working decreases.
Plush Yarn
Plush yarn is another excellent choice.
It gives the finished toy a squishy texture and makes the character look soft and inviting.
Worsted-Weight Acrylic
If you're less experienced with amigurumi, worsted-weight acrylic can be easier to work with.
The finished gingerbread man will be smaller and less fluffy, but the stitch definition will be clearer.
Which Yarn Is Best?
For a character resembling the reference photograph, choose soft bulky chenille yarn in gingerbread brown.
Use yarn of a similar thickness for the white icing and colorful details, or a slightly thinner yarn for small decorations.
You may need to adjust your hook size to achieve a firm crochet fabric that holds stuffing securely.
Crochet Abbreviations
All instructions use standard US crochet terminology.
| Abbreviation | Meaning |
|---|---|
| MR | Magic ring |
| ch | Chain |
| sc | Single crochet |
| hdc | Half double crochet |
| dc | Double crochet |
| sl st | Slip stitch |
| inc | Increase – 2 sc in the same stitch |
| dec | Decrease – work 2 stitches together |
| st / sts | Stitch / stitches |
| rnd | Round |
| rep | Repeat |
| FLO | Front loop only |
| BLO | Back loop only |
How to Make an Invisible Decrease
An invisible decrease helps keep the amigurumi fabric smooth and reduces visible gaps.
Insert the hook through the front loop of the next stitch.
Without yarning over, insert the hook through the front loop of the following stitch.
Yarn over and pull through both front loops.
Yarn over once more and pull through the remaining loops.
You've now decreased two stitches into one.
If your plush yarn makes the front loops difficult to identify, you can use a regular single crochet decrease.
Important Pattern Notes
Before beginning, review these tips.
The head, body, arms, and legs are worked mainly in continuous spiral rounds.
Do not join rounds unless the instructions specifically say to do so.
Use a stitch marker to identify the first stitch of each round.
Move the marker upward as you work.
Gauge and Tension
Exact gauge is less important than creating a firm fabric without large holes.
If you can see stuffing through your crochet stitches, switch to a smaller hook.
If the fabric is so tight that you struggle to insert your hook, try a slightly larger hook.
Stuffing
Add stuffing gradually as you work.
The head should be firmly shaped but still soft.
The arms and legs should be slightly less stuffed so they can move naturally.
Construction Overview
We'll complete the gingerbread man in this order:
- Crochet the head and add the face.
- Crochet the body.
- Make both arms.
- Make both legs.
- Add the white icing details.
- Crochet the green bow tie and red buttons.
- Make the frosting cap, holly leaves, and berry.
- Assemble the pieces and complete the finishing touches.
Part 1: Crochet the Gingerbread Head
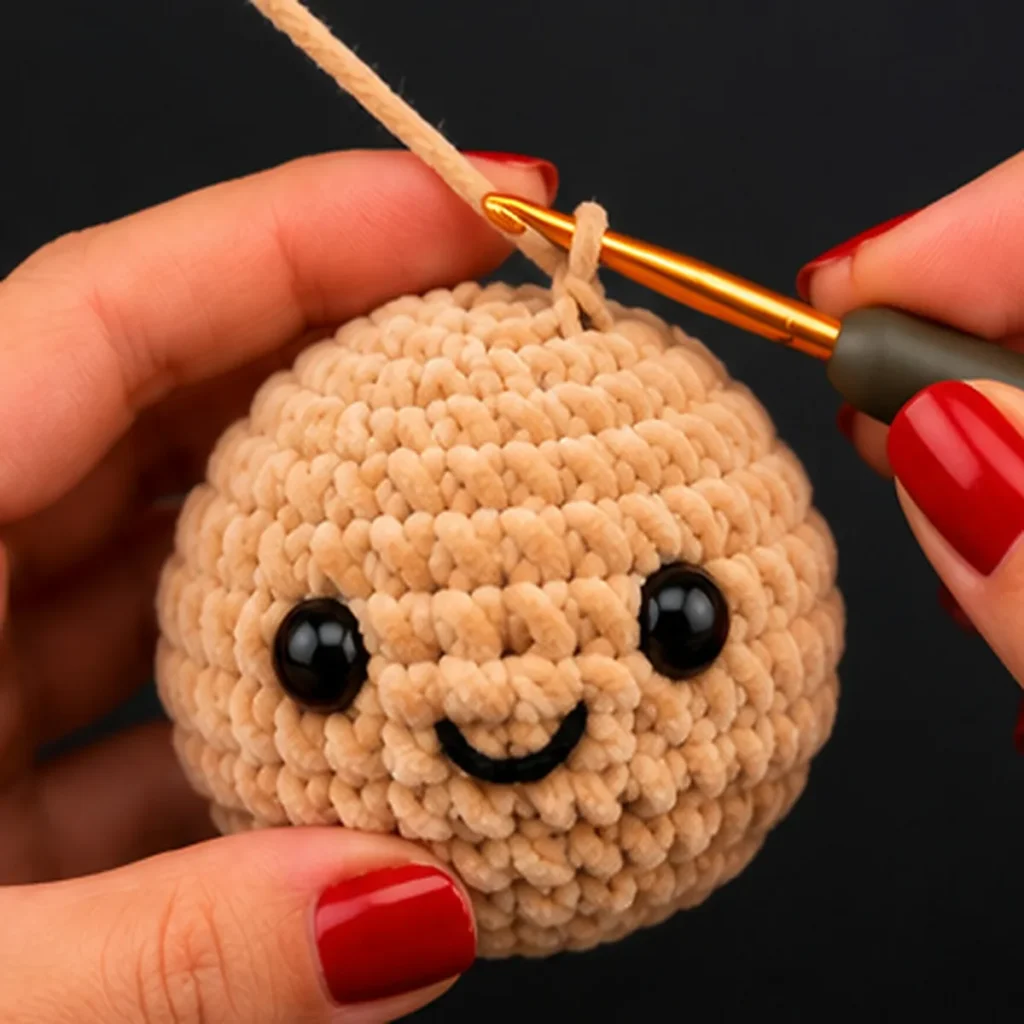
The large rounded head gives this little gingerbread character its adorable expression.
We'll start at the top and work downward.
Using gingerbread-brown yarn:
Round 1
Make a magic ring.
Work 6 sc into the ring.
Pull the ring closed.
6 sc.
Round 2
Increase in every stitch.
12 sc.
Round 3
Repeat (1 sc, inc) six times.
18 sc.
Round 4
Repeat (2 sc, inc) six times.
24 sc.
Round 5
Repeat (3 sc, inc) six times.
30 sc.
Round 6
Repeat (4 sc, inc) six times.
36 sc.
Round 7
Repeat (5 sc, inc) six times.
42 sc.
Round 8
Repeat (6 sc, inc) six times.
48 sc.
The crown of the head is now formed.
Gently spread the piece with your fingers.
It should resemble a rounded bowl.
Rounds 9–15
Work 1 sc in every stitch around.
48 sc in each round.
These seven rounds create the main height of the head.
Try to keep your tension consistent.
Position the Eyes
Before reducing the opening too much, position the safety eyes between Rounds 12 and 13, approximately nine stitches apart.
Make sure they sit evenly across the front.
Check their placement before installing the backs.
For embroidered eyes, mark the positions and stitch them later.
Round 16
Repeat (6 sc, dec) six times.
42 sc.
Round 17
Repeat (5 sc, dec) six times.
36 sc.
Round 18
Repeat (4 sc, dec) six times.
30 sc.
Round 19
Repeat (3 sc, dec) six times.
24 sc.
Round 20
Repeat (2 sc, dec) six times.
18 sc.
Stop here.
Do not close the opening.
Fasten off, leaving a long sewing tail.
Stuff the head gradually, shaping the cheeks and forehead.
The opening will be used to attach the head to the torso.
Embroider the Smile
Thread your yarn needle with black yarn.
Position the smile approximately two rounds beneath the eyes.
Create a small curved line using two or three embroidery stitches.
The smile should curve slightly upward at both ends.
Keep the embroidery loose enough that it doesn't pull the yarn fabric inward.
For a cute raised nose, you may also make a tiny tan crocheted circle using six single crochet stitches in a magic ring and sew it above the smile.
This optional detail adds extra dimension to the face.
Part 2: Crochet the Gingerbread Body
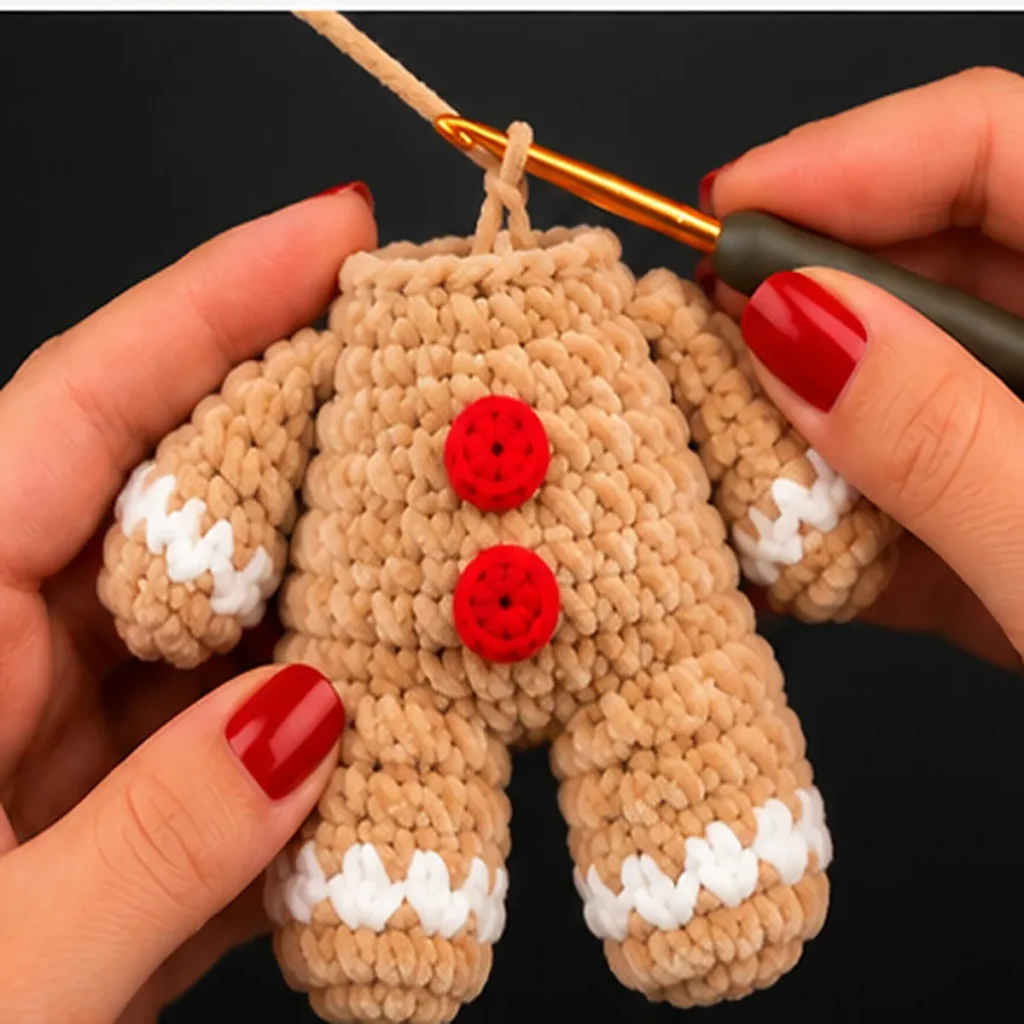
The body is slightly wider at the bottom and narrows toward the neck.
Using gingerbread-brown yarn:
Round 1
Make a magic ring and work 6 sc.
(6 sc)
Round 2
Increase in every stitch.
(12 sc)
Round 3
Repeat (1 sc, inc) six times.
(18 sc)
Round 4
Repeat (2 sc, inc) six times.
(24 sc)
Round 5
Repeat (3 sc, inc) six times.
(30 sc)
Rounds 6–10
Work 1 sc into every stitch.
(30 sc per round)
These rounds create the rounded lower torso.
Round 11
Repeat (3 sc, dec) six times.
(24 sc)
Rounds 12–16
Work 1 sc into every stitch.
(24 sc per round)
The torso should now resemble a small, slightly tapered cylinder.
Round 17
Repeat (2 sc, dec) six times.
(18 sc)
Rounds 18–19
Work 1 sc in each stitch.
(18 sc per round)
Fasten off, leaving a long sewing tail.
Do not close the upper opening.
Stuff the body evenly.
The eighteen-stitch neck opening matches the unfinished opening of the head.
Set the torso aside.
Part 3: Crochet the Gingerbread Arms
Our gingerbread man has two short, rounded arms that look adorable when angled slightly outward.
Make two identical arms.
Using brown yarn:
Round 1
Work 6 sc into a magic ring.
(6 sc)
Round 2
Increase in every stitch.
(12 sc)
Rounds 3–5
Work 1 sc in every stitch.
(12 sc per round)
These rounds form the rounded hands.
Round 6
Repeat (2 sc, dec) three times.
(9 sc)
Rounds 7–11
Work 1 sc in every stitch.
(9 sc per round)
Round 12
Repeat (1 sc, dec) three times.
(6 sc)
Fasten off, leaving a sewing tail.
Stuff the rounded hand lightly.
Use very little stuffing in the upper arm so the piece remains flexible.
Flatten the top opening.
Repeat for the second arm.
Add White Icing to the Arms
Using white yarn and a yarn needle, embroider a small zigzag line around the wrist area, approximately across Rounds 4–5.
Create short diagonal stitches that alternate up and down around the arm.
Repeat on the other arm.
This imitates the white frosting traditionally piped onto gingerbread cookies.
For a simpler version, use a short white surface-crochet line instead of embroidery.
Part 4: Crochet the Gingerbread Legs
The two chunky legs help give the gingerbread man his cute, rounded appearance.
Make two identical legs.
Round 1
With gingerbread-brown yarn, make a magic ring.
Work 6 sc.
(6 sc)
Round 2
Increase in every stitch.
(12 sc)
Round 3
Repeat (1 sc, inc) six times.
(18 sc)
Rounds 4–5
Work 1 sc in every stitch.
(18 sc per round)
These rounds form the rounded feet.
Round 6
Repeat (1 sc, dec) six times.
(12 sc)
Rounds 7–12
Work 1 sc in every stitch.
(12 sc per round)
Round 13
Repeat (2 sc, dec) three times.
(9 sc)
Round 14
Work 1 sc in each stitch.
(9 sc)
Fasten off, leaving a long sewing tail.
Add stuffing to the feet and lower legs.
Keep the upper section softer so the legs hang naturally.
Repeat the instructions for the second leg.
Add White Ankle Icing
Thread a yarn needle with white yarn.
Create a zigzag frosting line around each ankle, approximately between Rounds 5 and 6.
Make the white stitches visible but not overly tight.
Try to use a similar number of zigzag points on both legs.
This small detail helps the plushie resemble a beautifully decorated gingerbread cookie.
Part 5: Crochet the White Frosting Cap
The fluffy white frosting around the top of the head is one of the cutest features of this Christmas gingerbread amigurumi.
We'll make a separate cap and then sew it onto the head.
Using white yarn:
Round 1
Make a magic ring and work 6 sc.
(6 sc)
Round 2
Increase in every stitch.
(12 sc)
Round 3
Repeat (1 sc, inc) six times.
(18 sc)
Round 4
Repeat (2 sc, inc) six times.
(24 sc)
Round 5
Repeat (3 sc, inc) six times.
(30 sc)
Round 6
Repeat (4 sc, inc) six times.
(36 sc)
Round 7
Repeat (5 sc, inc) six times.
(42 sc)
Round 8
Repeat (6 sc, inc) six times.
(48 sc)
Round 9
Work 1 sc in each stitch.
(48 sc)
Round 10 – Scalloped Frosting Edge
Repeat the following around the edge:
- Slip stitch in the next stitch.
- Work 3 hdc into the next stitch.
- Slip stitch into the following stitch.
Repeat sixteen times around.
This creates a decorative scalloped edge resembling piped frosting.
Fasten off, leaving a long tail.
Position the Frosting
Place the white cap over the crown of the brown head.
The scalloped edge should rest above the eyes, framing the upper forehead.
Adjust the position until the frosting looks balanced.
If the cap feels too tight, try using a slightly larger hook when making it.
Sew the cap securely around its edge.
Make sure the white frosting stays neatly positioned without covering the eyes.
Part 6: Crochet the Holly Leaves and Red Berry
The holly decoration gives our gingerbread man a festive Christmas appearance.
We'll make two small green leaves and one round red berry.
Green Holly Leaf – Make Two
Using green yarn:
Step 1: Chain 7.
Step 2: Work 1 sc in the second chain from the hook.
Step 3: Work 1 hdc in the next chain.
Step 4: Work 1 dc into each of the next two chains.
Step 5: Work 1 hdc into the next chain.
Step 6: Work 1 sc into the final chain.
Chain 1, then rotate the work to crochet along the unused loops on the opposite side of the foundation chain.
Work:
1 sc, 1 hdc, 2 dc worked separately into the next two chains, 1 hdc, 1 sc.
Slip stitch near the leaf tip to finish.
Fasten off, leaving a sewing tail.
Repeat for the second leaf.
These leaves will have a softly elongated shape.
For more pointed leaves, gently shape their tips with your fingers.
Red Holly Berry
Using red yarn:
Round 1: Make a magic ring with 6 sc. (6)
Round 2: Increase in each stitch. (12)
Round 3: Work 1 sc in each stitch. (12)
Round 4: Decrease six times. (6)
Add a tiny amount of stuffing if necessary.
Fasten off and close the remaining opening.
Attach the Holly
Place the two green leaves near the top of the white frosting cap.
Angle them outward.
Position the red berry beside or slightly in front of the leaves.
Sew all pieces securely in place.
Keep the holly decoration balanced and compact.
It should sit attractively above the head without making the plushie top-heavy.
Part 7: Crochet the Green Bow Tie
The green bow tie adds a charming finishing touch beneath the gingerbread man's head.
We'll crochet a small rectangle and shape it into a bow.
Using green yarn:
Row 1
Chain 11.
Work 1 sc into the second chain from the hook and each remaining chain.
(10 sc)
Row 2
Chain 1 and turn.
Work 1 sc in every stitch.
(10 sc)
Row 3
Chain 1 and turn.
Work 1 sc in every stitch.
(10 sc)
Row 4
Chain 1 and turn.
Work 1 sc in every stitch.
(10 sc)
Fasten off, leaving a long tail.
Shape the Bow
Lay the rectangle flat.
Pinch the middle together.
Wrap the yarn tail around the center approximately five or six times.
Pull gently to create two rounded bow loops.
Secure the wrapping at the back.
The finished bow should resemble a classic little Christmas bow tie.
Position it directly below the head on the front of the upper chest.
Sew it firmly in place.
Part 8: Crochet the Two Red Buttons
Now we'll add the little red decorations to the gingerbread man's chest.
Make two small red buttons.
Using red yarn:
Round 1
Make a magic ring.
Work 6 sc into the ring.
(6 sc)
Round 2
Work 1 sc in each stitch.
(6 sc)
Slip stitch to finish.
Fasten off, leaving a sewing tail.
The result should be a small, slightly raised circular button.
Repeat to create a second button.
For larger buttons, you can instead increase to twelve stitches on the second round.
Attach the Buttons
Position the first button below the green bow tie.
Place the second button directly underneath it, leaving a small gap.
Pin both pieces in position before sewing.
Make sure they're centered on the body.
Sew each button securely around its edge.
For a decorative touch, add tiny darker-red embroidery stitches in the center.
Part 9: Assemble Your Gingerbread Amigurumi
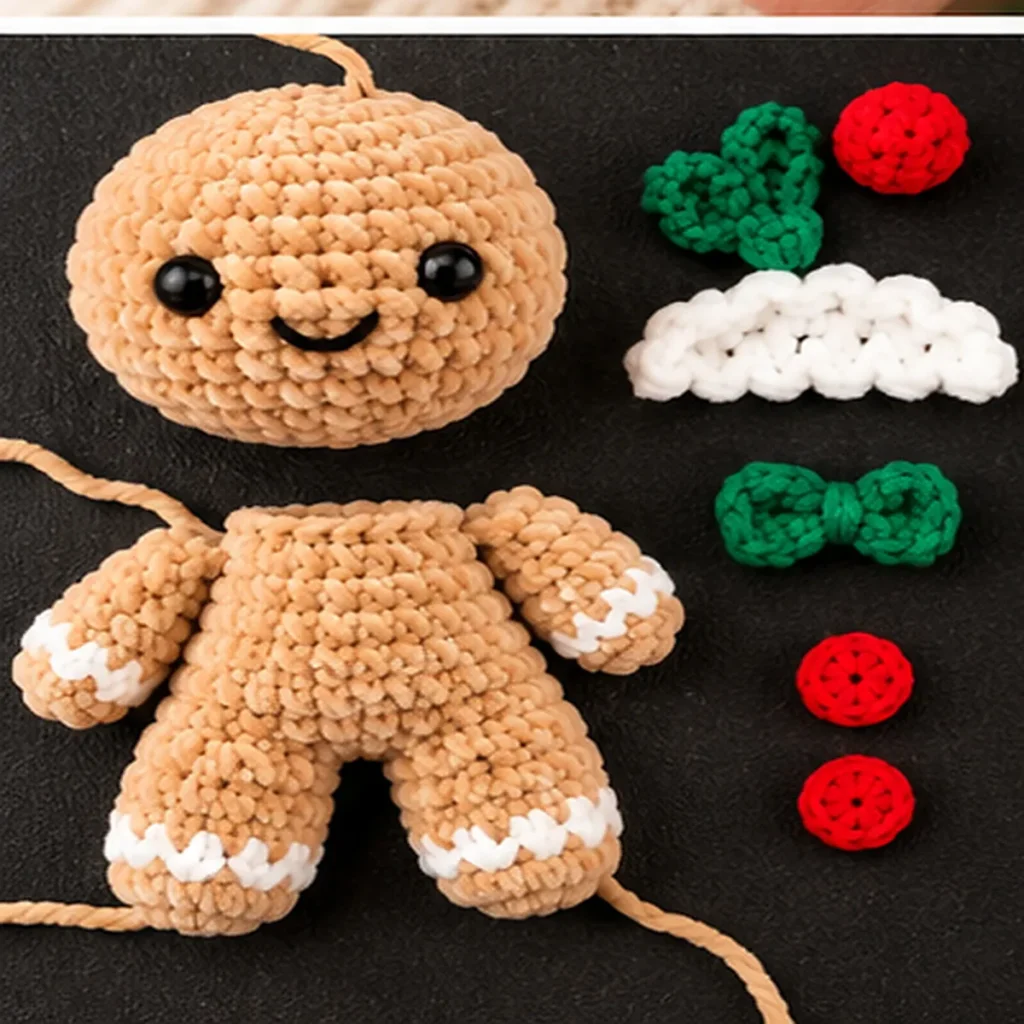
Now it's time to bring all the individual pieces together!
Lay everything out on your work surface.
You should have:
- One completed brown head.
- One brown torso.
- Two matching arms.
- Two matching legs.
- One white frosting cap.
- Two green holly leaves.
- One red berry.
- One green bow tie.
- Two red buttons.
If you've already attached the smaller decorations, keep the finished pieces nearby.
Step 1 – Attach the Legs
Position both legs underneath the torso.
Angle the rounded feet slightly outward.
Pin the legs in place.
Using the long sewing tails, stitch the top openings securely to the underside of the body.
Check that both legs sit at approximately the same height.
Reinforce the attachment points with several extra stitches.
Step 2 – Attach the Arms
Place one arm on either side of the upper torso, around Rounds 14–16.
The rounded hands should point slightly outward.
Sew the flattened top openings securely to the body.
Repeat for the second arm.
Check the character from the front to make sure both arms appear balanced.
Step 3 – Attach the Head
Align the eighteen-stitch opening of the head with the eighteen-stitch opening at the top of the torso.
Use the yarn tail to sew corresponding stitches together around the openings.
Before completing the seam, check the stuffing around the neck.
Add a small amount if necessary.
The head should sit upright without wobbling excessively.
Step 4 – Check the Decorations
Position the frosting cap and holly decoration.
Adjust the green bow tie and red buttons if they haven't already been sewn on.
Check the white icing lines on the arms and legs.
Step 5 – Final Shaping
Gently squeeze and shape the head, body, hands, and feet.
Make sure all the yarn tails are hidden.
Your adorable Christmas gingerbread amigurumi is now complete!
Part 10: Final Details and Quality Check
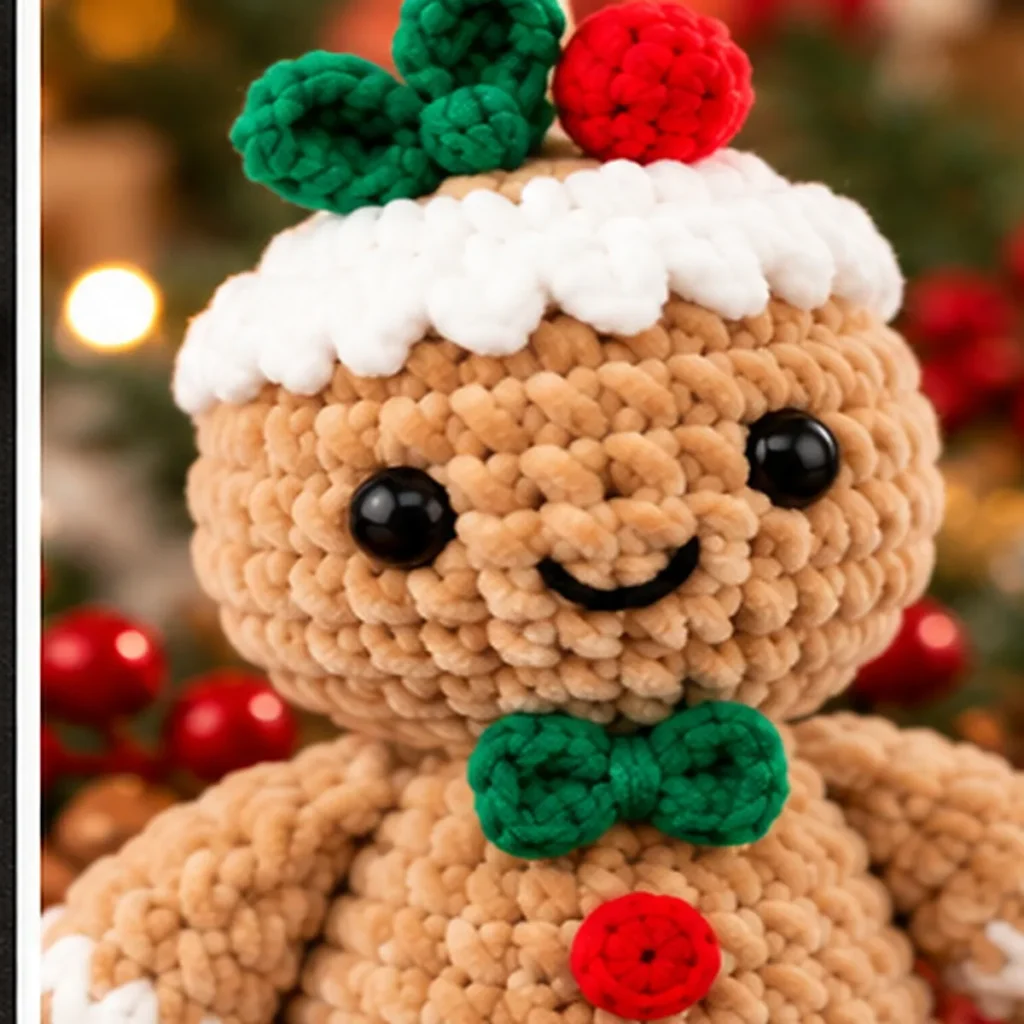
Before displaying your finished gingerbread plushie, take a few minutes to check the details.
Make sure:
- Both eyes are evenly positioned.
- The smile is centered.
- The white frosting cap is secure.
- The holly leaves and red berry are firmly attached.
- The bow tie sits neatly below the head.
- The two red buttons are centered.
- Both arms and legs are securely sewn into place.
- All yarn tails are woven in.
- No stuffing is visible between the stitches.
How to Make the Plushie Look Extra Fluffy
Chenille yarn may flatten slightly while you're working.
Gently lift the fibers with your fingers.
Avoid excessive brushing, which can damage or loosen certain plush yarns.
The finished character should look soft, rounded, and pleasantly squishy.
Complete Crochet Stitch Count Summary
| Piece | Maximum Stitches | Finishing |
|---|---|---|
| Gingerbread head | 48 sc | Leave 18-stitch opening |
| Body | 30 sc | Leave 18-stitch neck opening |
| Each arm | 12 sc | End with 6 stitches |
| Each leg | 18 sc | End with 9 stitches |
| White frosting cap | 48 sc | Add scalloped edging |
| Each holly leaf | Flat worked leaf | Sew onto frosting cap |
| Red berry | 12 sc | Close and attach |
| Green bow | 10 sc per row | Pinch and wrap center |
| Red buttons | 6 sc per round | Sew onto chest |
Use this chart as a quick reference when checking your stitch counts.
Creative Ways to Customize Your Gingerbread Amigurumi
One of the most enjoyable things about Christmas crochet is adding your own personal touches.
Once you've made the traditional gingerbread character, try experimenting with different colors and accessories.
Classic Christmas Gingerbread
Use warm caramel-brown yarn, white icing, green holly, a green bow, and red buttons.
This version is perfect for traditional Christmas decorations.
Pink Gingerbread Character
Choose pale pink for the bow tie and buttons.
Add a small pink bow above the frosting cap.
This creates a sweet, pastel Christmas variation.
Gingerbread With a Scarf
Instead of the green bow tie, crochet a miniature red-and-white scarf.
Wrap it around the neck and secure the ends.
Gingerbread Girl
Add a crocheted bow at the side of the head and a small decorative skirt.
Keep the same basic head and body construction.
Mini Gingerbread Ornament
Use thinner yarn and a smaller hook.
Crochet the same pieces at a smaller scale.
If the finished ornament is lightweight enough, you can sew a hanging loop securely to the top.
Avoid using detachable decorations.
Matching Gingerbread Friends
Make several gingerbread characters with different expressions, buttons, and bows.
Display them together as a handmade Christmas family.
Common Crochet Problems and How to Fix Them
My Plush Yarn Is Difficult to Count
Fluffy yarn can hide the tops of the stitches.
Use a stitch marker at the beginning of every round.
Gently feel each stitch with your fingers as you count.
Good lighting is particularly helpful.
The Head Looks Too Big
The large head is an intentional part of the character's cute proportions.
However, if it looks excessively large, check that you followed the decrease rounds correctly.
Make sure the body is stuffed firmly enough to support the head.
My Gingerbread Man Has a Wobbly Neck
Reinforce the seam connecting the head and body.
Add a little stuffing near the neck if necessary.
Keep the eighteen-stitch openings aligned when sewing.
The White Frosting Doesn't Fit
The frosting cap may be too tight because of your crochet tension.
Try using a slightly larger hook or adjusting the cap's depth.
Check that it sits above the eyes.
The Arms Look Uneven
Compare the stitch counts and lengths of both arms.
Pin them to the body before sewing.
Adjust their angles until you're happy with the symmetry.
The White Icing Looks Messy
Use a smooth white yarn if you find bulky chenille difficult to embroider with.
Make the diagonal icing stitches approximately the same length.
Avoid pulling them too tightly.
The Red Buttons Look Too Large
Use a smaller hook or thinner yarn for the buttons.
You can also make simple embroidered red circles instead of separate crocheted pieces.
The Stuffing Shows Through
Try a smaller crochet hook.
Make sure you're not overstuffing the piece.
Amigurumi fabric should be firm enough to contain the stuffing securely.
How to Wash and Care for Your Gingerbread Crochet Plushie
Handmade crochet toys need gentle care to maintain their shape and texture.
Always follow the washing instructions for your chosen yarn.
Spot Cleaning
Use a soft damp cloth and a little mild detergent.
Gently dab any dirty areas.
Avoid rubbing too hard.
Hand Washing
If your yarn, filling, and decorations are suitable for washing, gently hand wash the plushie in cool water.
Do not twist or wring it.
Drying
Press out excess water with a clean towel.
Reshape the gingerbread man while damp.
Allow it to air dry completely.
Storage
Store the finished plushie in a clean, dry place.
Avoid placing heavy objects on top of it.
For seasonal storage, keep it in a breathable fabric bag or clean container.
Fun Ways to Display Your Christmas Gingerbread Amigurumi
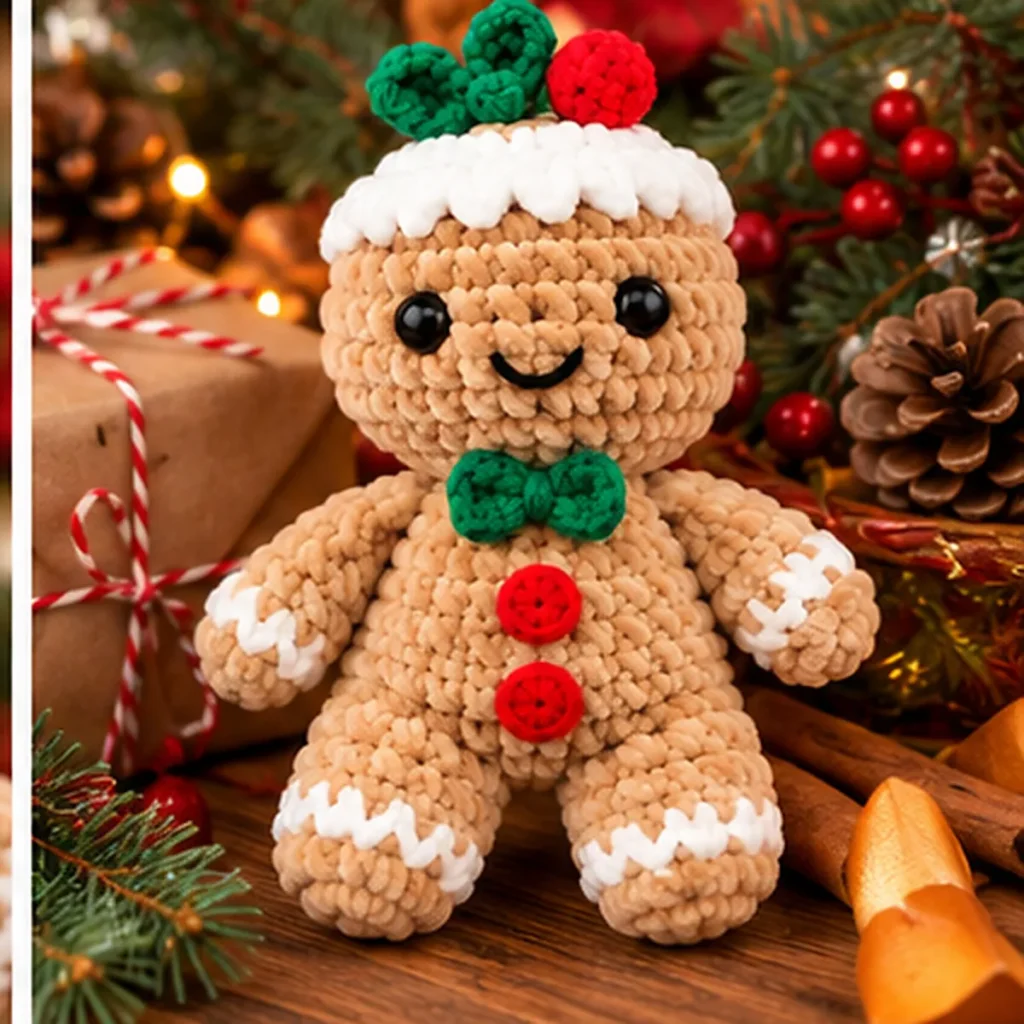
The completed gingerbread man makes a wonderful addition to your handmade holiday decorations.
Christmas Tree Display
Make a smaller version with a secure hanging loop and display it on your Christmas tree.
Christmas Shelf Decoration
Place the gingerbread plushie beside miniature Christmas trees, fairy lights, candles, and wrapped presents.
Keep it away from open flames and other heat sources.
Handmade Christmas Gift
Add the plushie to a festive gift box with tissue paper and a handwritten note.
Holiday Table Centerpiece
Arrange several gingerbread characters among pinecones, evergreen branches, and artificial berries.
Crochet Christmas Collection
Display your gingerbread man alongside handmade snowmen, Christmas trees, reindeer, and other seasonal amigurumi characters.
Craft Fair Display
A collection of gingerbread amigurumi characters can create an attractive holiday-themed craft table.
If you're selling finished toys, follow applicable toy-safety, testing, and labeling requirements for your market.
Frequently Asked Questions
1. Is this Christmas Gingerbread Amigurumi Crochet pattern suitable for beginners?
The project is best for intermediate crocheters or confident beginners who already understand basic amigurumi techniques.
You'll need to make separate pieces, use increases and decreases, sew parts together, and add decorative details.
2. What yarn is best for a fluffy gingerbread plushie?
Bulky chenille or soft plush yarn is a good choice.
It creates the fluffy, velvety texture seen in the reference photograph.
3. Can I make this gingerbread man using regular acrylic yarn?
Yes.
Regular acrylic yarn can work well and may make the individual crochet stitches easier to see.
Your finished toy will probably be smaller and less fluffy than the chenille version.
4. How tall will the finished gingerbread amigurumi be?
Using bulky yarn and an appropriate hook, the finished character is estimated to measure approximately eight to eleven inches tall.
Your actual size will depend on yarn thickness, tension, and stuffing.
5. Can I make the gingerbread man without safety eyes?
Absolutely!
You can embroider both eyes using smooth black yarn.
This avoids using plastic eyes, although all other pieces and attachments must also be securely constructed.
6. Can I make the white frosting without crocheting a separate cap?
Yes.
You can embroider white scallops around the upper forehead or work a decorative white surface-crochet edging.
The separate cap creates a fuller frosting effect.
7. How can I make the toy stand upright?
Distribute the stuffing evenly and position the legs symmetrically.
Because the legs are rounded and the head is large, the toy may need support to stand.
It's also adorable when seated.
8. Can I make a smaller gingerbread version?
Yes.
Use thinner yarn and a smaller crochet hook.
The same general instructions can be used to create a miniature character.
9. Can I change the decorations?
Of course!
Try pink buttons, a red bow tie, a miniature scarf, or a different holly arrangement.
Just make sure all decorations are securely attached.
10. Can I sell finished gingerbread amigurumi toys?
You can generally sell handmade crochet pieces you create, subject to applicable laws and marketplace rules.
If selling them as toys, follow relevant safety, labeling, and testing requirements, particularly for detachable components.
Conclusion: Crochet Your Own Adorable Christmas Gingerbread Friend
There's something truly special about creating a Christmas decoration with your own hands.
This Christmas Gingerbread Amigurumi Crochet Pattern combines the cozy texture of plush yarn with the timeless charm of holiday gingerbread cookies.
From the smiling brown face and white frosting to the holly decoration, little green bow tie, bright red buttons, and adorable icing-covered hands and feet, every detail makes this character extra sweet.
Although the pattern includes several separate pieces, working through them one at a time makes the process manageable and rewarding.
Start with the head, enjoy shaping the body, carefully sew the pieces together, and finish with your favorite decorative details.
Once you've completed your first gingerbread man, you can experiment with new colors, accessories, and sizes.
Make one for your Christmas decorations, create a collection for a holiday display, or give a little gingerbread friend as a thoughtful handmade gift.
Whatever you choose, this cheerful crochet character is sure to bring a little extra handmade magic to the season.
If you enjoyed this tutorial, save the Christmas Gingerbread Amigurumi Crochet Pattern to your favorite Pinterest Christmas crochet board so you can easily find it again.
And don't forget to explore more Christmas crochet patterns here at Crochet Petal Studio for even more festive handmade inspiration!
Happy crocheting, and Merry Christmas!
Crochet Petal Studio — A Little Yarn. A Little Wonder. Something Made by Hand.