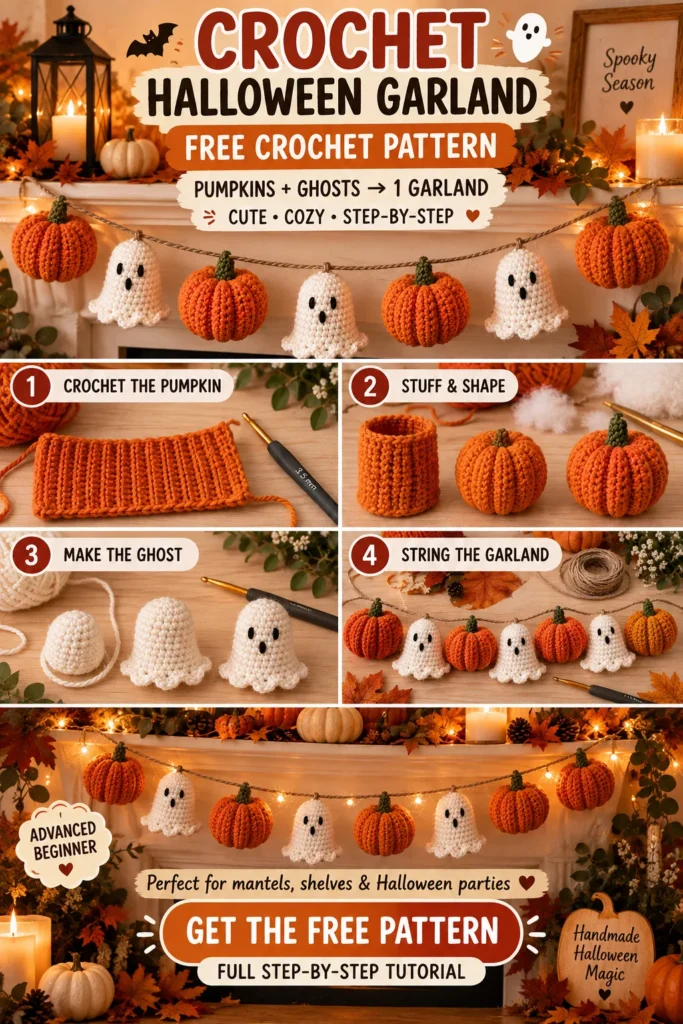
Add a little handmade magic to your October decorating with this Midnight Crochet Halloween Garland.
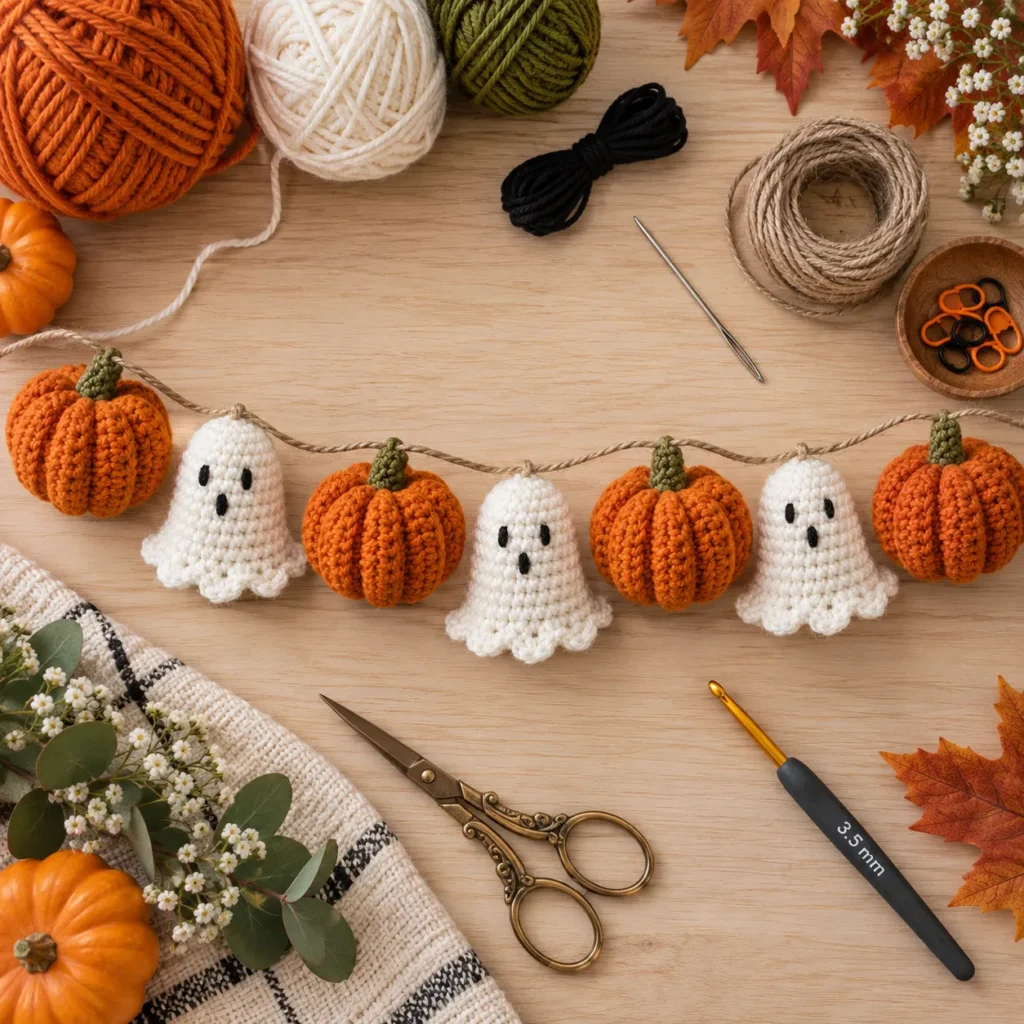
This cozy Halloween decoration combines plump orange crochet pumpkins with tiny white ghosts, all strung together on a simple natural cord.
The pumpkins are made from easy ribbed crochet rectangles that are seamed, stuffed, and cinched into shape. The ghosts are worked in continuous rounds with a softly scalloped bottom, embroidered black eyes, and a tiny surprised mouth.
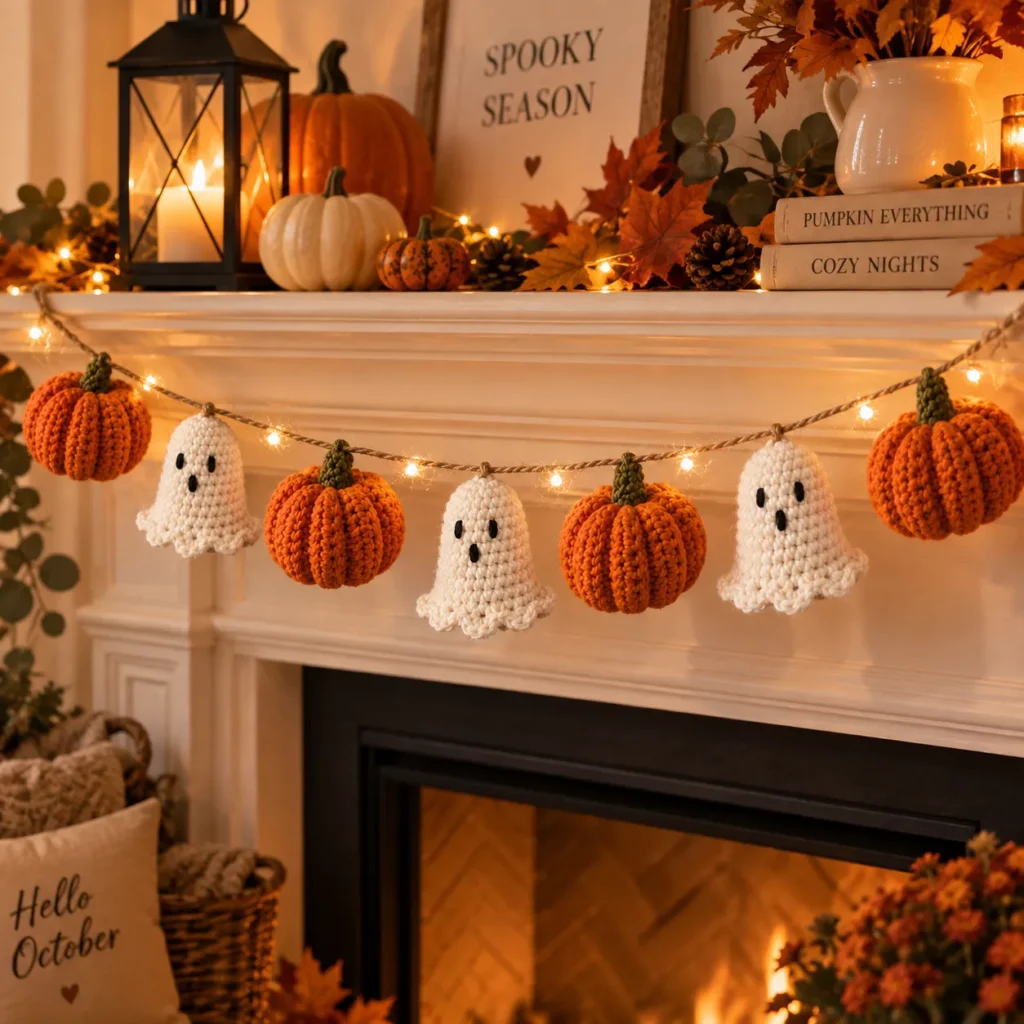
Hang the finished garland across a mantel, bookshelf, doorway, mirror, window, Halloween party table, or children’s room for a festive look that feels playful rather than spooky.
The pattern is easy to customize too. Make a short garland with five pieces, or keep adding pumpkins and ghosts until it fits your space.
Halloween Garland Pattern at a Glance
| Pattern Detail | Information |
|---|---|
| Skill Level | Advanced Beginner |
| Crochet Terms | US terminology |
| Yarn Weight | DK / Light #3 |
| Hook Size | 3.5 mm |
| Garland Length | Approx. 48–60 in / 122–152 cm |
| Pumpkin Size | Approx. 3 in / 7.5 cm |
| Ghost Height | Approx. 3.5 in / 9 cm |
| Suggested Pieces | 4 pumpkins + 3 ghosts |
| Construction | Ribbed pumpkins + amigurumi ghosts |
| Cord | Crochet chain or natural twine |
| Main Stitches | sc, hdc, BLO sc, sl st |
Why You’ll Love This Crochet Halloween Garland
This project gives you plenty of Halloween character without using complicated shaping or colorwork.
The pumpkins are especially beginner friendly because they start as simple rectangles.
The ghosts use basic single crochet rounds, so they are a good introduction to small amigurumi-style projects.
Once the motifs are finished, you can arrange them however you like.
Try:
- Pumpkin – Ghost – Pumpkin – Ghost
- Two pumpkins between each ghost
- All white ghosts
- Black, orange and cream pumpkins
- Rust, mustard and olive for a vintage Halloween palette
- Purple pumpkins with black ghosts
- Mini versions for a Halloween tree
Materials
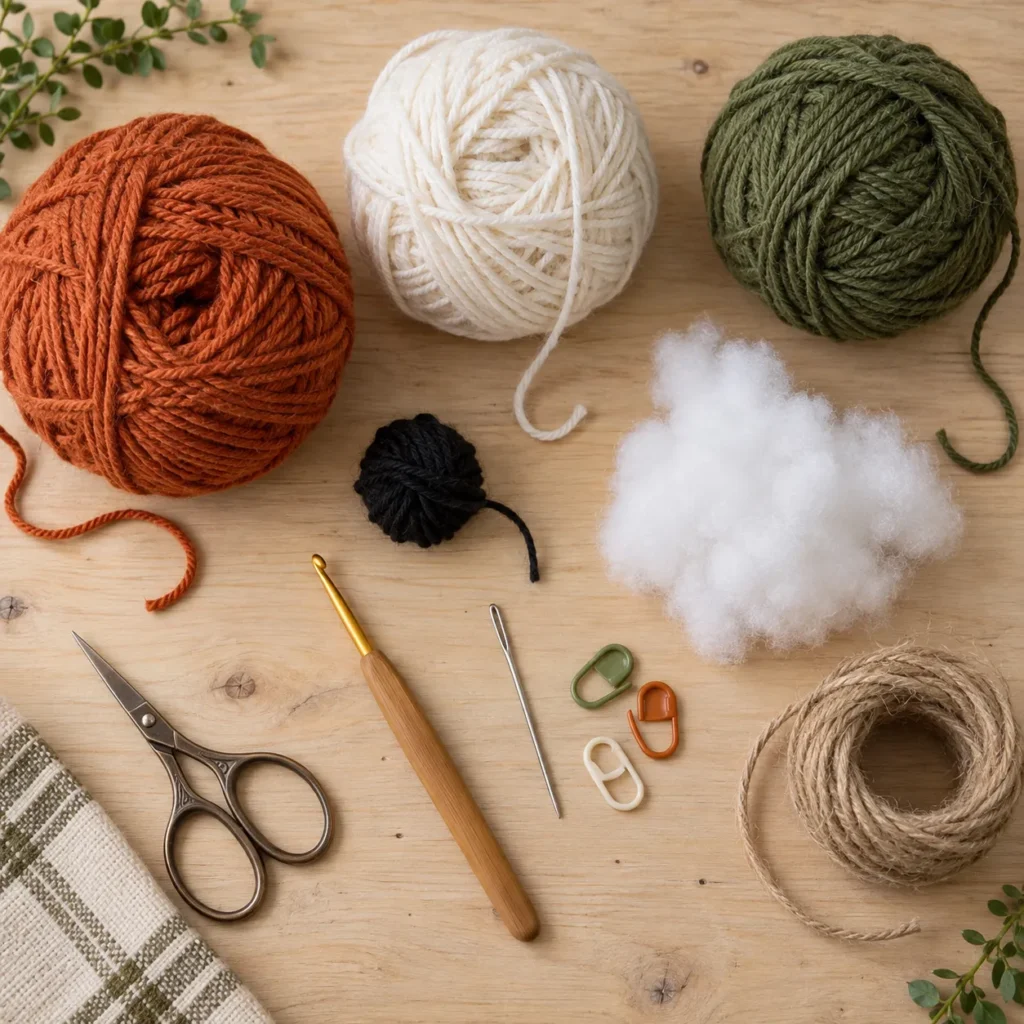
For one approximately 4–5 ft garland:
- 100–120 yd burnt-orange DK yarn
- 80–100 yd cream or white DK yarn
- Small amount olive or moss-green yarn
- Small amount black yarn or embroidery floss
- 3.5 mm crochet hook
- Polyester stuffing
- Yarn needle
- Scissors
- Stitch markers
- Natural twine, or extra yarn for a crochet cord
Optional:
- Wooden beads
- Mini tassels
- Black yarn bows
- Rust or mustard accent yarn
Crochet Abbreviations
| Abbreviation | Meaning |
|---|---|
| MR | Magic ring |
| ch | Chain |
| sc | Single crochet |
| hdc | Half double crochet |
| sl st | Slip stitch |
| BLO | Back loop only |
| st / sts | Stitch / stitches |
| inc | 2 sc in same stitch |
| dec | Single crochet decrease |
| rep | Repeat |
Part 1: Crochet the Ribbed Pumpkin
Make 4 or as many as desired.
Use burnt-orange yarn.
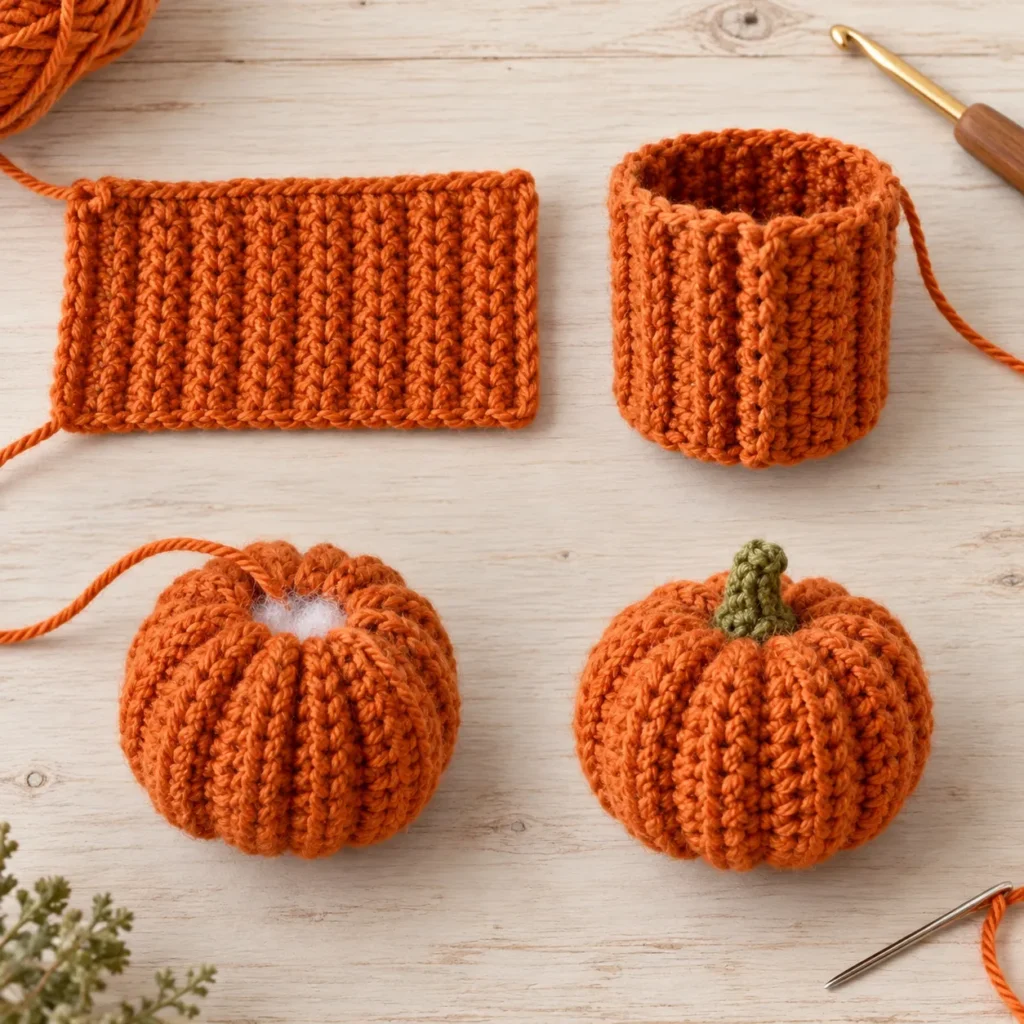
Pumpkin Rectangle
Ch 16.
Row 1
Sc in second chain from hook and across.
15 sc
Turn.
Row 2
Ch 1.
Sc BLO in each stitch across.
Turn.
Repeat Row 2 until the rectangle contains approximately:
30 rows
The rectangle should look deeply ribbed.
Do not fasten off yet.
Seam the Pumpkin
Fold the rectangle so the first and last rows meet.
Use slip stitches or a yarn needle to seam the short ends together.
You should now have a ribbed crochet tube.
Fasten off, leaving a long yarn tail.
Close the Bottom
Thread the yarn tail through a yarn needle.
Run the needle in and out around one open edge.
Pull tightly until the opening closes.
Make several securing stitches.
Turn the piece right side out.
Stuff the Pumpkin
Add polyester stuffing.
Fill the pumpkin firmly enough to hold a rounded shape, but do not overstuff.
The crochet ribs should remain visible.
Close the Top
Using another long yarn tail, weave around the upper edge.
Pull tightly.
Secure the opening with several stitches.
Shape the Pumpkin
Pass the yarn needle from the top center through the pumpkin and out through the bottom center.
Pull gently.
Bring the yarn back through the pumpkin several times.
This creates the small indentation at the top and bottom.
Do not pull so tightly that the pumpkin becomes flat.
Crochet the Stem
Using olive-green yarn:
Ch 5.
Beginning in second chain from hook:
Sl st in each chain.
Fasten off.
Sew the small stem into the top center of the pumpkin.
For a thicker stem, work 4 sc into a magic ring and continue for 2–3 tiny rounds.
Part 2: Crochet the Ghost
Make 3 or as many as desired.
Use white or warm ivory yarn.
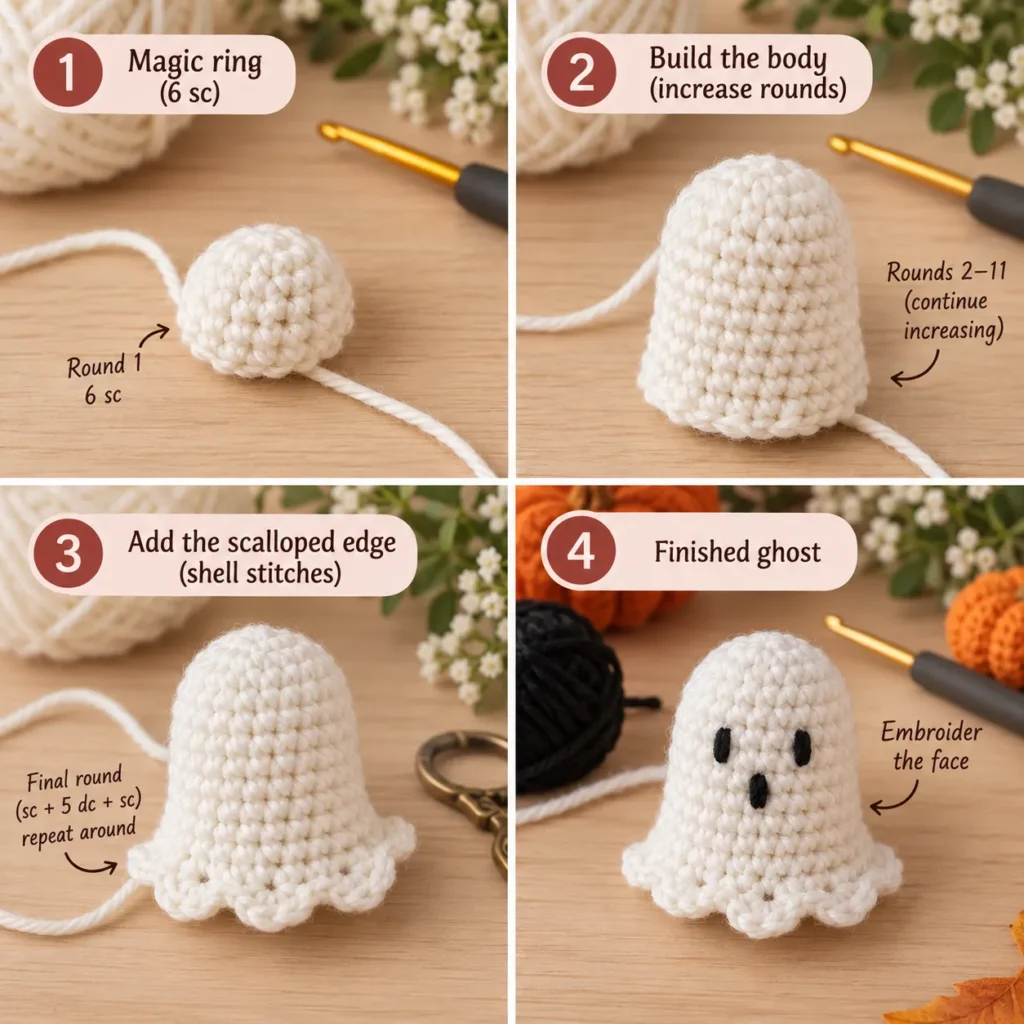
The ghost is worked in continuous rounds.
Use a stitch marker to mark the beginning of each round.
Round 1
Create a magic ring.
Work:
6 sc into MR
6 sts
Round 2
Inc in every stitch.
12 sts
Round 3
Repeat:
sc, inc
around.
18 sts
Round 4
Repeat:
2 sc, inc
around.
24 sts
Rounds 5–11
Sc in every stitch around.
24 sts
The piece should now resemble a rounded little dome.
Shape the Ghost Body
Round 12
Repeat:
4 sc, dec
around.
20 sts
Rounds 13–15
Sc around.
20 sts
At this point, add a small amount of stuffing.
Keep the body softly stuffed rather than very firm.
The bottom should remain flexible.
Crochet the Ghost Skirt
Work the final round as a scalloped edge.
Repeat around:
sl st in next st
5 dc in next st
sl st in next st
This creates little waves around the bottom.
Adjust the spacing slightly if necessary so the final scallop fits neatly.
Fasten off.
Add the Ghost Face
Using black embroidery yarn or black cotton thread:
Embroider two short vertical eyes.
Place them approximately 4–5 stitches apart.
For the mouth, make a tiny oval or short vertical stitch between and slightly below the eyes.
Keep the facial details small.
A simple expression looks especially cute on a miniature garland.
Optional Ghost Arms
For a slightly more dimensional ghost, crochet two tiny arms.
Using white yarn:
Ch 5.
Starting in second chain:
Sl st in each chain.
Fasten off.
Sew one arm to each side.
Angle them slightly upward or outward.
This step is optional.
The simpler arm-free ghost works especially well for garlands.
Part 3: Make the Garland Cord
You have two easy options.
Option 1 – Natural Twine
Cut approximately:
60–72 in / 152–183 cm
of natural jute or cotton cord.
Leave extra length at both ends for hanging loops.
Option 2 – Crochet Cord
Using cream, beige, orange or brown yarn:
Ch approximately:
180–220 chains
or until the cord reaches your desired length.
For a thicker cord, slip stitch back through every chain.
Fasten off.
Part 4: Arrange the Halloween Pieces
Lay all motifs flat before attaching them.
A simple seven-piece arrangement is:
Pumpkin – Ghost – Pumpkin – Ghost – Pumpkin – Ghost – Pumpkin
Leave approximately:
5–7 in / 12–18 cm
between motifs.
For a longer garland, continue repeating the sequence.
Do not attach the pieces until you are satisfied with the spacing.
Part 5: Attach the Pumpkins
Thread the cord through the upper third of each pumpkin.
Pass the cord underneath one or two crochet stitches rather than directly through the stuffing.
The pumpkin should hang upright.
If necessary, make one small hidden stitch around the cord to keep the pumpkin from sliding.
Part 6: Attach the Ghosts
Thread the cord through the top of the ghost.
Insert the yarn needle just behind the top-center stitches.
Pull the cord through.
The ghost should hang vertically.
Leave the scalloped skirt free.
If the ghost turns sideways, make one hidden stitch at the top to stabilize it.
Make Hanging Loops
At each end of the garland, create a small loop.
For twine:
Tie a secure overhand knot.
For crochet cord:
Fold approximately 3 inches back and sew the end to the cord.
These loops make it easy to hang the garland from hooks, nails, command hooks, or mantel corners.
Halloween Garland Color Ideas
Classic Halloween
Orange pumpkins
White ghosts
Olive stems
Natural cord
Midnight Halloween
Black pumpkins
Cream ghosts
Rust stems
Black cord
Vintage Autumn
Rust pumpkins
Oatmeal ghosts
Mustard stems
Brown cord
Pastel Halloween
Blush pumpkins
Cream ghosts
Sage stems
Ivory cord
Gothic Halloween
Burgundy pumpkins
Gray ghosts
Black stems
Black cord
Candy Halloween
Orange pumpkins
Lavender ghosts
Lime-green stems
Purple cord
Add Wooden Beads
Wooden beads look especially nice between the crochet motifs.
Choose beads with holes large enough for your cord.
Try this sequence:
Pumpkin – bead – ghost – bead – pumpkin
Natural wood keeps the look cozy.
Black-painted beads create a stronger Halloween style.
Add Tassels
Mini tassels can be attached between motifs.
Use:
- Black
- Mustard
- Rust
- Cream
Keep the tassels small so they do not compete with the pumpkins and ghosts.
Make a Mini Garland
For a smaller version, use sport or fingering yarn with approximately a 2.5–3 mm hook.
Reduce the pumpkin rectangle to:
11–12 stitches wide
and approximately:
22–24 rows
For ghosts, stop increasing at 18 stitches.
Mini garlands are perfect for:
- Halloween trees
- Tiered trays
- Shelves
- Wreaths
- Small mirrors
Make an Extra-Long Mantel Garland
For a large mantel or doorway, make:
6 pumpkins + 5 ghosts
or:
8 pumpkins + 7 ghosts
Measure your hanging space first.
Add approximately 12 inches of extra cord so the garland can drape naturally.
Halloween Garland Styling Ideas
Hang the finished garland across:
- Fireplace mantel
- Entryway mirror
- Bookshelf
- Bedroom headboard
- Kitchen shelf
- Window
- Party dessert table
- Classroom display
- Halloween photo backdrop
For a nighttime display, pair the crochet garland with warm-white LED fairy lights.
Avoid placing yarn decorations directly against hot bulbs or open flames.
Tips for a Professional Finish
Keep all pumpkins approximately the same size.
Use the same stuffing amount in every pumpkin.
Embroider all ghost faces before attaching them to the cord.
Measure the spacing instead of guessing.
Hide all yarn ends before assembly.
Arrange the motifs first, then attach them.
Allow the finished garland to drape slightly instead of pulling it perfectly straight.
Safety Notes
If the garland will be used around babies or young children, avoid loose beads, buttons, bells, or detachable decorations.
Keep hanging cords out of reach of infants and toddlers.
This pattern is designed primarily as seasonal décor rather than a toy.
Use battery-powered LED lights rather than candles or other open flames near yarn decorations.
Frequently Asked Questions
Is this Halloween Garland beginner friendly?
Yes.
The pumpkins are very simple because they begin as flat rectangles.
The ghosts require basic amigurumi-style rounds, making the project suitable for an adventurous beginner.
How many pumpkins and ghosts do I need?
The sample version uses:
4 pumpkins + 3 ghosts
You can easily add more.
How long is the finished garland?
Approximately 48–60 inches / 122–152 cm, depending on spacing.
Can I use worsted-weight yarn?
Yes.
Your pumpkins and ghosts will simply be larger.
Use an appropriate hook for your yarn.
Can I make the pumpkins different colors?
Absolutely.
Rust, cream, mustard, sage, black and burgundy all work beautifully.
Can I make the ghosts without stuffing?
Yes.
A very small amount of stuffing gives the nicest shape, but they can also remain mostly hollow.
Can I crochet the hanging cord?
Yes.
A long chain works perfectly if you do not want to use twine.
Can I add fairy lights?
Yes—use cool-running, battery-powered LED lights and keep the yarn away from any source that becomes hot.
Save This Crochet Halloween Garland
Save this Midnight Crochet Halloween Garland pattern to Pinterest for your fall crafting list.
The mix of plump pumpkins and tiny ghosts makes it a fun decoration for Halloween parties, mantels, cozy autumn evenings, classrooms, windows, and handmade seasonal displays.