
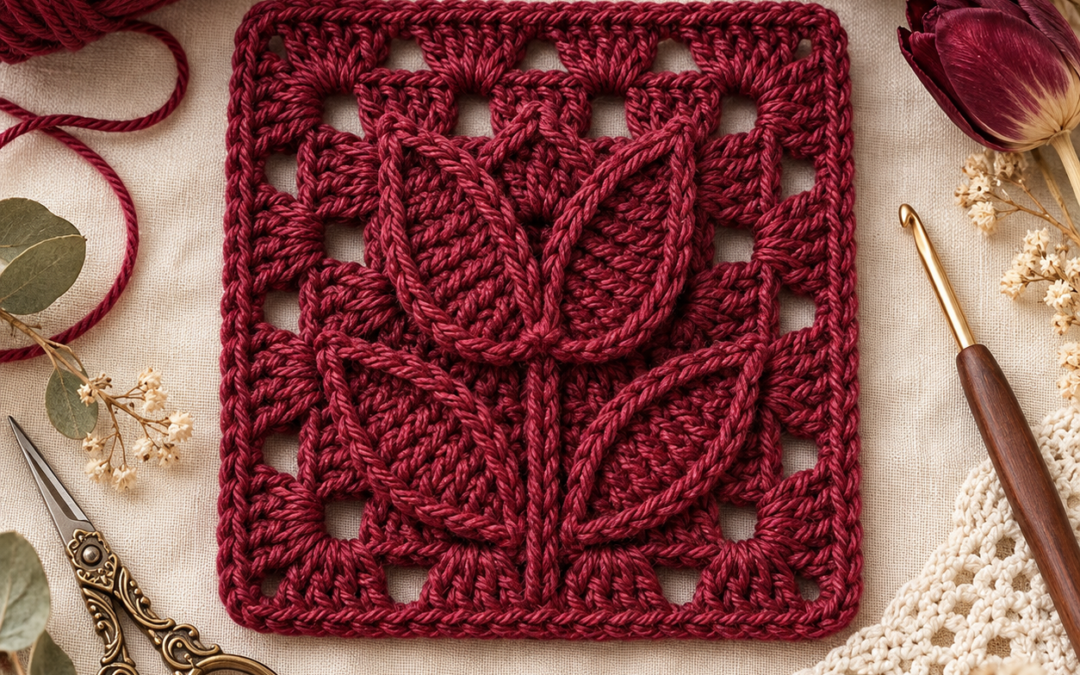
Floral granny squares are one of the prettiest ways to combine classic crochet construction with botanical detail, and this Crochet Tulip Granny Square Pattern creates a dimensional flower motif that looks especially beautiful in blankets, bags, cushions, wall hangings, and spring décor.
The design features a raised tulip bloom in the center, two side leaves, a slim vertical stem, and a structured square border that frames the flower without making the motif feel crowded.
For the main sample, use a rich deep berry / burgundy yarn for a dramatic monochrome look.
You can also make the tulip and background in contrasting colors for a brighter spring version.
Pattern at a Glance
| Detail | Pattern Information |
|---|---|
| Skill Level | Confident Beginner / Intermediate |
| Crochet Terms | US terminology |
| Yarn | DK / Light #3 cotton |
| Hook | 3.5 mm |
| Construction | Center floral motif + square border |
| Main Stitches | ch, sc, hdc, dc, tr, sl st |
| Finished Size | Approx. 6–7 in square |
| Best Uses | Blankets, bags, pillows, wall décor |
Why This Tulip Granny Square Works
The flower is built first.
Then the background is worked around the flower to transform the botanical motif into a square.
The basic structure is:
stem → leaves → tulip petals → openwork frame → square border
This gives the flower a raised, almost embossed appearance.
The surrounding granny-style spaces keep the finished motif light rather than overly dense.

Materials
You’ll need:
- DK / light #3 cotton yarn
- 3.5 mm crochet hook
- Yarn needle
- Scissors
- Stitch marker, optional
- Blocking pins and mat
For a monochrome square, use one color throughout.
For a more botanical version, try:
- pink or burgundy flower
- olive or sage stem and leaves
- cream or oatmeal background
Abbreviations
| Abbreviation | Meaning |
|---|---|
| ch | Chain |
| sc | Single Crochet |
| hdc | Half Double Crochet |
| dc | Double Crochet |
| tr | Treble Crochet |
| sl st | Slip Stitch |
| st / sts | Stitch / stitches |
| sp | Space |
Part 1: Crochet the Center Stem
Using your flower color or green yarn:
Ch 10.
Starting in the second chain from the hook:
work sl st in each chain across.
This creates a narrow reinforced stem.
For a thicker stem, work one row of sc instead.
Fasten off with a long tail if you want to sew the stem onto the background later.
Part 2: Make the Two Leaves
Make two.
Ch 9.
Starting in the second chain from the hook:
sl st, sc, hdc, dc, tr, dc, hdc, sc
Work ch 2 at the tip.
Continue down the other side of the foundation chain:
sc, hdc, dc, tr, dc, hdc, sc, sl st
Fasten off.
Gently shape each leaf into a pointed oval.
Position one leaf slightly higher than the other so the motif looks more natural.
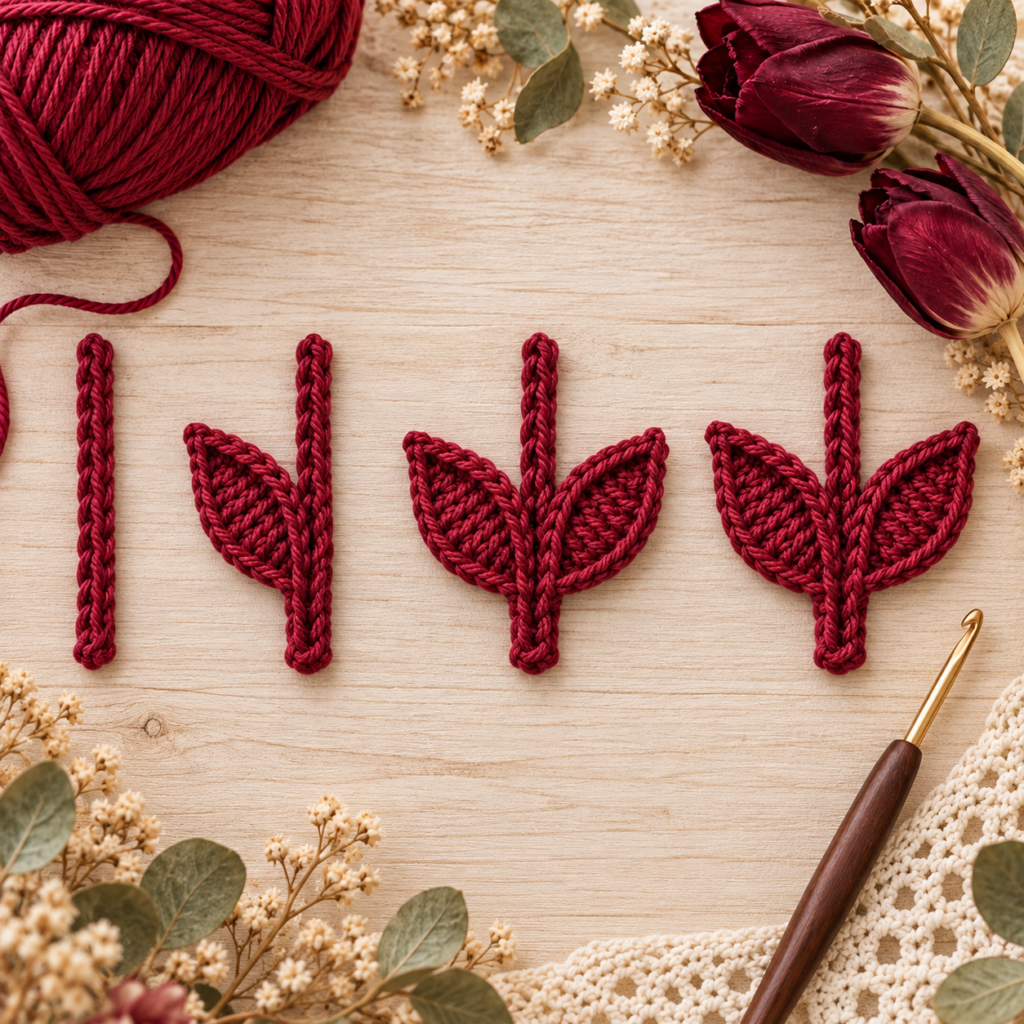
Part 3: Crochet the Tulip Center Petal
The flower uses three main pointed petals.
Start with the tallest center petal.
Ch 10.
Work back along the chain:
sl st, sc, hdc, dc, tr, tr, dc, hdc, sc
Work around the end and continue along the opposite side using the same stitch progression.
The shape should become a long pointed petal.
Fasten off.
Part 4: Make the Side Tulip Petals
Make two slightly smaller petals.
Ch 8.
Starting in the second chain:
sl st, sc, hdc, dc, tr, dc, hdc
Work around the tip and mirror the stitches on the opposite side.
Fasten off.
Position the side petals slightly behind the center petal.
Angle them outward to create the classic tulip silhouette.
Joining the Tulip
Arrange:
- one tall center petal
- one side petal angled left
- one side petal angled right
Overlap the lower edges slightly.
Using the same yarn, sew the three petals together along their lower third.
Attach the flower to the top of the stem.

Part 5: Create the Openwork Background
Now turn the floral motif into a granny square.
Lay the flower flat.
Join your background yarn near the bottom of the stem.
Work chains around the motif, anchoring them at strategic points around:
- stem base
- leaf tips
- leaf sides
- flower edges
- upper petal tips
The goal is to create an open rectangular framework around the flower.
Use approximately:
ch 4–6 between anchor points
depending on the distance.
Keep the tension relaxed.
Part 6: Build the First Square Round
Once the open frame surrounds the flower, begin shaping the corners.
At each of four corner positions, work:
3 dc, ch 2, 3 dc
Use ordinary granny clusters between the corners.
Work:
3 dc into each suitable chain space
around the square.
Join with a sl st.
Part 7: Add the Final Border
For the next round:
Work 3 dc in each granny space.
At each corner:
3 dc, ch 2, 3 dc
Repeat around.
For a cleaner final edge, add one round of sc.
At each corner, work:
sc, ch 1, sc
in the corner space.
Fasten off and weave in the ends.

Blocking the Square
Blocking is especially important for floral granny squares.
Lightly dampen the finished piece.
Pin all four corners into a perfect square.
Then pin the centers of each side.
Adjust the flower gently so the petals remain symmetrical.
Allow the square to dry completely.
This will make:
- the border straighter
- the corners sharper
- the openwork more even
- the tulip motif more defined
Color Ideas
This square works beautifully in both monochrome and multicolor combinations.
Burgundy Romance
Deep burgundy throughout
Spring Pink
Dusty pink flower + sage leaves + cream background
Cottage Blue
Dusty blue flower + olive leaves + oatmeal background
Lavender Garden
Lavender flower + sage leaves + ivory border
Peach Blossom
Peach flower + moss leaves + cream background
Classic Red Tulip
Deep red flower + green leaves + warm cream
Neutral Botanical
Terracotta flower + olive leaves + oatmeal background

Make a Tulip Granny Square Blanket
This pattern becomes especially striking when repeated.
For a small throw:
Make approximately 30–36 squares.
Arrange them in alternating colors.
Try:
- pink
- burgundy
- cream
- sage
- lavender
Join the squares using slip stitch, single crochet, or mattress stitch.
Finish with a simple border around the blanket.
Make a Floral Tote Bag
Use:
8–12 Tulip Granny Squares
Join them into two rectangular panels.
Add a plain crochet side strip.
Finish with sturdy crochet handles.
Using cream backgrounds with different flower colors creates a particularly pretty spring tote.
Make a Cushion Cover
Make four larger squares for the front.
Join them in a 2 × 2 layout.
Create a simple solid crochet panel for the back.
This turns the tulip motif into a beautiful cottage-style accent pillow.
Turn It Into Wall Art
One single tulip square can also work as decorative wall art.
Block it carefully.
Mount it inside:
- a wooden frame
- embroidery hoop
- shadow box
For a minimalist look, use one burgundy square against warm cream linen.
Tips for a Better Tulip Granny Square
Keep all three tulip petals clearly separated.
Make the center petal slightly taller.
Angle the two side petals outward.
Do not make the leaves identical in position.
Keep the openwork chains relaxed.
Count your corner spaces carefully.
Block the square before joining it to other motifs.
Use cotton yarn if you want especially crisp stitch definition.
Frequently Asked Questions
Is this Crochet Tulip Granny Square beginner friendly?
It is best for a confident beginner because it combines simple stitches with floral assembly and square shaping.
What yarn works best?
DK cotton is excellent because it gives the flower and border clear definition.
How large is the finished square?
Approximately 6–7 inches / 15–18 cm, depending on yarn, hook size, and tension.
Can I make it in one color?
Yes. A monochrome version creates a beautiful embossed floral effect.
Can I use different colors for the flower and background?
Absolutely. That is one of the best ways to make the tulip stand out.
Can I turn it into a blanket?
Yes. Repeat the motif and join the squares after blocking.
Do I need to block it?
Blocking is strongly recommended because it helps both the flower and square border look polished.
Save This Crochet Tulip Granny Square Pattern
Save this Crochet Tulip Granny Square Pattern to Pinterest for your spring and floral crochet projects.
With its raised tulip petals, pointed leaves, structured stem, openwork background, and classic square border, this motif can become anything from a single framed decoration to a whole floral blanket.
