
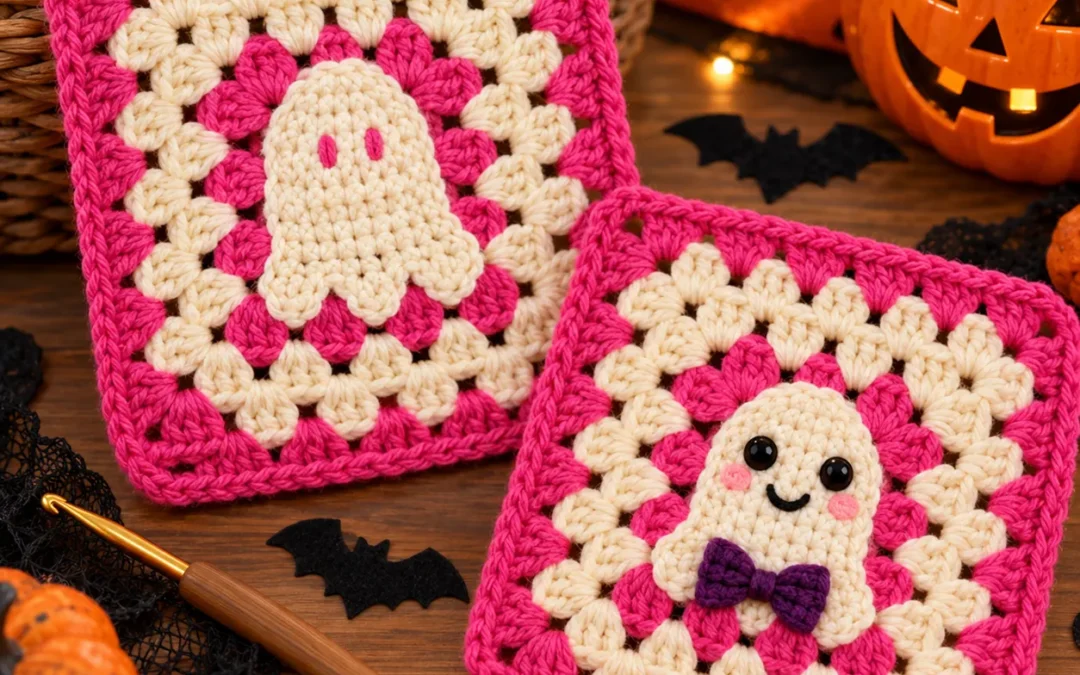
Halloween crochet doesn't always have to be spooky! Sometimes, the sweetest little ghost is all you need to bring a playful touch of Halloween magic to your handmade projects.
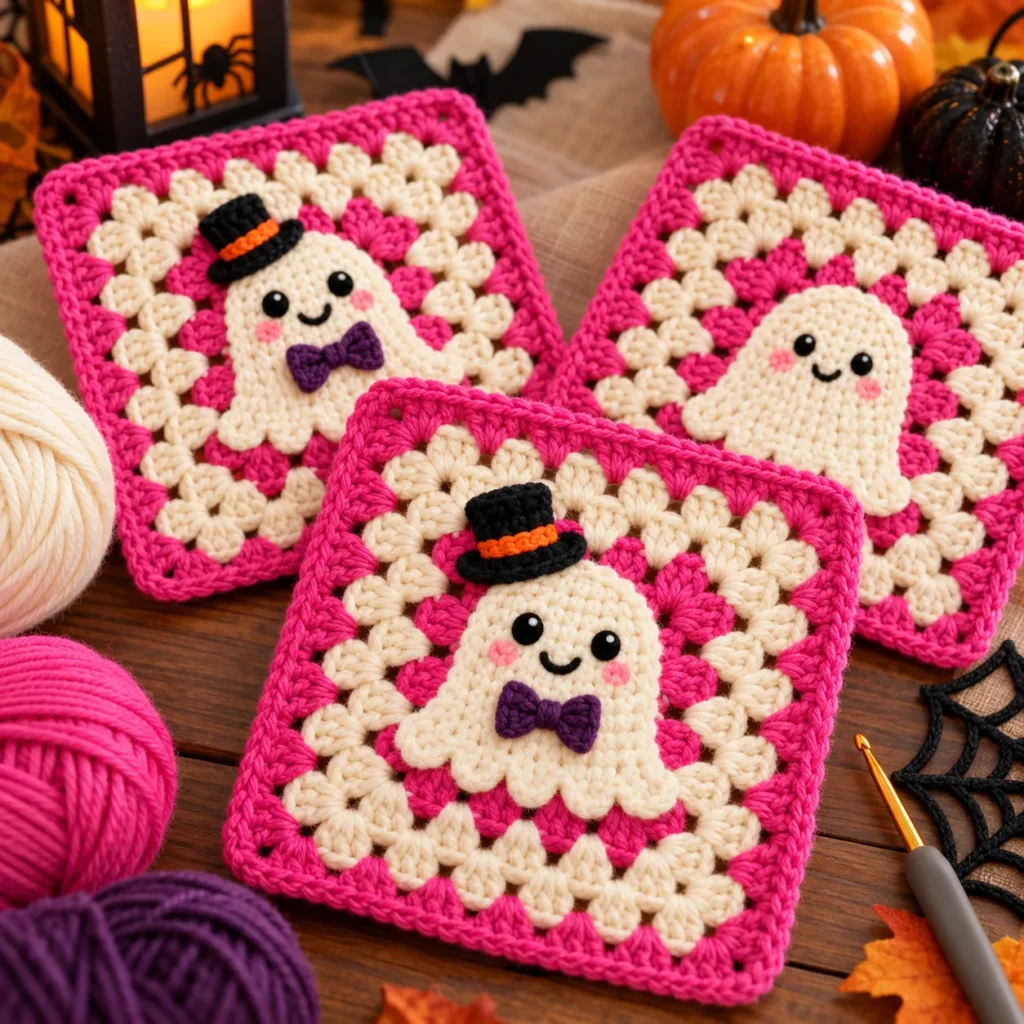
This Halloween Crochet Granny Square Pattern combines a charming cream ghost, cheerful pink details, traditional granny-square clusters, and a pretty pink border. The result is a colorful Halloween-inspired motif that's perfect for blankets, pillows, bags, and seasonal decorations.
If you love granny squares but want to try something more interesting than the classic design, this project is a wonderful way to build your skills while creating something adorable.
The ghost is formed directly into the center of the square using simple colorwork. After completing the central motif, you'll crochet decorative rounds of cream and pink granny clusters to create the finished square.
There's no need to make a separate ghost and sew it onto the background.
Throughout this tutorial, I'll explain the materials, stitch abbreviations, complete row-by-row instructions, color changes, granny-square rounds, finishing techniques, and common mistakes.
You'll also discover creative project ideas, useful customization tips, and answers to frequently asked questions.
Grab your favorite crochet hook and some pretty pink and cream yarn. Let's make a little Halloween magic!
What Makes This Halloween Granny Square Special?
Traditional granny squares usually begin with a magic ring and expand outward in groups of double crochet stitches.
This project takes a slightly different approach.
Instead of beginning with a traditional circular granny-square center, we'll start with a small square panel of single crochet stitches.
Using two contrasting yarn colors, we'll create a cute ghost silhouette directly inside that panel.
Once the central design is complete, we'll add granny clusters around the outside to create the familiar openwork granny-square appearance.
The project features:
- A cream ghost with a rounded head and playful lower edge.
- Two small pink eyes and a tiny pink mouth.
- An integrated design that doesn't require sewing on a separate appliqué.
- Decorative cream granny-square clusters.
- Bright pink accent rounds.
- A neat, structured outer border.
This combination makes the square eye-catching while remaining achievable for crocheters familiar with basic stitches.
The textured granny border adds dimension, while the simple central ghost provides a fun focal point.
You can make a single square as a seasonal decoration or repeat the design to create a complete Halloween-themed crochet project.
Halloween Crochet Granny Square: Project Details
| Detail | Information |
|---|---|
| Project Name | Halloween Crochet Granny Square Pattern |
| Skill Level | Confident beginner / intermediate |
| Crochet Terms | US terminology |
| Main Technique | Single crochet colorwork and granny clusters |
| Yarn Weight | DK or light worsted |
| Recommended Hook | 4.0 mm |
| Colors | Cream and pink |
| Estimated Finished Size | Approximately 7–9 inches square |
| Estimated Time | 2–4 hours |
| Construction | One-piece center with crocheted granny rounds |
| Sewing Required | No appliqué sewing |
| Blocking | Recommended |
The finished dimensions and completion time are estimates. They will vary with your yarn, hook size, and personal crochet tension.
Materials and Supplies
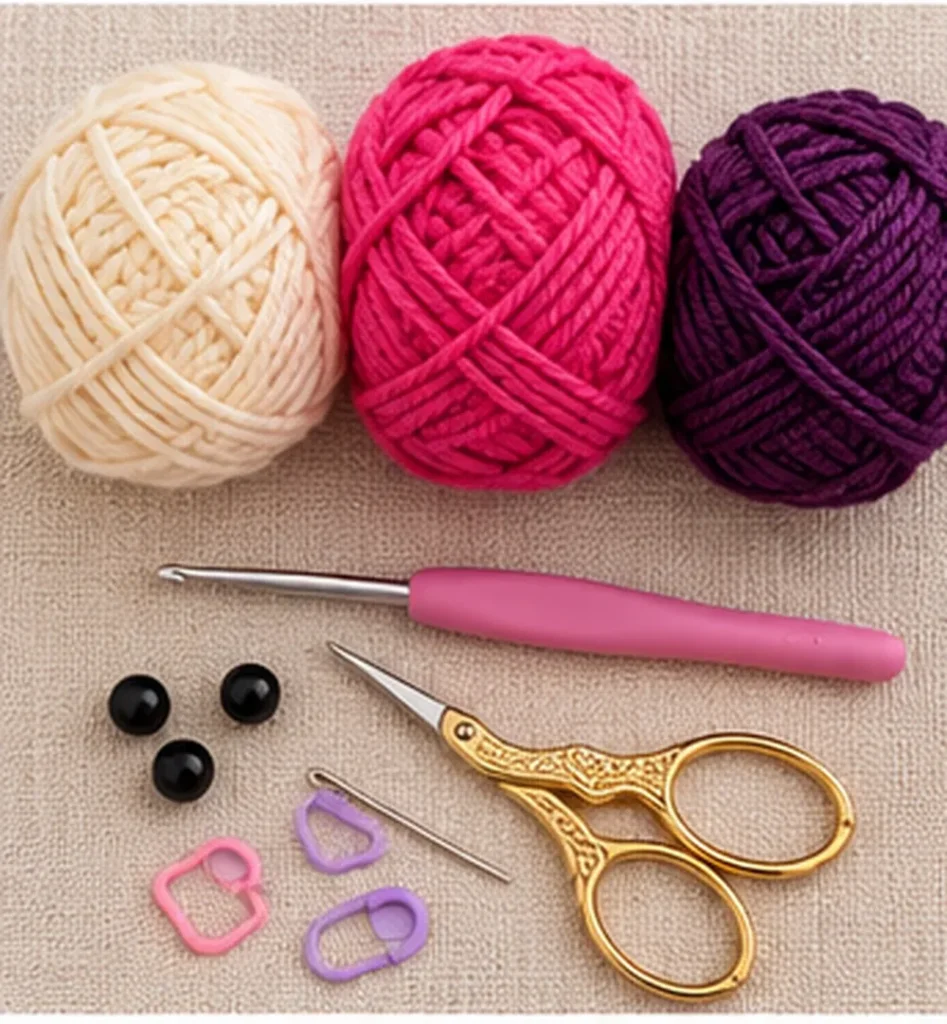
Before beginning, gather everything you need.
1. Yarn
For this Halloween granny square, choose smooth DK-weight yarn.
Cotton yarn is especially nice because it provides clean stitch definition and makes the ghost's shape easier to recognize.
A cotton-acrylic blend or a smooth acrylic yarn is another practical option.
You'll need two main colors:
Color A – Soft Cream
Choose warm ivory, vanilla, or natural cream for the ghost and decorative granny rounds.
Allow approximately 25–35 grams.
Color B – Bright Pink
Choose bubblegum pink, raspberry, or a cheerful rose-pink shade for the background, facial details, and outer granny rounds.
Allow approximately 25–35 grams.
These are working estimates rather than measured amounts from a completed sample.
You may want additional yarn if you're planning to make several squares.
2. Crochet Hook
Use a 4.0 mm crochet hook to begin.
If you crochet tightly, a 4.5 mm hook may be more comfortable.
If your stitches are very loose, try a 3.5 mm hook.
The goal is to create a firm center without making the granny-square border stiff.
3. Additional Tools
You'll also need:
- Tapestry needle for weaving in yarn ends.
- Sharp scissors.
- Stitch markers.
- Measuring tape.
- Blocking mat.
- Rustproof blocking pins.
Optional supplies include small yarn bobbins for managing color changes and a row counter for keeping track of the ghost design.
Helpful tip: Avoid using extremely fuzzy yarn for your first square. A smooth yarn makes it much easier to identify individual stitches and complete the colorwork accurately.
Crochet Abbreviations
All instructions use US crochet terminology.
| Abbreviation | Meaning |
|---|---|
| ch | Chain |
| sc | Single crochet |
| dc | Double crochet |
| sl st | Slip stitch |
| st / sts | Stitch / stitches |
| sp | Space |
| rep | Repeat |
| RS | Right side |
| WS | Wrong side |
| P | Pink yarn |
| C | Cream yarn |
Special Stitch: Granny Cluster
A granny cluster consists of three double crochet stitches worked into the same space.
Granny cluster = 3 dc in the indicated space.
Granny clusters create the openwork texture commonly associated with traditional granny squares.
Special Stitch: Granny Corner
A standard granny corner consists of:
(3 dc, ch 2, 3 dc) in the same corner space.
The chain-2 opening allows the square to expand while maintaining its four corners.
Changing Yarn Colors
Color changes are essential for forming the ghost directly in the center panel.
To change colors:
- Insert your hook into the next stitch.
- Yarn over and pull up a loop using the current color.
- Before completing the single crochet, drop the current yarn.
- Yarn over with the new color.
- Pull the new color through both loops on your hook.
- Continue crocheting with the new color.
This creates a cleaner transition between the cream and pink sections.
Before You Begin: Understanding the Ghost Design
Our central ghost is created using a 16-stitch-wide panel worked over 16 rows.
The pink stitches form the background.
The cream stitches create the ghost's body.
A few strategically placed pink stitches inside the cream section create the eyes and mouth.
After completing the center, we'll crochet a setup round around its four sides.
That setup round provides the foundation for the decorative granny clusters.
Important Pattern Notes
- Every colorwork row contains exactly 16 single crochet stitches.
- The turning chain does not count as a stitch.
- The ghost pattern is symmetrical, so it remains easy to read when turning your work.
- Change colors during the final yarn-over of the previous stitch.
- Keep color changes snug, but avoid pulling the unused yarn too tightly.
- The beginning chain-3 of each granny round counts as one double crochet.
- Work the specified chain-2 spaces at all four corners.
For a neater center, use small yarn bobbins or carry unused strands loosely along the wrong side. Carrying dark pink behind light cream can sometimes show through, so test your chosen yarn before deciding which technique looks best.
Part 1: Crochet the Integrated Ghost Center

The ghost is the most important detail in the entire design.
Take your time with this section.
If you've never worked crochet color changes before, practice with a small swatch first.
Starting Chain
With pink yarn, chain 17.
Working into the second chain from the hook, we'll create a foundation row containing 16 single crochet stitches.
For clarity, the instructions below use:
P = one single crochet worked in pink.
C = one single crochet worked in cream.
For example, "P2, C12, P2" means crochet two pink single crochet stitches, twelve cream single crochet stitches, and two pink single crochet stitches.
Each row must contain 16 stitches.
Chain 1 and turn after every row except the final row.
Row 1 – Begin the Ghost's Scalloped Bottom
Starting in the second chain from the hook, work:
P2, C3, P1, C4, P1, C3, P2.
Total: 16 sc.
This row forms three cream sections separated by pink stitches.
The cream sections will eventually resemble the playful, wavy lower edge of a little ghost.
Chain 1 and turn.
Row 2 – Connect the Lower Body
Work:
P2, C12, P2.
Total: 16 sc.
The cream area now connects across the center, creating the bottom portion of the ghost.
Chain 1 and turn.
Row 3 – Build the Ghost Body
Repeat:
P2, C12, P2.
Total: 16 sc.
Keep your stitches consistent.
The ghost should now have a solid cream middle surrounded by pink stitches at either end.
Chain 1 and turn.
Row 4 – Continue the Body
Work:
P2, C12, P2.
Total: 16 sc.
This row continues the main ghost silhouette.
Chain 1 and turn.
Row 5 – Complete the Wider Body
Work:
P2, C12, P2.
Total: 16 sc.
The lower portion of your ghost is now complete.
Chain 1 and turn.
Row 6 – Begin Shaping the Sides
Work:
P3, C10, P3.
Total: 16 sc.
The ghost becomes slightly narrower as the number of pink background stitches increases.
Chain 1 and turn.
Row 7 – Continue the Narrower Body
Repeat:
P3, C10, P3.
Total: 16 sc.
The side edges should be starting to slope gently inward.
Chain 1 and turn.
Row 8 – Finish the Middle Section
Work:
P3, C10, P3.
Total: 16 sc.
The middle section is now ready for the ghost's face.
Chain 1 and turn.
Row 9 – Create the Little Mouth
Work:
P4, C3, P2, C3, P4.
Total: 16 sc.
The two pink stitches in the center form a small mouth.
For a larger smile, you can add optional surface details later, but keep the written stitch count unchanged.
Chain 1 and turn.
Row 10 – Create the Face Background
Work:
P4, C8, P4.
Total: 16 sc.
This row adds a cream section between the mouth and eyes.
Chain 1 and turn.
Row 11 – Crochet the Ghost's Eyes
Work:
P4, C2, P1, C2, P1, C2, P4.
Total: 16 sc.
The two single pink stitches inside the cream area form the ghost's eyes.
Before moving on, make sure they appear evenly spaced.
Chain 1 and turn.
Row 12 – Continue the Upper Head
Work:
P4, C8, P4.
Total: 16 sc.
This cream row begins building the forehead above the eyes.
Chain 1 and turn.
Row 13 – Shape the Head
Repeat:
P4, C8, P4.
Total: 16 sc.
Chain 1 and turn.
Row 14 – Start Rounding the Head
Work:
P5, C6, P5.
Total: 16 sc.
The cream section becomes narrower to create the curved head shape.
Chain 1 and turn.
Row 15 – Continue the Rounded Top
Work:
P5, C6, P5.
Total: 16 sc.
Chain 1 and turn.
Row 16 – Complete the Ghost
Work:
P6, C4, P6.
Total: 16 sc.
Fasten off the cream yarn.
Leave the pink yarn available if you'd like to continue directly into the setup round, or fasten off and rejoin it later.
Congratulations! Your ghost colorwork panel is complete.
The cream stitches should now form a recognizable ghost silhouette, with two eyes, a small mouth, and a playful lower edge.
Checkpoint: Before Moving On
Count your stitches across the final row.
You should have exactly sixteen.
Check both side edges, and confirm that you completed sixteen rows.
If you accidentally increased or decreased, correct the error before adding the granny border.
The next step depends on having four reasonably even sides.
Part 2: Create the Square Foundation
The central ghost panel is complete, but we still need to prepare its edges for granny-square clusters.
We'll accomplish this using a simple single crochet setup round.
Setup Round 1 – Frame the Ghost
Using cream yarn, join at one of the panel's four corner stitches.
With the right side facing:
- In the first corner stitch, work (sc, ch 2, sc).
- Work one sc in each of the fourteen stitches between that corner and the next corner.
- Work (sc, ch 2, sc) in the next corner stitch.
- Along the next side, work one sc into each of the fourteen row ends between corners.
- Work (sc, ch 2, sc) into the third corner.
- Work one sc in each of the fourteen interior foundation stitches along the bottom.
- Work (sc, ch 2, sc) into the fourth corner.
- Work one sc into each of the fourteen remaining row ends.
- Join to the first sc with a slip stitch.
Stitch count: 64 sc and four chain-2 corner spaces.
Between consecutive corner spaces, you should have sixteen single crochet stitches along each side.
It's important that the two stitches made into each corner remain separated by their chain-2 space.
If picking up stitches along the row ends feels unfamiliar, use stitch markers to divide the side into fourteen evenly spaced insertion points before crocheting.
The ghost now sits inside a framed crochet panel, ready for the traditional granny-square rounds.
Part 3: Crochet the First Cream Granny Round
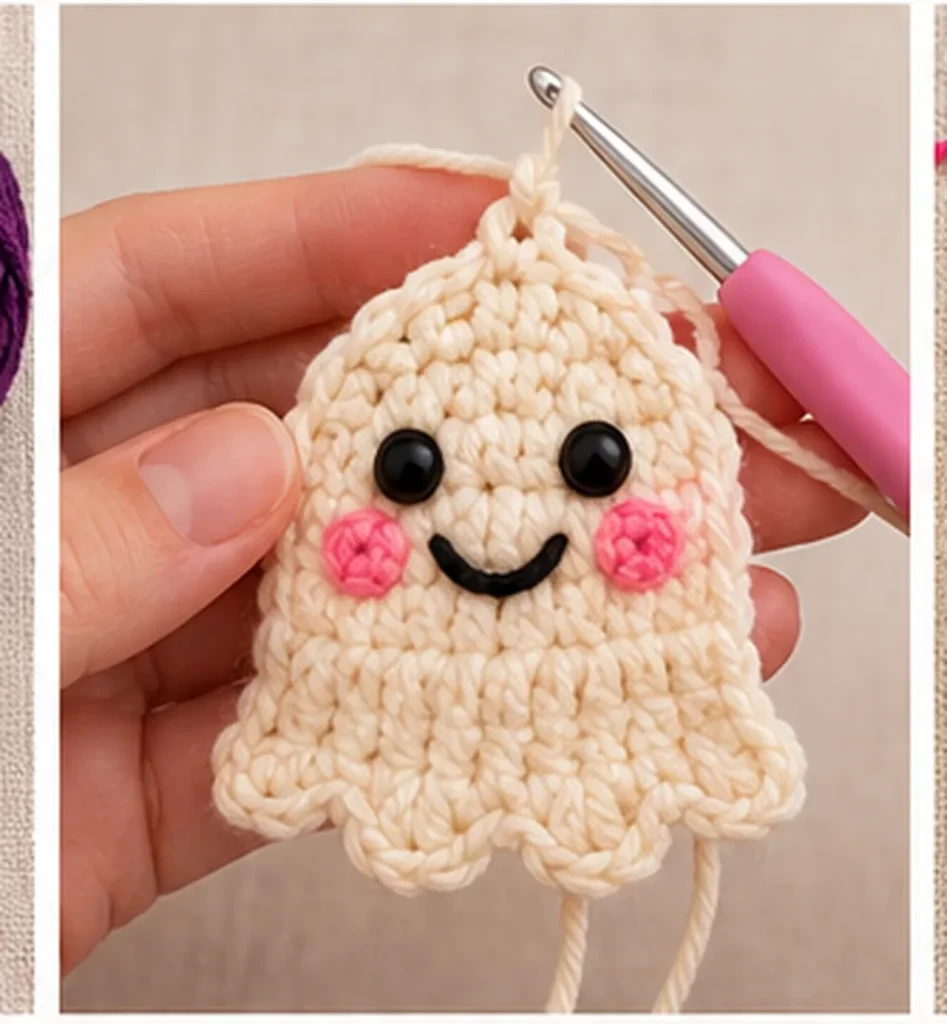
This round creates the transition from the solid center into classic open granny clusters.
Granny Round 2 – Cream Clusters
Join cream yarn in a chain-2 corner space if it isn't already attached there.
- Chain 3 and work 2 dc into the corner.
- Chain 2, then work 3 dc into the same corner.
- Chain 1.
- Along the next side, skip the first two sc and work 3 dc into the third sc.
- Chain 1.
- Skip the next three sc and work 3 dc into the following sc.
- Repeat Step 5–6 twice more, creating a total of four side clusters, worked into side stitches 3, 7, 11, and 15.
- Chain 1 and skip the final side sc.
- In the next corner space, work (3 dc, ch 2, 3 dc).
- Continue around, repeating the same side sequence and corner instructions.
- Join to the beginning chain-3.
Stitch count: 24 granny clusters (72 dc), 20 chain-1 spaces, and four chain-2 corners.
Your square should now have a decorative cream round surrounding the integrated ghost.
Part 4: Build the Cream Granny-Square Surround
Granny Round 3 – Expand the Cream Clusters
This round works into the chain spaces created in the previous round.
- Slip stitch across to the nearest corner space.
- Work (3 dc, ch 2, 3 dc) in the corner, using chain-3 as the first double crochet.
- Chain 1.
- Work 3 dc into the next chain-1 space.
- Chain 1.
- Continue working a granny cluster in every chain-1 side space.
- In each corner, work (3 dc, ch 2, 3 dc).
- Keep a chain-1 between every adjacent cluster along a side.
- Join to complete the round.
Stitch count: 28 granny clusters (84 dc), 24 chain-1 spaces, and four chain-2 corners.
This cream round helps brighten the design and creates a lovely contrast against the colorful center.
Take a moment to spread the square flat.
It should have four visible corners and an even arrangement of granny clusters.
Part 5: Add the Pink Accent Round
The bright pink is what gives this Halloween granny square its cheerful, playful appearance.
Granny Round 4 – Pink Clusters
Fasten off the cream yarn.
Join pink yarn in any corner chain-2 space.
- Work (3 dc, ch 2, 3 dc) in the corner.
- Chain 1.
- Work 3 dc in the next chain-1 space.
- Chain 1.
- Continue placing one granny cluster in every chain-1 side space.
- Work the standard granny corner in each corner space.
- Repeat around all four sides.
- Join to the top of the beginning chain-3.
Stitch count: 32 granny clusters (96 dc), 28 chain-1 spaces, and four chain-2 corners.
Fasten off pink.
Your square now has a pretty pink accent surrounding the cream granny section.
The contrast is especially attractive if you've chosen a bright raspberry or bubblegum pink yarn.
Part 6: Add the Final Cream Granny Round
Granny Round 5 – Cream Surround
Join cream yarn in a corner space.
Work the same traditional granny-round pattern:
- In every corner, work (3 dc, ch 2, 3 dc).
- In each chain-1 side space, work 3 dc.
- Chain 1 between adjacent clusters.
- Continue until all four sides are complete.
- Join the round.
Stitch count: 36 granny clusters (108 dc), 32 chain-1 spaces, and four chain-2 corners.
Fasten off cream.
The repeating cream and pink sections should now create an attractive layered appearance around the little ghost.
Part 7: Crochet the Bright Pink Outer Round
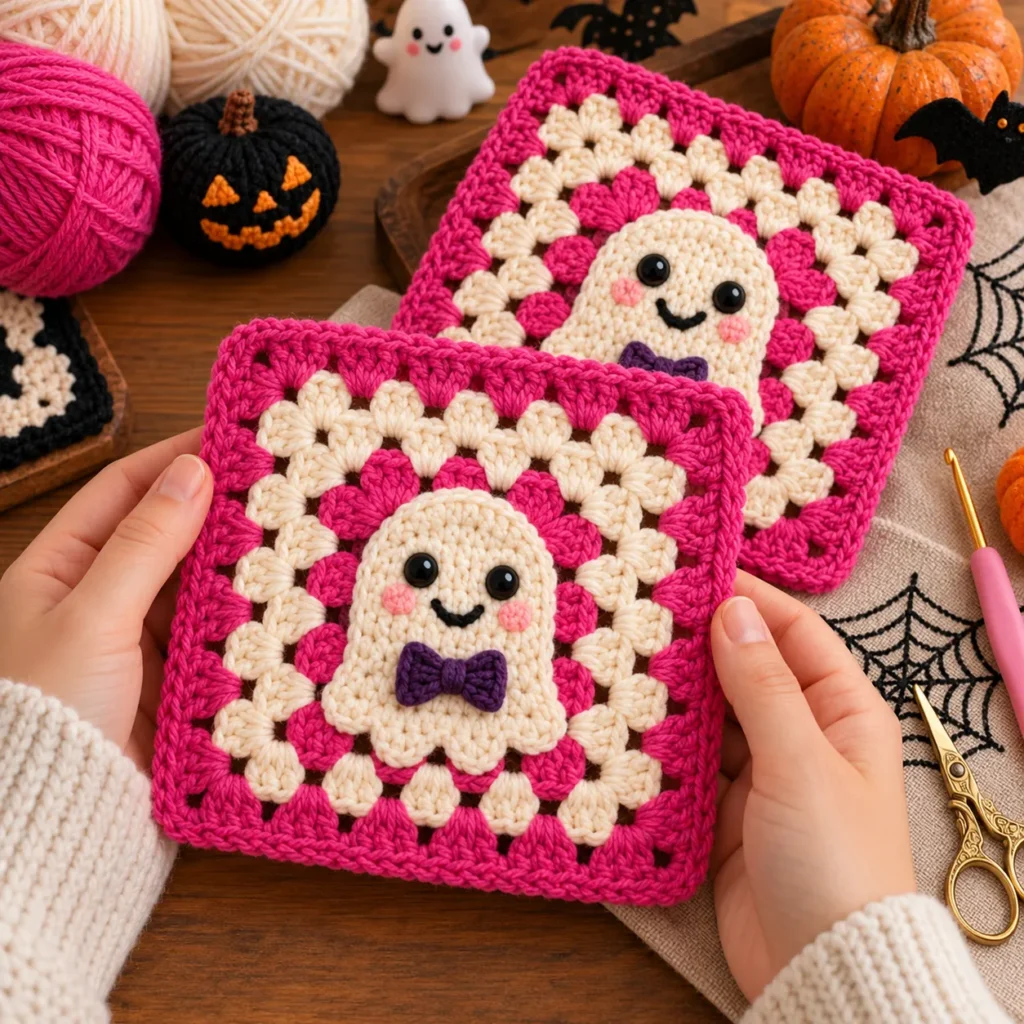
Granny Round 6 – Pink Outer Clusters
Join pink yarn in any corner space.
- Work (3 dc, ch 2, 3 dc) into the corner.
- Chain 1.
- Work one granny cluster into each side chain-1 space, chaining 1 between clusters.
- In every corner space, work (3 dc, ch 2, 3 dc).
- Continue around all four sides.
- Join to complete the round.
Stitch count: 40 granny clusters (120 dc), 36 chain-1 spaces, and four chain-2 corners.
Don't fasten off yet.
We can continue into the final edging using the same yarn.
Round 7 – Neat Pink Border
The final round helps create a firm, finished outer edge.
- Chain 1.
- Work one sc into each dc stitch.
- Work one sc into every chain-1 space.
- In every chain-2 corner space, work (sc, ch 2, sc).
- Continue evenly around all four sides.
- Join with a slip stitch.
Stitch count: 164 sc and four chain-2 corner spaces.
Fasten off and weave in the loose ends.
Your Halloween Crochet Granny Square is now complete!
Stitch Count Checklist
Use this table to check your progress as you crochet.
| Section | Expected Count |
|---|---|
| Ghost center | 16 stitches × 16 rows |
| Setup Round 1 | 64 sc + 4 corners |
| Granny Round 2 | 24 clusters |
| Granny Round 3 | 28 clusters |
| Granny Round 4 | 32 clusters |
| Granny Round 5 | 36 clusters |
| Granny Round 6 | 40 clusters |
| Final Round 7 | 164 sc + 4 corners |
Each granny round increases by four clusters.
If your stitch count doesn't match, inspect the previous round before continuing.
Optional: Add Texture and Personality to Your Ghost
The basic pattern creates a simple, integrated ghost using cream-and-pink colorwork.
However, you can add a little extra dimension if you'd like.
Give Your Ghost a Raised Outline
Use a small crochet hook and cream yarn to work surface slip stitches along the outside of the cream ghost shape.
Insert your hook through the fabric from front to back and pull up loops of cream yarn along the color boundary.
Keep the stitches loose enough that they don't pucker the fabric.
This creates a decorative outline and gives the ghost a more defined appearance.
Make a Happier Face
You can optionally add a curved smile using a small amount of dark embroidery thread or yarn.
If you'd prefer a completely no-sew project, use short surface slip stitches with your crochet hook.
Add a Little Bow
For a cute Halloween party look, make a small purple bow and attach it to the front.
This is an optional decorative addition, not part of the no-sew integrated pattern.
Try Blush Cheeks
Use short pink surface stitches on either side of the smile.
Keep the cheeks subtle so the ghost's face remains easy to recognize.
For blankets or projects intended for babies and young children, avoid detachable plastic eyes and other small decorations. Crocheted or securely embroidered facial details are the safer choice.
How to Block Your Halloween Granny Square
Blocking helps the motif lie flat and improves the appearance of the finished edges.
It's especially useful if you're planning to join several squares.
Step-by-Step Blocking Instructions
Step 1: Check your yarn label.
Different fibers need different blocking methods.
Step 2: Lightly dampen the square if wet blocking is appropriate for your yarn.
Step 3: Gently press the square between clean towels to remove excess moisture.
Step 4: Place the square on a flat blocking mat.
Step 5: Shape it into a square with four equal sides.
Step 6: Pin the corners and, if necessary, the centers of the sides.
Step 7: Let it dry completely.
Step 8: Remove the pins and check the finished dimensions.
Avoid stretching the ghost's center panel too aggressively.
You want the center to remain neat and the granny clusters to open naturally.
Never apply direct high heat to acrylic yarn.
Common Crochet Problems and How to Fix Them
Small mistakes can happen, particularly when working color changes and shaped motifs.
Here are a few problems you might encounter.
Problem 1: My Ghost Looks Uneven
First, check that every row contains exactly sixteen stitches.
Next, compare your color changes with the row instructions.
Even a single misplaced cream stitch can alter the ghost's shape.
When using colorwork, always complete the final yarn-over of the previous stitch with the new color.
This helps produce cleaner boundaries.
Problem 2: Pink Yarn Shows Through the Cream
This can happen when you carry the unused pink strand inside cream stitches.
Try keeping the unused yarn behind the work instead.
Alternatively, use separate small yarn bobbins for different color sections.
Be careful not to create tight strands across the back.
Problem 3: My Square Is Curling
Curling may be caused by tight tension, a small hook, or insufficient space at the corners.
Check that each granny corner contains two clusters separated by chain 2.
If the corners are correct, try loosening your tension.
Blocking may improve minor curling.
Problem 4: My Granny Clusters Look Too Tight
Ensure you're working into the chain spaces rather than forcing multiple stitches into individual stitch tops.
You can also try moving up half a hook size.
Problem 5: The Outer Border Is Wavy
A wavy border often indicates too many stitches or overly loose tension.
Check that you aren't accidentally increasing along the straight sides.
In the final edging, work one sc per dc, one sc per chain-1 space, and the specified stitches at each corner.
Problem 6: My Corners Aren't Square
Look at the chain-2 corner spaces.
They should be consistent throughout the granny rounds.
If one corner contains fewer stitches than the others, the square may pull toward that side.
Gently blocking the finished motif can also help improve its shape.
Creative Ways to Use Halloween Ghost Granny Squares
Once you've completed your first square, you might find yourself wanting to make another!
The design works beautifully in several types of crochet projects.
1. Halloween Granny-Square Blanket
Make a collection of ghost squares and join them into a cozy seasonal blanket.
You can alternate the ghost motifs with plain pink, cream, black, or lavender granny squares.
This creates visual variety without making the blanket feel overly busy.
2. Cute Halloween Tote Bag
Use several ghost granny squares as decorative panels for a handmade tote bag.
A fabric lining can help protect the crochet stitches and make the bag more practical for everyday use.
3. Decorative Halloween Pillow
Create a pillow front using four or more squares.
Pair the colorful front with a plain cream or pink crochet back.
The finished pillow would be a lovely addition to a seasonal sofa or cozy reading corner.
4. Halloween Wall Hanging
Join three squares vertically and attach the top edge to a wooden dowel.
Add a hanging cord and display it on a wall or door.
5. Handmade Halloween Gifts
A set of ghost granny squares can make a thoughtful handmade gift for a crochet-loving friend.
You could also include them in a small project kit with matching yarn and crochet tools.
6. Colorful Seasonal Table Decoration
Join a few squares to create a decorative table mat or runner.
Choose colors that coordinate with your Halloween decorations.
Keep crocheted pieces away from open flames, hot cookware, and other direct heat sources.
Color Combinations to Try
The original pink-and-cream color palette is playful, but there are plenty of other combinations worth exploring.
Pastel Halloween
- Soft lavender background.
- Ivory ghost.
- Pale lilac outer border.
This creates a gentle, dreamy Halloween appearance.
Classic Halloween
- Pumpkin-orange background.
- Cream ghost.
- Black outer border.
Perfect for a more traditional seasonal look.
Gothic Halloween
- Deep plum background.
- Pale cream ghost.
- Charcoal or black outer border.
This color combination feels elegant and dramatic.
Candy-Colored Halloween
- Bubblegum pink background.
- Vanilla-cream ghost.
- Bright purple border.
Ideal for a cute, colorful Halloween collection.
Neutral Halloween
- Beige background.
- Ivory ghost.
- Warm brown outer edging.
A lovely option for modern or farmhouse-inspired decorations.
Remember to choose contrasting colors so the ghost remains visible against its background.
Tips for Making Multiple Granny Squares
If you're creating a blanket, tote bag, or pillow, consistency matters.
Use the same yarn brand, weight, and hook size for every square whenever possible.
Check your stitch counts as you work.
Even one missing granny cluster can affect the finished dimensions.
Block your finished squares to matching measurements before joining them.
For a neat blanket, arrange the squares on a flat surface before attaching them.
You can join your motifs using slip stitches, single crochet, or mattress stitch.
For a decorative joining method, single crochet through the matching edges creates a raised seam.
For a flatter, more discreet finish, mattress stitch is an attractive alternative.
How to Care for Your Finished Project
Proper care helps handmade crochet projects stay beautiful.
Always follow the washing instructions for your chosen yarn.
For many cotton crochet projects, gentle hand washing in cool water is suitable.
Use a mild detergent and avoid harsh rubbing.
After washing, press gently between clean towels to remove excess moisture.
Lay the project flat to dry and reshape the edges if needed.
Avoid hanging wet crochet items, especially if they're heavy, because the weight may stretch the stitches.
For long-term seasonal storage, make sure the project is completely dry before putting it away.
Store it in a clean, dry place away from prolonged direct sunlight.
Frequently Asked Questions
1. Is this Halloween Crochet Granny Square beginner-friendly?
The project is best suited to confident beginners and intermediate crocheters.
The granny rounds use simple double crochet clusters, but the central ghost requires careful color changes and stitch counting.
If you're new to colorwork, practice on a small swatch before starting.
2. Do I need to sew the ghost onto the granny square?
No.
In this pattern, the ghost is created directly in the central crochet panel using cream and pink yarn.
You don't need to crochet a separate appliqué or sew the ghost into position.
3. Can I use worsted-weight yarn?
Yes.
Worsted-weight yarn is a good option, although your finished square may be larger than the estimates provided.
Choose an appropriate hook size and adjust your tension as needed.
4. How long does it take to crochet one ghost granny square?
A confident crocheter may complete the project in approximately two to four hours.
Beginners may need longer, especially when learning the color changes.
5. Can I make this granny square larger?
Absolutely.
You can continue adding traditional granny-square rounds after Round 6.
Work one additional granny cluster into each chain-1 side space and a standard corner group into every chain-2 corner.
Each new granny round adds four clusters.
Finish with your preferred edging once the square reaches the desired dimensions.
6. Can I use different yarn colors?
Yes!
You can customize the ghost, background, and border using any colors you prefer.
Just make sure the ghost contrasts with the surrounding background.
7. Why doesn't my ghost look exactly like the reference photograph?
This tutorial uses an integrated flat-colorwork construction inspired by the pictured project.
The reference photograph features a more dimensional, raised ghost effect.
You can add optional surface-crochet detailing for additional texture, but the two construction styles will not produce identical results.
8. Should I block my granny squares before joining them?
Blocking is recommended.
It helps achieve consistent dimensions and makes the joining process easier.
Always use a blocking method appropriate for your yarn.
9. Can I make a blanket using only ghost squares?
Yes.
You can repeat the same motif to create a charming Halloween blanket.
Alternatively, mix ghost squares with plain granny squares for a more varied design.
10. Can I sell finished items made from this pattern?
You can generally sell handmade items made from your own work, subject to any applicable laws and marketplace requirements.
When creating products for sale, make sure your finished items are safe for their intended use, particularly if they're meant for children.
Conclusion: Make Your Own Cute Halloween Ghost Granny Square
There's something wonderful about combining traditional crochet techniques with playful seasonal designs.
This Halloween Crochet Granny Square Pattern offers a cheerful twist on classic Halloween crafting, replacing scary details with a cute cream ghost and a beautiful pink-and-cream color palette.
Along the way, you'll practice single crochet colorwork, creating a shaped motif, working traditional granny clusters, changing yarn colors, and finishing a square with a neat border.
Once you've made your first square, the creative possibilities are almost endless.
Use your motifs to make blankets, pillows, bags, decorations, or handmade gifts.
Experiment with different color palettes, add optional facial details, and create a collection that reflects your personal crochet style.
Most importantly, enjoy the process.
Crochet is about more than following a pattern. It's about transforming simple stitches into something meaningful, creative, and handmade.
If you enjoyed this tutorial, save the Halloween Crochet Granny Square Pattern to your favorite Pinterest crochet board so you can find it again later.

Happy crocheting, and have a wonderfully creative Halloween!
Crochet Petal Studio — A Little Yarn. A Little Wonder. Something Made by Hand.