
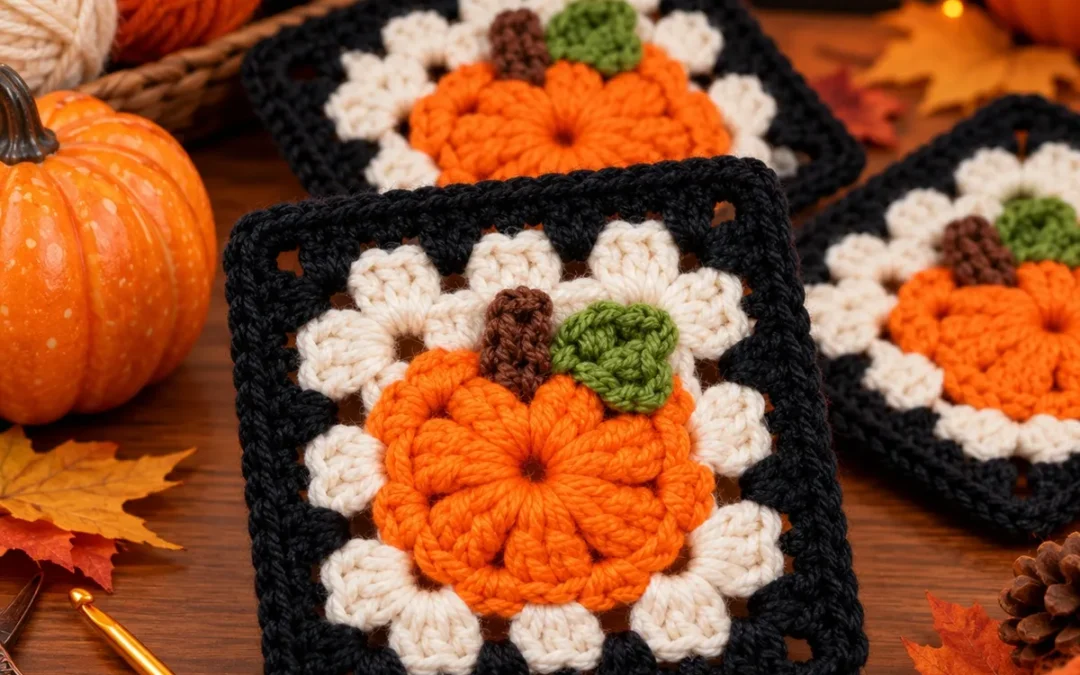
There's something magical about combining cozy crochet stitches with the warm, cheerful colors of autumn. And when Halloween arrives, what could be more charming than a little handmade pumpkin surrounded by classic granny-square stitches?
This Halloween Pumpkin Granny Square is the perfect mix of traditional crochet and playful seasonal design. With its beautifully textured orange pumpkin, tiny brown stem, delicate green leaf, soft cream granny clusters, and bold black border, this project brings a touch of Halloween magic to your crochet collection.
Whether you're decorating your home for fall, creating a Halloween blanket, making a seasonal tote bag, or simply looking for a fun weekend crochet project, this adorable pumpkin square is a wonderful choice.
The design begins with a textured pumpkin center created using puff stitches. Then we'll work around the pumpkin to transform the circular center into a traditional granny square. Finally, we'll add the black border, crochet a little stem and leaf, and bring everything together.
If you already know how to make basic stitches, this is also a lovely opportunity to practice puff stitches, color changes, granny clusters, and working from a circle into a square.
In this complete crochet tutorial, you'll find everything you need to make your own Halloween pumpkin granny square, including materials, stitch abbreviations, detailed round-by-round instructions, assembly tips, finishing techniques, creative project ideas, and answers to common questions.
So grab your favorite crochet hook, some bright orange yarn, and a cup of something warm. Let's make a beautiful little pumpkin!
What Is a Halloween Pumpkin Granny Square?
A Halloween pumpkin granny square is a decorative crochet motif that combines a recognizable pumpkin shape with the traditional square construction used in many granny-square patterns.
Instead of starting with ordinary granny clusters, this design begins with a circular pumpkin center featuring raised puff stitches.
The textured orange center creates the appearance of individual pumpkin sections.
Next, cream-colored granny clusters are worked around the pumpkin, gradually transforming the circular motif into a square.
A contrasting black border finishes the design and provides a structured edge suitable for joining multiple squares.
A small brown stem and green leaf complete the pumpkin.
Why You'll Love This Pattern
There are so many reasons to enjoy making this little autumn crochet project:
- Beautiful texture: The puff-stitch pumpkin creates a raised, dimensional centerpiece.
- Classic crochet techniques: The surrounding granny clusters give the motif a familiar handmade appearance.
- Seasonal colors: Orange, cream, black, green, and brown create a lovely Halloween palette.
- Small and satisfying: One square can be completed without committing to a large project.
- Great for leftover yarn: This is a practical way to use small amounts of seasonal colors.
- Versatile: You can turn the finished squares into blankets, bags, cushion covers, garlands, and wall hangings.
The combination of texture and openwork makes this design especially attractive when several finished squares are joined together.
Halloween Pumpkin Granny Square Pattern Details
| Project Detail | Information |
|---|---|
| Pattern Name | Halloween Pumpkin Granny Square |
| Skill Level | Confident beginner to intermediate |
| Crochet Terminology | US terms |
| Recommended Yarn | DK or light worsted weight |
| Crochet Hook | 4.0 mm (G/6) |
| Construction | Circular pumpkin center transformed into a square |
| Main Techniques | Puff stitches, single crochet, double crochet, granny clusters |
| Finished Size | Approximately 6–7 inches (15–18 cm), depending on gauge |
| Estimated Time | 2–3 hours |
| Main Colors | Orange, cream, black, brown, and green |
| Finishing | Weave ends, attach stem and leaf, optional blocking |
Sizing note: Finished measurements are estimates. Because this is a newly developed pattern, crochet a sample square and measure it before planning a large blanket or other size-sensitive project.
Materials and Tools You'll Need
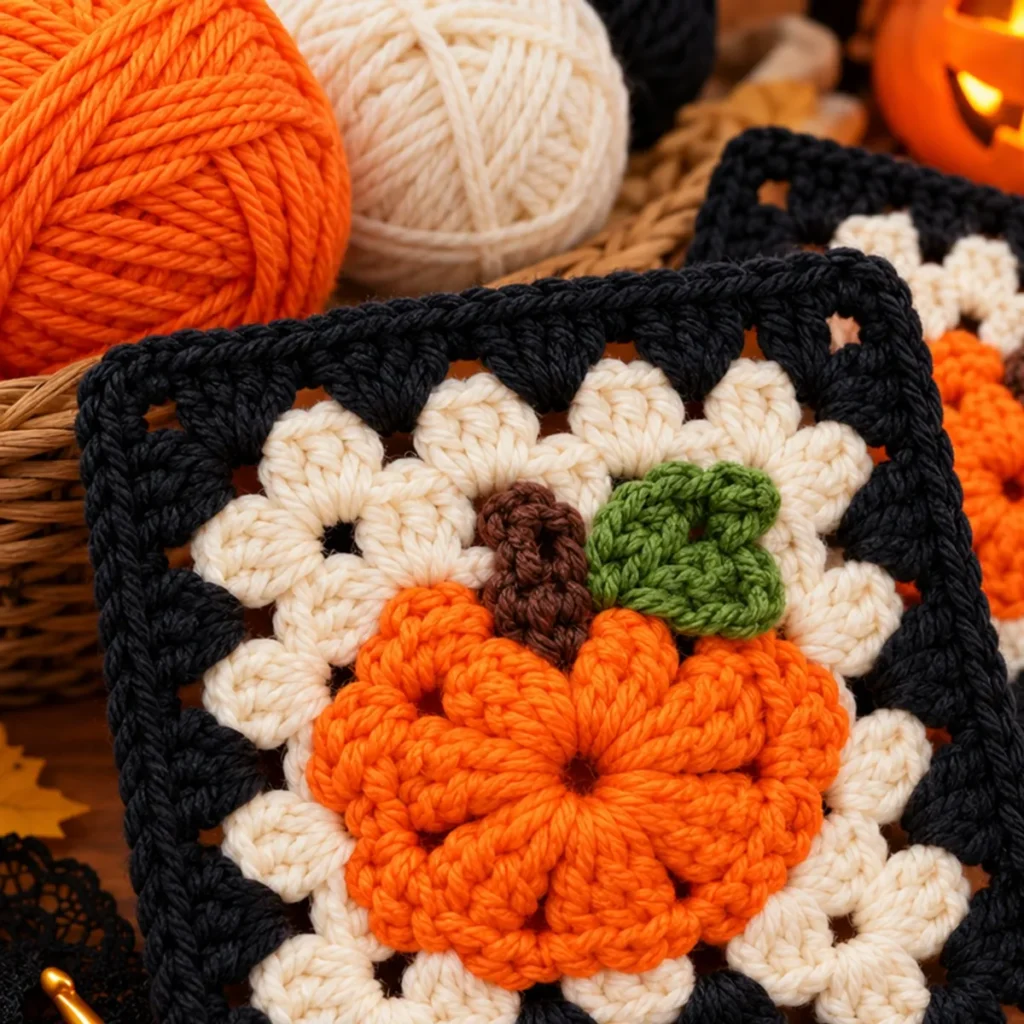
The right yarn colors make a big difference in the finished appearance of your pumpkin granny square.
For the version inspired by this project, I recommend choosing rich, warm colors that feel cozy and autumnal.
Yarn Colors
Color A – Pumpkin Orange
Approximately 12–18 grams.
Choose a bright pumpkin-orange yarn for the center.
A vibrant orange shade helps the pumpkin stand out against the cream background.
Color B – Warm Cream
Approximately 12–20 grams.
Use soft ivory, vanilla, or natural cream for the granny-square surround.
Cream is a lovely alternative to bright white because it creates a warmer, more vintage-inspired appearance.
Color C – Black
Approximately 8–12 grams.
Black creates the dramatic outer border.
It also makes the square especially suitable for Halloween projects.
Color D – Chocolate Brown
Approximately 1–2 grams.
Brown yarn is used for the small pumpkin stem.
Color E – Sage or Olive Green
Approximately 1–2 grams.
Green yarn creates the decorative leaf beside the stem.
These quantities are approximate and may vary depending on the yarn and finished dimensions.
Additional Supplies
You'll also need:
- A 4.0 mm crochet hook.
- A tapestry needle.
- Small sharp scissors.
- Stitch markers.
- Measuring tape.
- Blocking pins and a blocking mat, if desired.
What Yarn Works Best?
I recommend using smooth cotton or cotton-acrylic yarn for this design.
Cotton offers excellent stitch definition and helps the pumpkin's individual puff stitches stand out.
A smooth acrylic yarn is also suitable, particularly if you're planning a soft blanket.
Try to use the same yarn weight for all five colors.
Mixing significantly different yarn thicknesses can affect the finished dimensions and make the center appear uneven.
Crochet Abbreviations
All instructions use standard US crochet terminology.
| Abbreviation | Meaning |
|---|---|
| ch | Chain |
| sc | Single crochet |
| hdc | Half double crochet |
| dc | Double crochet |
| sl st | Slip stitch |
| st / sts | Stitch / stitches |
| sp | Space |
| rep | Repeat |
| rnd | Round |
| BLO | Back loop only |
| RS | Right side |
| WS | Wrong side |
Special Stitch: Puff Stitch
The puff stitch is responsible for the lovely raised texture in the center of the pumpkin.
For this pattern, work the following puff stitch:
- Yarn over.
- Insert the hook into the indicated space.
- Yarn over and pull up a long loop.
- Yarn over again and insert the hook into the same space.
- Yarn over and pull up another long loop.
- Repeat the yarn-over, insert, and pull-up sequence one more time.
- You should now have seven loops on your hook.
- Yarn over and pull through all seven loops.
- Chain 1 to secure the puff.
The final securing chain is part of the puff stitch. It is not the additional chain-1 space used between puffs in Round 1.
Try to pull the loops up to a similar height every time.
Consistent loop height creates neat, evenly raised pumpkin sections.
Special Stitch: Granny Cluster
A granny cluster consists of three double crochet stitches worked into the same space.
Granny cluster = 3 dc in one indicated space.
Special Stitch: Granny Corner
A standard granny corner consists of:
(3 dc, ch 2, 3 dc) in the same corner space.
Working this combination into each corner helps the motif grow evenly while maintaining its square shape.
Before You Begin: Understanding the Construction
The Halloween Pumpkin Granny Square is made in four main stages.
First, you'll create a circular orange pumpkin using raised puff stitches.
Second, you'll work a cream granny round that transforms the circle into a square.
Third, you'll continue expanding the square with another cream round and a contrasting black border.
Finally, you'll crochet a small brown stem and green leaf and attach them to the upper portion of the pumpkin.
Important Pattern Notes
- The pumpkin center is worked in joined rounds.
- The beginning chain of the puff-stitch round does not count as a puff.
- The beginning chain-3 in a granny round counts as one double crochet.
- Work all four corners using the exact corner combination specified.
- Chain-1 spaces between granny clusters are important for maintaining the openwork texture.
- The stem and leaf are small separate crochet pieces attached during finishing.
- Weave in yarn ends securely, especially if the square will become part of a blanket or bag.
Take time to read through the instructions before beginning.
Part 1: Crochet the Orange Pumpkin Center

The pumpkin center is the most recognizable part of the project.
We'll create a circular motif with twelve raised puff stitches.
The puffs radiate outward from the center, creating a ribbed texture similar to the natural sections of a pumpkin.
Round 1 – Create the Pumpkin Ridges
Using orange yarn and your 4.0 mm hook:
- Make a magic ring.
- Chain 1.
- Work one puff stitch into the magic ring.
- Chain 1 to create a space between puffs.
- Repeat Steps 3–4 until you have twelve puff stitches.
- Pull the magic ring closed carefully.
- Join with a slip stitch into the top of the first puff stitch.
Stitch count: 12 puff stitches and 12 chain-1 spaces.
You should now have a small, circular pumpkin center with twelve raised sections radiating outward.
Helpful Tips for Round 1
Puff stitches can use more yarn than ordinary double crochet stitches.
Avoid pulling the loops too tightly.
If your hook struggles to pass through all the loops, try making them slightly taller.
As you finish the round, spread the puff stitches evenly around the center.
If you cannot close the magic ring completely, pull the yarn tail firmly but gently.
Don't cut the starting tail too short. You'll secure it later.
Round 2 – Build the Pumpkin's Outer Edge
Continue using orange yarn.
- Slip stitch into the next chain-1 space between two puff stitches.
- Chain 1.
- Work 2 sc into that same chain-1 space.
- Work 2 sc into every remaining chain-1 space around the pumpkin.
- Join with a slip stitch into the first sc.
Stitch count: 24 sc.
This round creates a stable outer edge while preserving the raised appearance of the puff stitches.
Round 3 – Smooth the Pumpkin Circle
Chain 1.
- Work one sc into each stitch around.
- Continue until all 24 stitches are complete.
- Join with a slip stitch into the first sc.
Stitch count: 24 sc.
Fasten off the orange yarn and weave in the starting tail.
Your pumpkin center is now complete.
It should look like a small, textured orange circle, with pronounced raised sections and a neat outer edge.
Don't worry if the edges aren't perfectly circular yet.
The surrounding granny-square rounds and gentle blocking will help the finished project take shape.
Part 2: Turn the Pumpkin Into a Granny Square
This is one of the most satisfying stages of the project.
We'll take the circular orange motif and create four corners using cream granny clusters.
Preparing Your Pumpkin Center
Lay your orange circle flat with the right side facing upward.
Count the 24 stitches around its outer edge.
Place stitch markers in stitches 1, 7, 13, and 19.
These four evenly spaced stitches will become the corners of your granny square.
Position the first marker toward the upper-right portion of the pumpkin, so the eventual square has a horizontal top edge.
The unmarked stitches between corners will be used to create the side clusters.
Round 4 – First Cream Granny Round
Join cream yarn in marked stitch 1.
First corner:
- Chain 3, counting as the first dc.
- Work 2 more dc in the same stitch.
- Chain 2.
- Work 3 dc in the same stitch.
You have created your first granny corner.
First side:
- Chain 1.
- Skip stitch 2 and work 3 dc into stitch 3.
- Chain 1.
- Skip stitch 4 and work 3 dc into stitch 5.
- Chain 1.
- Skip stitch 6.
Second corner:
- Into marked stitch 7, work (3 dc, ch 2, 3 dc).
Repeat this sequence around the pumpkin.
Your remaining corner stitches will be stitches 13 and 19.
Work one granny cluster into each unmarked odd-numbered stitch between the corners, chaining 1 between adjacent clusters.
After the last side cluster in stitch 23, chain 1, skip stitch 24, and join to the top of the beginning chain-3.
Stitch count: 16 granny clusters (48 dc), 12 chain-1 spaces, and four chain-2 corner spaces.
Your orange pumpkin should now be surrounded by cream granny clusters.
You'll notice the shape changing from circular to square.
Check Your Work
Before starting the next round, examine each corner.
Every corner should contain two granny clusters separated by a chain-2 space.
Each side should contain two individual granny clusters between the corner groups.
If one side looks shorter than the others, recount your clusters and check for skipped stitches.
Part 3: Add the Second Cream Granny Round
This round gives the pumpkin more breathing room and creates the lovely cream background seen in the inspiration image.
Round 5 – Expand the Cream Granny Square
Continue with cream yarn.
Slip stitch across to the nearest corner chain-2 space.
- Work (3 dc, ch 2, 3 dc) into the corner, using chain-3 as the first dc.
- Chain 1.
- Work 3 dc into the next chain-1 side space.
- Chain 1.
- Continue placing one granny cluster into each side chain-1 space.
- In the next corner, work (3 dc, ch 2, 3 dc).
- Repeat the same sequence along the remaining sides.
- Chain 1 between adjacent clusters.
- Join to the beginning chain-3.
Stitch count: 20 granny clusters (60 dc), 16 chain-1 spaces, and four chain-2 corner spaces.
Fasten off the cream yarn.
Your pumpkin granny square should now be looking much closer to the finished design.
The cream stitches form an open, textured frame that allows the orange center to stand out beautifully.
How to Keep the Square Flat
If the cream section begins to curl, check your corner stitch counts.
Each corner must contain a complete granny corner.
Also check that you haven't accidentally skipped a chain-1 side space.
If your tension is particularly tight, try relaxing your grip on the working yarn.
Granny-square stitches need enough room to spread naturally.
Part 4: Crochet the Black Halloween Border
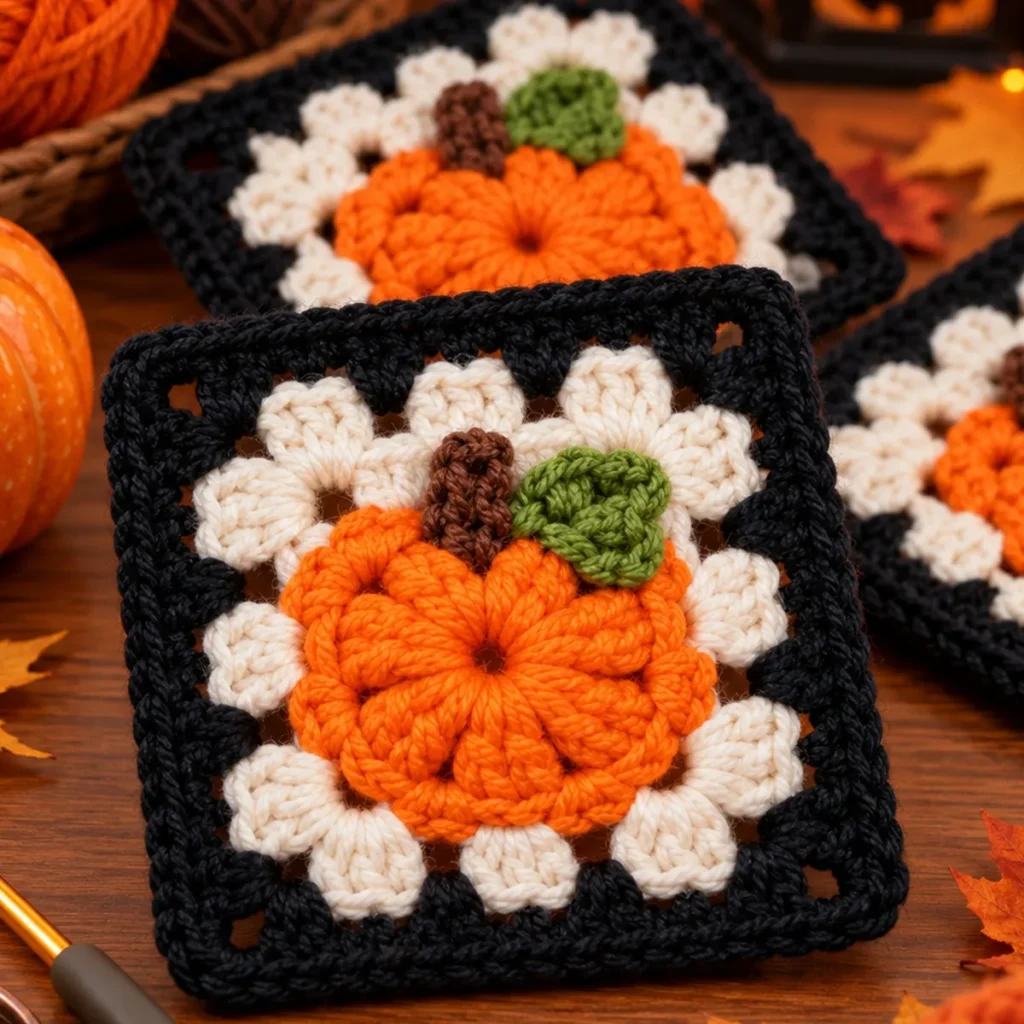
The black outer border creates the dramatic contrast that gives this pumpkin granny square its Halloween personality.
It also provides a practical edge for joining several squares into larger projects.
Round 6 – Black Granny Round
Join black yarn in any corner chain-2 space.
- Work (3 dc, ch 2, 3 dc) into the corner, using the starting chain-3 as the first dc.
- Chain 1.
- Work a granny cluster into the next chain-1 side space.
- Chain 1.
- Continue working one granny cluster in every side chain-1 space.
- At each corner, work (3 dc, ch 2, 3 dc).
- Repeat around all four sides.
- Join to the beginning chain-3.
Stitch count: 24 granny clusters (72 dc), 20 chain-1 spaces, and four chain-2 corners.
You now have a black granny round surrounding the cream pumpkin square.
Don't fasten off yet.
We'll work one more round to complete the border.
Round 7 – Final Black Edging
Chain 1.
- Work one sc into every dc stitch.
- Work one sc into every chain-1 side space.
- In each chain-2 corner, work (sc, ch 2, sc).
- Continue around the entire square.
- Join with a slip stitch into the first sc.
Stitch count: 100 sc and four chain-2 corner spaces.
Fasten off the black yarn, leaving a tail long enough to weave securely into the border.
The black edging should now create a neat, defined square.
Why Use Black for the Border?
Black adds contrast and makes the orange pumpkin appear especially vibrant.
It also creates a strong visual outline, which looks lovely when multiple squares are joined together.
If you're making a Halloween blanket, you could use black yarn for the joining seams to create a coordinated design.
Part 5: Crochet the Brown Pumpkin Stem
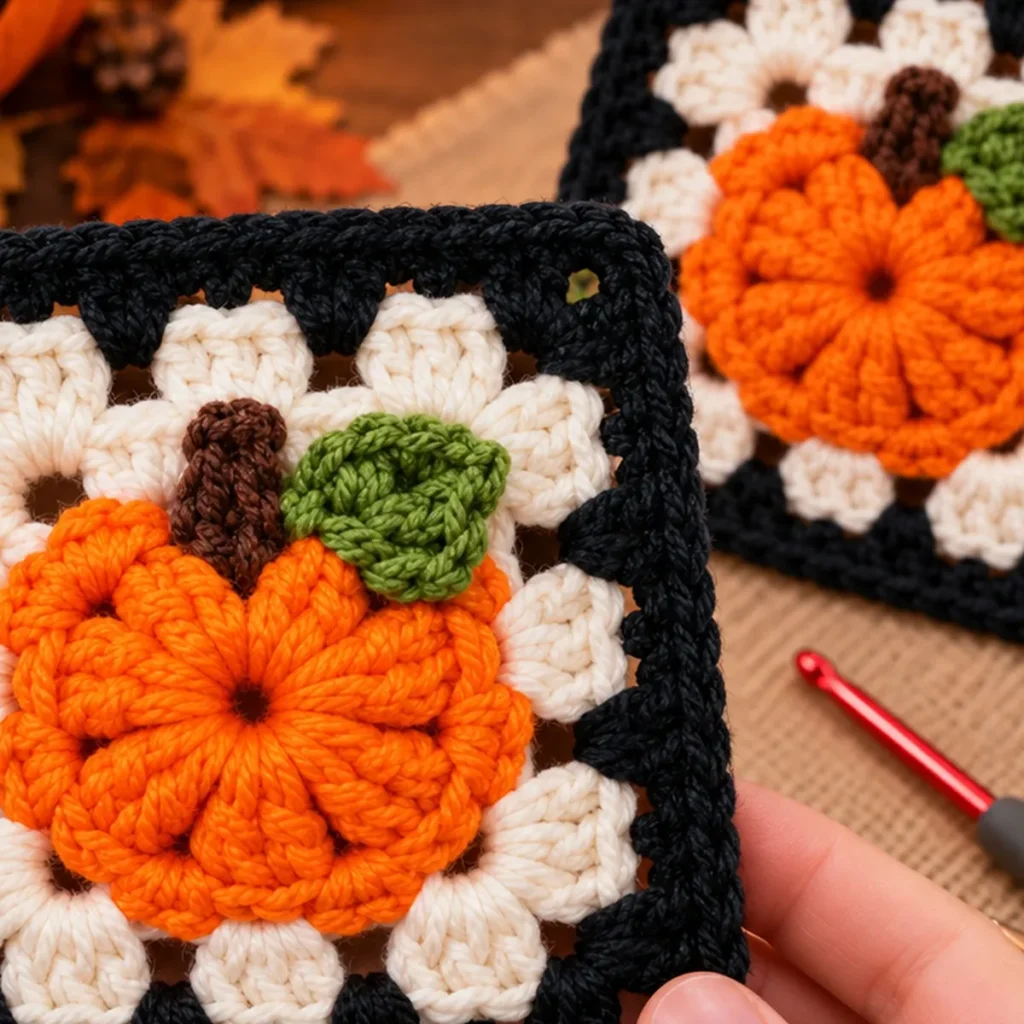
A little brown stem gives your pumpkin its recognizable autumn appearance.
We'll make a simple, slightly rectangular stem using single crochet.
Stem Instructions
Using brown yarn and your 4.0 mm hook:
Row 1: Chain 6. Starting in the second chain from the hook, work one sc in each chain across.
Stitch count: 5 sc.
Chain 1 and turn.
Row 2: Work one sc into each stitch across.
Stitch count: 5 sc.
Fasten off, leaving a long sewing tail.
The finished stem should look like a small rectangle.
Turn it so the five-stitch length runs vertically when placed on the pumpkin.
You can fold it very slightly to create a more dimensional appearance.
Positioning the Stem
Lay the granny square flat.
Place the brown stem at the top center of the orange pumpkin.
Overlap its bottom edge slightly with the orange stitches.
The upper section can extend onto the cream background.
Use a stitch marker or pin to hold it temporarily.
Wait until the leaf is also ready before sewing everything securely into place.
Part 6: Crochet the Green Pumpkin Leaf
The little green leaf adds a lovely finishing detail and brings another natural autumn color into the design.
Leaf Instructions
Using sage or olive-green yarn:
- Chain 8.
- Slip stitch into the second chain from the hook.
- Work 1 sc into the next chain.
- Work 1 hdc into the next chain.
- Work 1 dc into the next chain.
- Work 1 hdc into the next chain.
- Work 1 sc into the next chain.
- Slip stitch into the final chain.
You have completed the first side of the leaf.
Now work along the opposite side of the foundation chain.
- Slip stitch into the opposite side of the end chain.
- Work 1 sc into the next chain.
- Work 1 hdc into the next chain.
- Work 1 dc into the next chain.
- Work 1 hdc into the next chain.
- Work 1 sc into the next chain.
- Slip stitch into the final chain.
Join and fasten off, leaving a long tail for attachment.
Your leaf should have a narrow pointed end, a slightly rounded middle, and a small base.
Optional Leaf Vein
For an additional decorative detail, use a tapestry needle to embroider a short line down the center of the leaf.
Alternatively, work a few loose surface slip stitches along its center.
This is optional, but it can help create a more natural appearance.
Part 7: Attach the Stem and Leaf
Now it's time to bring all the details together.
Place the finished pumpkin granny square on a flat surface, right side facing upward.
Attach the Brown Stem
Thread the long brown yarn tail through a tapestry needle.
Position the stem at the top center of the pumpkin.
Sew the bottom portion securely onto the orange pumpkin center using small stitches.
You can also attach the upper end to the cream background for extra stability.
Keep the sewing stitches discreet by passing the needle through existing crochet loops.
Avoid pulling too tightly.
Attach the Green Leaf
Position the green leaf beside the stem, angling it slightly outward.
In the reference color arrangement, the leaf sits to the right of the brown stem.
Use the green yarn tail to secure the base of the leaf.
Add a few small stitches along the body of the leaf if you want it to lie completely flat.
For a slightly dimensional finish, you can leave the pointed tip free.
For blankets or bags that will be washed frequently, secure the leaf more thoroughly so it doesn't catch on other objects.
Check the Final Shape
Once the stem and leaf are attached, lay the square flat again.
Check that the pumpkin appears centered.
The stem should point toward the top edge of the square.
The leaf should sit naturally beside the stem.
If everything looks balanced, weave in the remaining ends.
Your Halloween Pumpkin Granny Square is complete!
Crochet Stitch Count Checklist
This quick table will help you confirm your stitch counts as you work.
| Round | Stitch Count |
|---|---|
| Round 1 | 12 puffs + 12 chain-1 spaces |
| Round 2 | 24 sc |
| Round 3 | 24 sc |
| Round 4 | 16 granny clusters + 4 corners |
| Round 5 | 20 granny clusters + 4 corners |
| Round 6 | 24 granny clusters + 4 corners |
| Round 7 | 100 sc + 4 corners |
The granny-cluster rounds increase by four clusters per round.
If your stitch counts don't match, check the previous round before continuing.
How to Block Your Halloween Pumpkin Granny Square
Blocking is a helpful finishing step, particularly when making multiple squares for a blanket or bag.
It helps even out the corners, relaxes tight stitches, and gives the completed motif a more uniform appearance.
Step-by-Step Blocking Instructions
Step 1: Check the care instructions on your yarn label.
Step 2: If your yarn is suitable for wet blocking, lightly dampen the square.
Step 3: Place it between two clean towels and press gently to remove excess moisture.
Step 4: Lay the square onto a foam blocking mat.
Step 5: Shape it into a square, gently stretching the corners until the sides appear even.
Step 6: Pin the four corners in place.
Step 7: Add extra pins along the edges if necessary.
Step 8: Leave the square to dry completely.
Step 9: Remove the pins and check the final dimensions.
Be careful not to flatten the raised orange puff stitches too aggressively.
You want the pumpkin to retain its lovely dimensional texture.
Avoid direct high heat on acrylic yarn.
Tips for Making a Beautiful Pumpkin Granny Square
1. Keep Your Puff Stitches Consistent
The pumpkin's texture depends on the puff stitches having a similar height.
When pulling up each loop, try to maintain the same tension.
If some puffs are much taller than others, the center may appear uneven.
2. Use Smooth Yarn
Smooth yarn helps individual stitches stand out.
This is especially important for the pumpkin center and small green leaf.
Very fuzzy yarn can make the stitch texture less distinct.
3. Don't Pull the Magic Ring Too Tight Too Early
Leave a little room while completing your first few puffs.
Once all twelve puffs are finished, gradually tighten the center.
This makes it easier to work comfortably.
4. Count Your Granny Clusters
Each cream and black granny round needs the correct number of clusters.
Counting as you go is much easier than discovering a missed cluster several rounds later.
5. Use Stitch Markers for the Corners
Stitch markers are particularly helpful when turning the circular pumpkin into a square.
Marking the four corner anchor stitches before starting the cream round helps prevent mistakes.
6. Attach Decorations Securely
When adding the stem and leaf, use several small sewing stitches.
The finished square may eventually become part of a blanket or bag, so the decorations should be secure.
Common Problems and How to Fix Them
Even experienced crocheters occasionally encounter problems with small decorative motifs.
Here are some of the most common issues.
My Pumpkin Center Is Curling
The puff stitches may be too tight, or the outer rounds may not have enough flexibility.
Try pulling the puff loops slightly higher.
Also check that Round 2 contains exactly 24 single crochet stitches.
Gentle shaping can help minor curling.
My Pumpkin Has a Large Hole in the Center
Pull the magic ring's starting tail gently to close the opening.
If the ring isn't closing, check that you began with an adjustable magic ring rather than a fixed chain circle.
My Cream Section Won't Lie Flat
Check that each corner contains the complete granny corner.
Also verify that you're working one cluster into every designated side space.
Skipping a corner or adding unintended clusters can distort the square.
My Black Border Looks Wavy
Wavy borders often result from excess stitches.
Check that Round 7 contains one sc in every dc, one sc in every chain-1 side space, and the specified corner combination.
My Stem Keeps Falling Forward
Secure its base with additional stitches.
You can also attach the upper section to the cream background to help it remain upright.
My Leaf Looks Too Large
Try using a slightly smaller hook.
You can also shorten the starting chain to make a smaller leaf, adjusting the stitch arrangement accordingly.
Creative Ways to Use Halloween Pumpkin Granny Squares

Once you've completed one pumpkin granny square, you'll probably want to make several more!
These little motifs are incredibly versatile.
1. Halloween Crochet Blanket
Join a collection of pumpkin granny squares to create a beautiful seasonal blanket.
You can alternate them with plain cream, black, orange, or olive-green squares.
This creates a coordinated Halloween design without making the blanket feel too busy.
2. Pumpkin Granny-Square Tote Bag
Use four or more squares to create the front and back panels of a handmade tote bag.
Add crocheted straps and a fabric lining for extra durability.
The bright orange pumpkins would make a cheerful autumn accessory.
3. Halloween Pillow Cover
Create a cushion front using several pumpkin squares.
Pair it with a solid cream or black crochet back.
This is a lovely way to add handmade Halloween style to a living room or reading nook.
4. Fall Wall Hanging
Join several squares vertically and attach them to a wooden dowel.
Add a simple yarn loop for hanging.
This makes a charming handmade decoration for an entryway, bedroom, or craft room.
5. Halloween Garland
Make smaller pumpkin squares and connect them along a crocheted chain.
Hang your garland across a mantel or shelf.
Keep it safely away from candles, fireplaces, and other heat sources.
6. Handmade Autumn Gifts
Pumpkin granny squares also make thoughtful gifts for friends and family who love handmade decorations.
You can use them as decorative patches, framed crochet art, or part of a larger handmade project.
Beautiful Color Combinations to Try
The orange, cream, and black version is perfect for Halloween, but you can create many different looks by changing the yarn colors.
Classic Halloween
- Bright orange pumpkin.
- Cream granny clusters.
- Black border.
- Brown stem.
- Olive-green leaf.
Soft Cottagecore Autumn
- Muted terracotta pumpkin.
- Oatmeal background.
- Warm brown border.
- Sage-green leaf.
Pastel Halloween
- Peach pumpkin.
- Soft ivory background.
- Dusty-pink border.
- Pale sage leaf.
Elegant Neutral Fall
- Cream pumpkin.
- Beige granny clusters.
- Chocolate-brown border.
- Olive leaf.
Dark and Moody Halloween
- Burnt-orange pumpkin.
- Deep plum background.
- Charcoal border.
- Forest-green leaf.
Each palette gives the same basic design a completely different personality.
For a blanket, consider alternating two or three coordinated color combinations.
How to Make Your Pumpkin Granny Square Larger
If you'd like a larger square, you can continue working additional granny rounds before the final single crochet border.
After Round 6, continue in your chosen color.
Work (3 dc, ch 2, 3 dc) in every corner space.
Work one 3-dc cluster in every chain-1 side space, placing chain 1 between adjacent clusters.
Each additional round increases the total number of granny clusters by four.
For example, an extra granny round after Round 6 would contain 28 clusters.
The next would contain 32.
Once your square reaches the desired size, work the final single crochet edging.
If your finished square is much larger than the original, you may wish to enlarge the pumpkin center in a future version to maintain the design's proportions.
How to Join Multiple Granny Squares
If you're turning your squares into a blanket or bag, choose a joining method that complements the design.
Slip-Stitch Join
Place two squares together with the desired sides facing outward.
Work slip stitches through the corresponding edge stitches.
This creates a relatively neat and sturdy seam.
Single Crochet Join
Place the squares together and work single crochet stitches through both layers.
This produces a decorative raised seam.
Black yarn can make an especially attractive joining color for Halloween projects.
Mattress-Stitch Join
Use a tapestry needle and yarn to join the squares with a flatter, less visible seam.
This method works well if you want the pumpkin motifs to remain the main focus.
Whichever method you choose, block the squares to matching dimensions before joining them.
How to Wash and Care for Your Crochet Pumpkin Projects
The correct care method depends on your yarn.
Always follow the yarn manufacturer's washing instructions.
For many cotton crochet projects, gentle hand washing is a good option.
Use cool or lukewarm water and a mild detergent.
Avoid excessive rubbing or twisting, particularly around the stem and leaf.
After washing, gently press out excess water using a clean towel.
Lay the project flat to dry.
Reshape the corners if necessary.
Store seasonal crochet decorations in a cool, dry place away from prolonged direct sunlight.
If storing a blanket or bag for several months, make sure it's completely clean and dry first.
Frequently Asked Questions
1. Is the Halloween Pumpkin Granny Square beginner-friendly?
The pattern is suitable for confident beginners who already understand basic crochet stitches.
The puff-stitch center and circular-to-square transition may require a little practice.
Once those sections are complete, the granny rounds are straightforward.
2. Can I use worsted-weight yarn?
Yes.
Worsted-weight yarn works well for this design.
Your square may turn out larger and thicker than the estimated dimensions, depending on your hook size and tension.
3. How long does one pumpkin granny square take?
Most crocheters should allow approximately two to three hours for their first square.
The time depends on experience, yarn handling, and the finishing details.
Later squares may take less time as you become familiar with the pattern.
4. Do I need to sew the pumpkin onto the square?
No.
The orange pumpkin center is crocheted directly into the granny-square construction.
Only the small brown stem and green leaf are attached separately.
5. Can I make this design without the leaf?
Absolutely.
The green leaf is a decorative detail.
You can omit it and finish the pumpkin with only a small brown stem.
6. How many pumpkin squares do I need for a blanket?
The number depends on the finished size of your squares and the blanket dimensions you want.
For example, if your blocked squares measure 7 inches, an arrangement of 8 squares across and 10 squares down would use 80 squares.
Before adding any extra border, the approximate dimensions would be 56 × 70 inches, not including changes from joining.
7. Can I change the border color?
Yes.
Black is ideal for Halloween, but brown, rust, forest green, plum, and cream can all look beautiful.
Choose a border color that contrasts with the pumpkin.
8. Should I block the squares before joining?
Blocking is recommended, especially for larger projects.
It helps even out the dimensions and makes joining easier.
9. Can I use acrylic yarn instead of cotton?
Yes.
Smooth acrylic yarn is suitable for decorative squares and blankets.
Choose an appropriate blocking and washing method for your yarn.
10. Can I make these squares for non-Halloween projects?
Definitely!
Pumpkins are popular throughout autumn, not just Halloween.
Use a softer color palette to make the design suitable for Thanksgiving, harvest celebrations, or general fall home décor.
Conclusion: Make Your Own Halloween Pumpkin Granny Square
There's something especially cozy about crocheting little pumpkins as the weather turns cooler.
This Halloween Pumpkin Granny Square combines the charm of traditional crochet with the playful beauty of autumn.
The raised orange puff stitches create a textured pumpkin, while the cream granny clusters and bold black border give the design a distinctive Halloween appearance.
The small brown stem and green leaf add the perfect finishing touch.
Whether you're making a single decorative square or planning a larger blanket, tote bag, pillow, or wall hanging, this project offers plenty of opportunities to be creative.
Experiment with different yarn colors, practice your puff stitches, and enjoy the process of watching the pumpkin take shape.
Every handmade stitch adds something special.
If you enjoyed this crochet tutorial, save the Halloween Pumpkin Granny Square pattern to your favorite Pinterest crochet board so you can easily find it again.

And don't forget to share your finished pumpkins with other crochet lovers!
Happy crocheting, and have a wonderfully creative Halloween!
Crochet Petal Studio — A Little Yarn. A Little Wonder. Something Made by Hand.