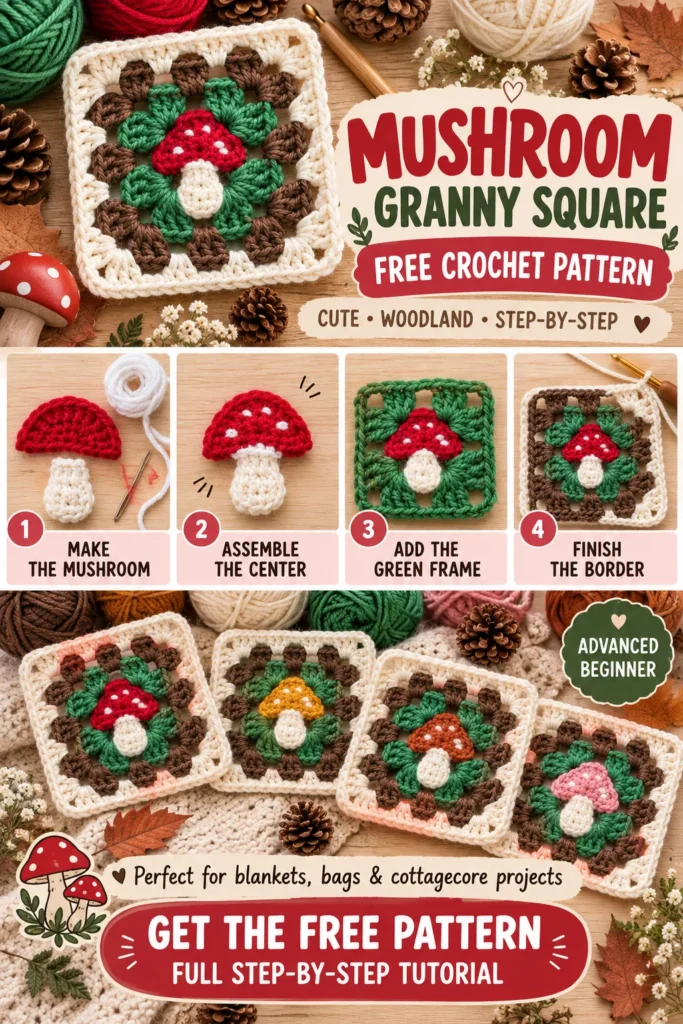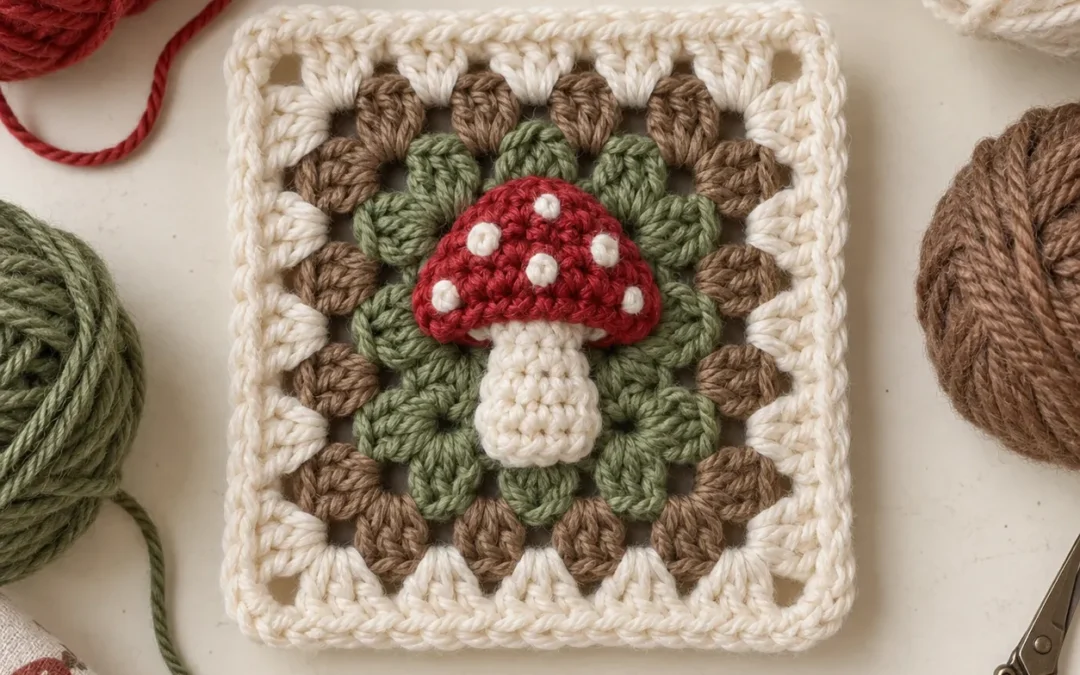
Add a little woodland magic to your crochet projects with this Mushroom Granny Square Crochet Pattern.
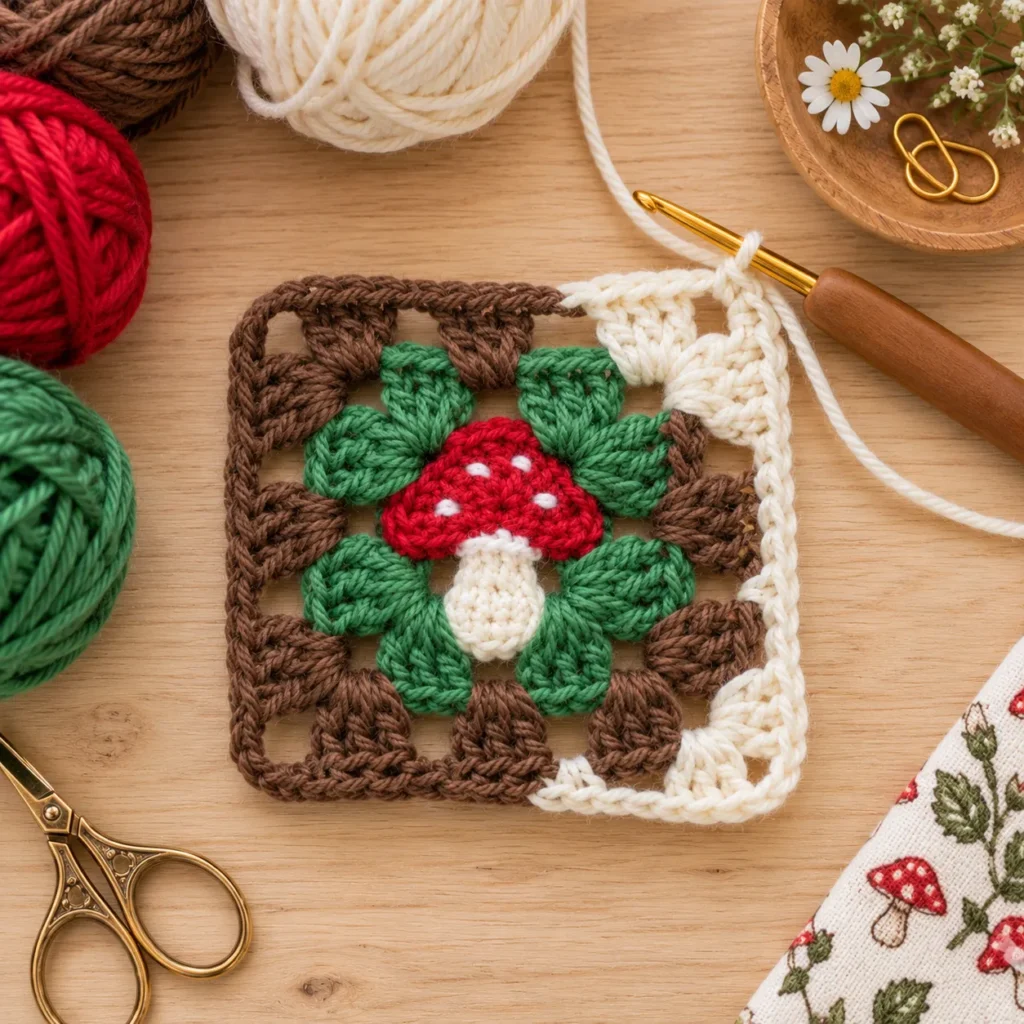
This charming motif features a tiny red-and-cream crochet mushroom surrounded by leafy green stitches, an earthy brown granny-square round, and a soft cream outer frame.
The combination of red, green, brown, and ivory gives the square a cozy cottagecore feel that works beautifully for fall, Christmas, woodland nurseries, and whimsical handmade accessories.
Make just one as a decorative patch, or crochet a whole collection for blankets, bags, cushions, scarves, cardigans, and wall hangings.
Mushroom Granny Square Pattern at a Glance
| Pattern Detail | Information |
|---|---|
| Skill Level | Advanced Beginner |
| Crochet Terms | US terminology |
| Yarn Weight | DK / Light #3 |
| Hook Size | 4 mm |
| Finished Size | Approx. 4–4.5 in / 10–11.5 cm |
| Construction | Mushroom centerpiece + granny rounds |
| Main Stitches | sc, hdc, dc |
| Main Colors | Red, green, brown, cream |
| Optional Detail | White mushroom spots |
| Best For | Blankets, bags, cushions, cardigans |
The finished size will vary depending on yarn, hook size, and tension.
Why You’ll Love This Mushroom Granny Square
This square has a lot of personality without requiring complicated tapestry crochet.
The tiny mushroom becomes the focal point, while the surrounding green and brown rounds create the feeling of a miniature woodland scene.
Because the outer section follows familiar granny-square construction, it is easy to enlarge the motif simply by adding more rounds.
It is also very customizable.
Try combinations such as:
- Red + forest green + chocolate brown
- Burnt orange + olive + camel
- Dusty pink + sage + taupe
- Mustard + moss + deep brown
- Burgundy + pine green + oatmeal
You can also alternate mushroom squares with plain granny squares to keep a larger project from becoming too visually busy.

Materials
For one square:
- Small amount of red DK-weight yarn
- Small amount of cream or white DK yarn
- Small amount of leafy or emerald-green yarn
- Small amount of chocolate-brown yarn
- Small amount of ivory or warm-white yarn
- 4 mm crochet hook
- Yarn needle
- Scissors
- Stitch markers, optional
- Blocking mat and pins, optional
DK cotton or a cotton-acrylic blend gives especially nice stitch definition.
You can also use leftover yarn, making this a useful scrap-busting project.
Crochet Abbreviations
| Abbreviation | Meaning |
|---|---|
| MR | Magic ring |
| ch | Chain |
| sc | Single crochet |
| hdc | Half double crochet |
| dc | Double crochet |
| sl st | Slip stitch |
| st / sts | Stitch / stitches |
| sp | Space |
| sk | Skip |
| rep | Repeat |
Pattern Notes
This square is built in several stages.
First, crochet the tiny mushroom centerpiece.
Next, surround it with green stitches to create the leafy woodland center.
Then add a brown granny-style round.
Finish with a soft cream frame.
The mushroom can be decorated with tiny embroidered white spots at the end.
For a blanket or bag, block all squares to the same measurement before joining.
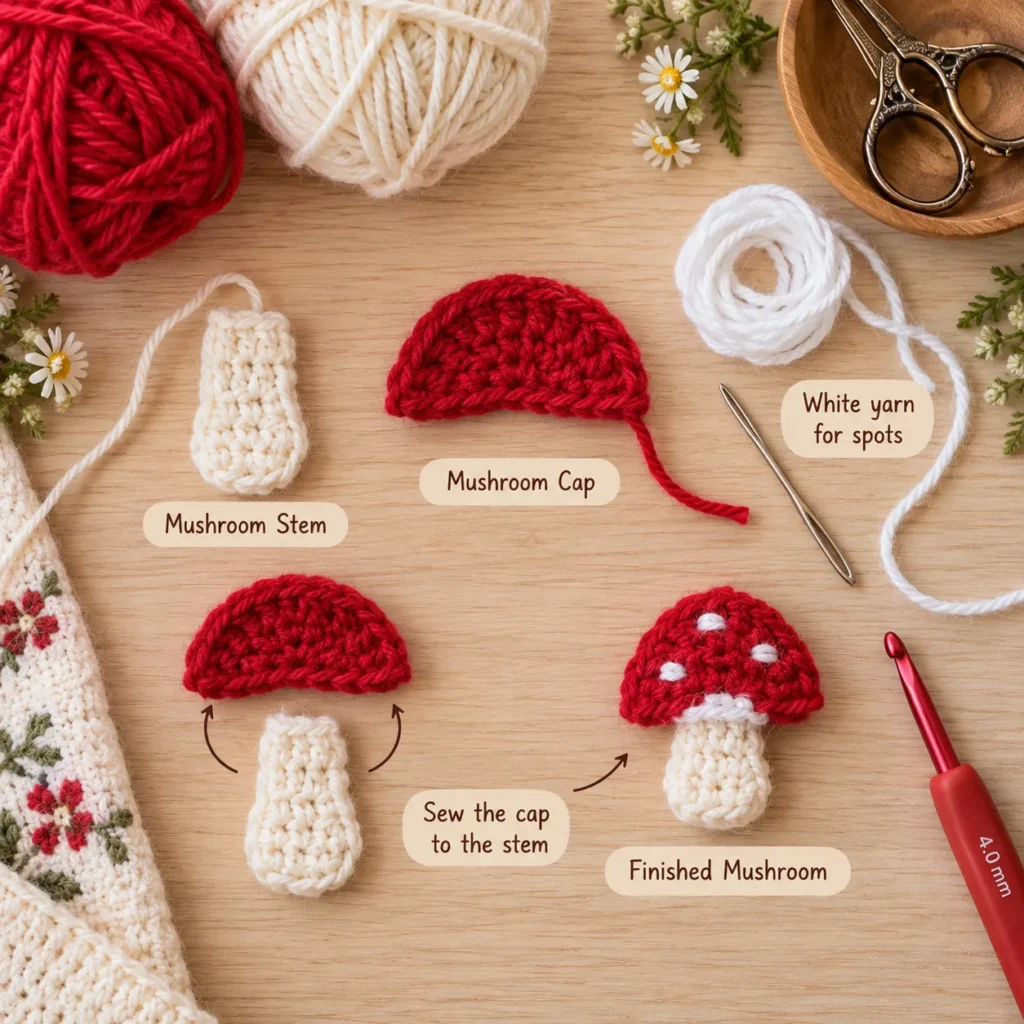
Part 1: Crochet the Tiny Mushroom Stem
Using cream yarn:
Ch 5.
Beginning in the second chain from the hook:
- sc in next 2 chains
- hdc in next chain
- 3 hdc in final chain
Rotate the work slightly.
Continue along the opposite side of the foundation chain:
- hdc in next chain
- sc in next 2 chains
Join with a sl st.
Fasten off, leaving a tail for assembly.
You should have a tiny tapered oval that will become the mushroom stem.
Part 2: Crochet the Mushroom Cap
Using red yarn:
Ch 7.
Row 1
Starting in the second chain from the hook:
Sc across.
6 sc
Turn.
Row 2
Ch 1.
Work:
2 sc in first stitch, sc in next 4 sts, 2 sc in last stitch
8 sts
Turn.
Row 3
Ch 1.
Sc across.
Row 4
Ch 1.
Sc2tog.
Sc across until 2 stitches remain.
Sc2tog.
6 sts
Fasten off.
Use the yarn tail to gently curve the lower edge.
The cap should look wider than the stem and slightly rounded.
Add White Mushroom Spots
Thread a yarn needle with cream or white yarn.
Add approximately 3–5 small spots to the red cap.
Use short embroidery stitches.
Vary their size slightly so they look more organic.
Secure the yarn tails on the back.
Assemble the Tiny Mushroom
Place the red cap over the upper portion of the cream stem.
The stem should extend clearly below the cap.
Sew the two pieces together using matching yarn.
Keep the back as flat as possible because the mushroom will sit in the middle of the granny square.
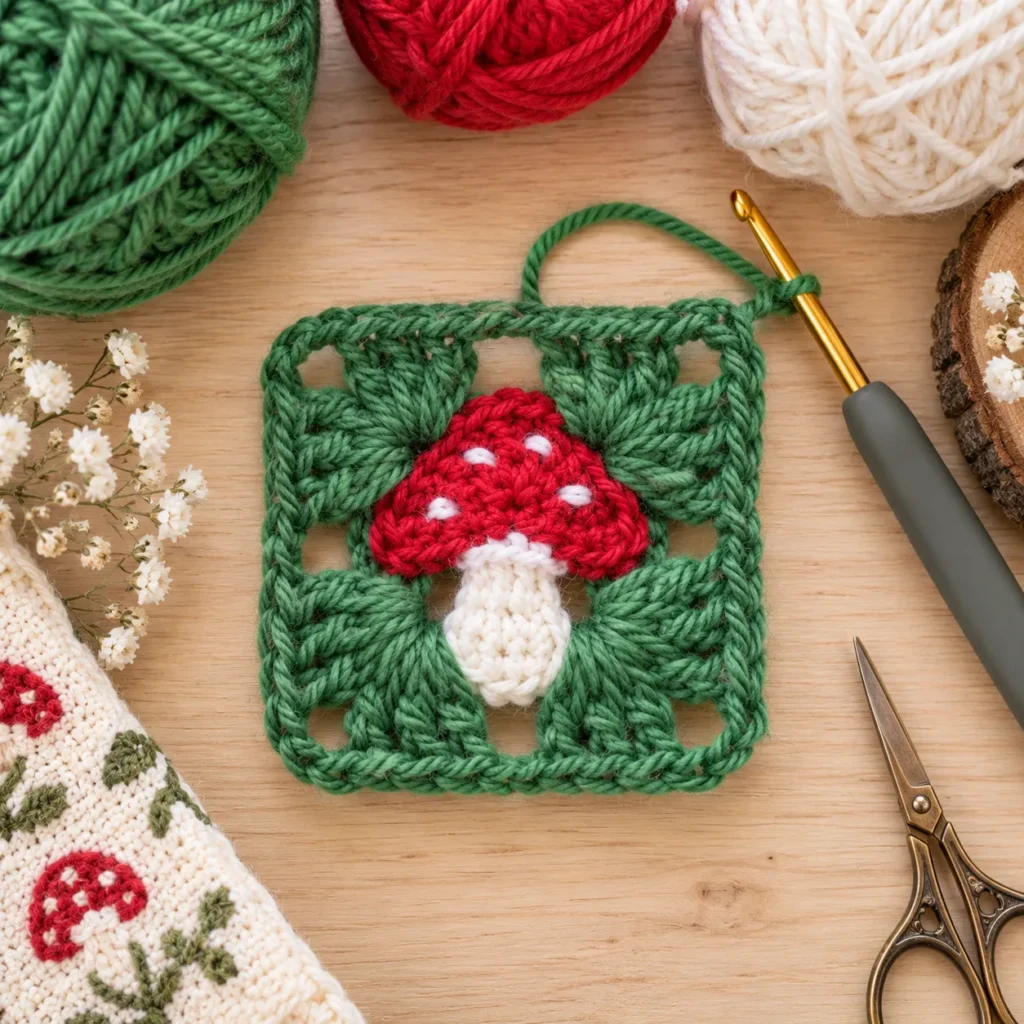
Part 3: Crochet the Green Woodland Frame
Using green yarn:
Create a magic ring.
Ch 3.
Work:
2 dc, ch 2
into the ring.
Repeat:
3 dc, ch 2
three more times.
Join with a sl st.
You should now have four groups of 3 dc.
Pull the magic ring closed only enough to keep the center neat, but leave enough space to position the mushroom visually in the middle.
Fasten off.
Attach the Mushroom to the Center
Place the tiny mushroom over the green center.
The cap should sit slightly above the exact midpoint.
Use small hidden stitches to secure:
- the bottom of the stem
- both sides of the stem
- the lower edge of the mushroom cap
Do not sew around every edge.
Leaving a little dimensional lift makes the motif more interesting.
Part 4: Expand the Green Square
Join green yarn in any corner space.
Round 2
In the corner work:
3 dc, ch 2, 3 dc
Ch 1.
Move to the next corner.
Work:
3 dc, ch 2, 3 dc
Ch 1.
Repeat around.
Join.
Fasten off.
You should now have a clearly defined small green granny square surrounding the mushroom.
Part 5: Crochet the Earthy Brown Round
Join brown yarn in any corner.
Ch 3.
Work:
2 dc, ch 2, 3 dc
into the same corner.
Ch 1.
In the next side space work:
3 dc
Ch 1.
At the next corner work:
3 dc, ch 2, 3 dc
Continue around.
Each side should contain one granny cluster between the corners.
Join with a sl st.
Fasten off.
The brown round creates a warm earthy frame around the leafy green center.
Part 6: Add the Cream Outer Frame
Join cream or ivory yarn in any corner.
Cream Round 1
Work:
3 dc, ch 2, 3 dc
in the first corner.
Ch 1.
Work 3 dc in each side space, with ch 1 between clusters.
At every corner work:
3 dc, ch 2, 3 dc
Continue around.
Join.
Cream Round 2
For a slightly larger finished square, continue with one more cream round.
Sl st into the first corner.
Work:
3 dc, ch 2, 3 dc
in every corner.
Work:
3 dc
into every side space.
Ch 1 between groups.
Join and fasten off.
Your square should now measure approximately:
4–4.5 inches / 10–11.5 cm
depending on your yarn and tension.
Part 7: Final Mushroom Details
Once the square is complete, check the mushroom.
If necessary, add another small white highlight to the cap.
You can also embroider a few tiny green grass stitches around the base of the mushroom stem.
For an especially whimsical version, use brown embroidery yarn to add two or three tiny French knots around the green area to suggest forest soil.
Keep these details subtle.
The mushroom should remain the clear focal point.
Blocking the Finished Granny Square
Blocking gives the square a much cleaner shape.
Lightly dampen the finished motif.
Pin it into a square measuring approximately:
4–4.5 inches
Make sure:
- all four corners are even
- opposite sides measure the same
- the mushroom sits upright
- the outer cream frame is flat
Allow it to dry completely before removing the pins.
Mushroom Granny Square Project Ideas
Woodland Blanket
Make mushroom squares in several colors.
Alternate them with:
- cream granny squares
- moss-green squares
- brown squares
- rust-orange squares
This creates a cozy woodland patchwork look.
Mushroom Tote Bag
Use:
4 squares for the front
and
4 squares for the back
Add a plain crochet bottom and handles.
A fabric lining makes the bag more practical.
Cottagecore Cushion
Join four mushroom squares into a 2 × 2 panel.
Create a solid cream or sage crochet panel for the back.
Add a removable cushion insert.
Patchwork Cardigan
Mix mushroom squares with neutral granny squares.
Use cream, brown, sage, and rust for a wearable autumn palette.
Mushroom Garland
Use a smaller hook and thinner yarn.
Crochet several mini squares and attach them to a long chain.
This works especially well for woodland nurseries or fall decorations.
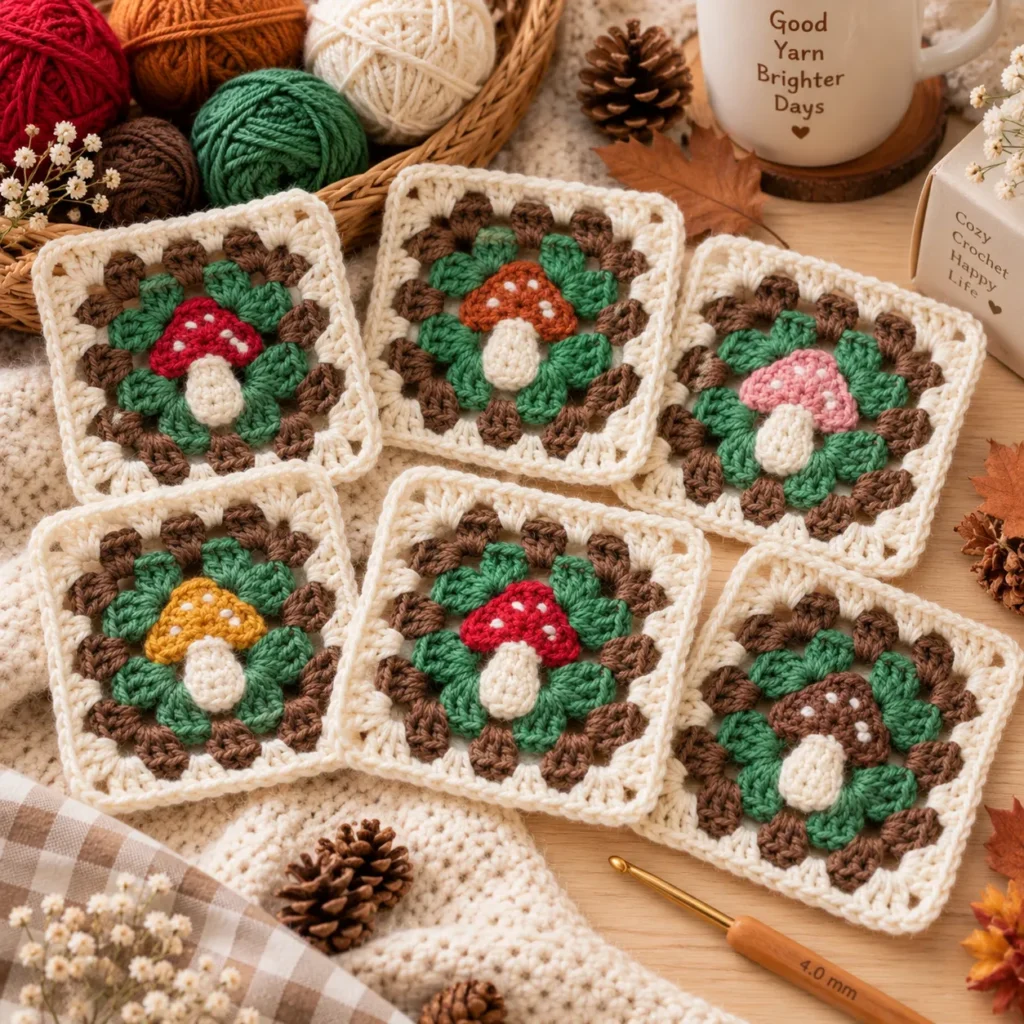
Mushroom Color Variations
Classic Fairy-Tale
Red cap
Cream stem
Green middle
Brown earth round
Ivory border
Autumn Forest
Burnt-orange cap
Oatmeal stem
Olive middle
Chocolate-brown round
Cream border
Pink Cottagecore
Dusty-pink cap
Ivory stem
Sage middle
Taupe round
Cream border
Christmas Woodland
Bright red cap
White stem
Deep green center
Warm brown round
Snow-white border
Neutral Mushroom
Camel cap
Cream stem
Muted moss center
Dark beige round
Oatmeal border
How to Make the Square Larger
Continue adding granny rounds after the cream frame.
For every additional round:
At each corner work:
3 dc, ch 2, 3 dc
In each side space work:
3 dc
Ch 1 between all granny clusters.
You can continue entirely in cream or introduce another coordinating color.
How to Make a Smaller Square
Use sport-weight or fingering-weight yarn with an appropriate smaller hook.
You can also stop after the first cream border round.
A smaller version is ideal for:
- scarves
- garlands
- miniature bags
- mug rugs
- decorative patches
Tips for Consistent Granny Squares
Make all mushroom centers first.
Then make all green rounds.
Continue each stage in batches.
This helps keep your tension more consistent across a large project.
Always block squares before joining them.
If one square is slightly smaller, gently block it to match the others rather than adding random extra stitches.
Frequently Asked Questions
Is this Mushroom Granny Square beginner friendly?
It is best for an advanced beginner.
You should be comfortable with chains, single crochet, double crochet, granny-square corners, simple sewing, and changing colors.
Do I need to sew the mushroom on?
Yes, in this version the tiny mushroom is created separately and secured into the middle of the square.
This makes the motif easier to control and customize.
Can I use worsted-weight yarn?
Yes.
The finished square will simply be larger and thicker.
Use an appropriate hook for your yarn.
Can I make all the rounds the same color?
Yes.
For example, you could use cream for the entire square and allow only the red mushroom to provide contrast.
Can this square be used for a blanket?
Yes.
Just make sure every square is blocked to the same dimensions before joining.
Can I change the mushroom color?
Absolutely.
Pink, orange, mustard, burgundy, brown, and purple all work beautifully.
Save This Mushroom Granny Square Pattern
Save this Mushroom Granny Square Crochet Pattern to Pinterest for your next woodland project.
The tiny mushroom, earthy colors, and classic granny construction make these squares especially fun for fall crafts, cottagecore accessories, handmade gifts, blankets, and bags.