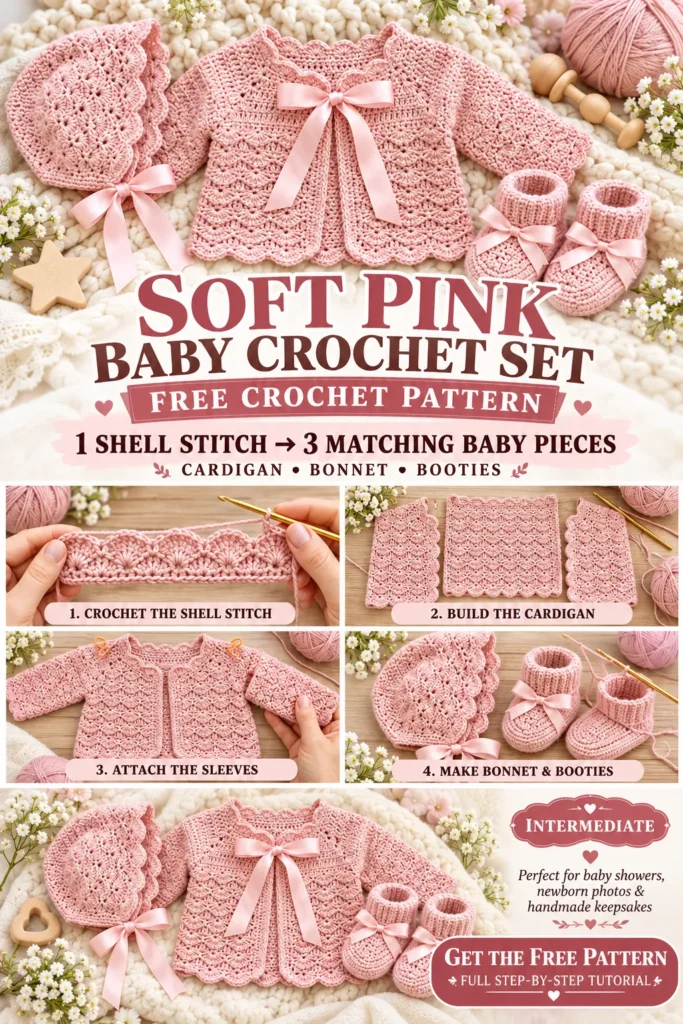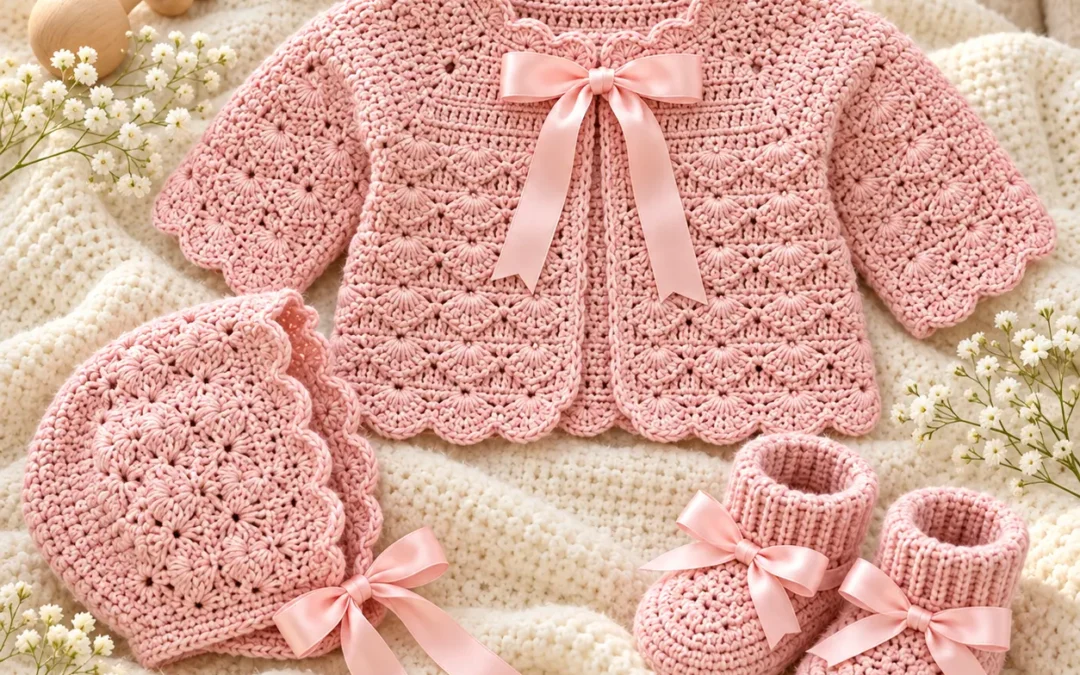
Explore a delicate handmade outfit in this Soft Pink Shell Stitch Baby Set crochet guide. This article introduces the cardigan, bonnet, and booties construction, but the adaptable sizing guidance is not a size-graded, stitch-by-stitch pattern. Check your measurements and gauge carefully rather than assuming the example dimensions will fit every baby.
This coordinated baby set combines a textured shell-stitch cardigan with a matching bonnet and tiny booties, all worked in a soft dusty-pink yarn for a classic heirloom-inspired look.
The design features:
- Textured shell-stitch cardigan
- Soft scalloped edges
- Matching baby bonnet
- Ribbed-cuff crochet booties
- Decorative pink bow accents
- Feminine but timeless nursery styling
It makes a beautiful project for baby showers, newborn photographs, christening-style outfits, keepsake boxes, and handmade gifts.
Pattern at a Glance
| Pattern Detail | Information |
|---|---|
| Skill Level | Intermediate |
| Crochet Terms | US terminology |
| Yarn Weight | DK / Light Worsted |
| Hook Size | 3.5 mm |
| Main Stitch | Shell stitch |
| Set Includes | Cardigan, bonnet, booties |
| Construction | Cardigan worked in sections |
| Edging | Scalloped |
| Decoration | Optional crochet or ribbon-style bows |
| Sample Size | Approx. 3–6 months |
Why You’ll Love This Baby Set
This pattern is especially beautiful because the three pieces look coordinated without being overly complicated.
The shell stitch gives the fabric:
- Soft texture
- Gentle drape
- Vintage character
- Decorative detail without extra appliqués
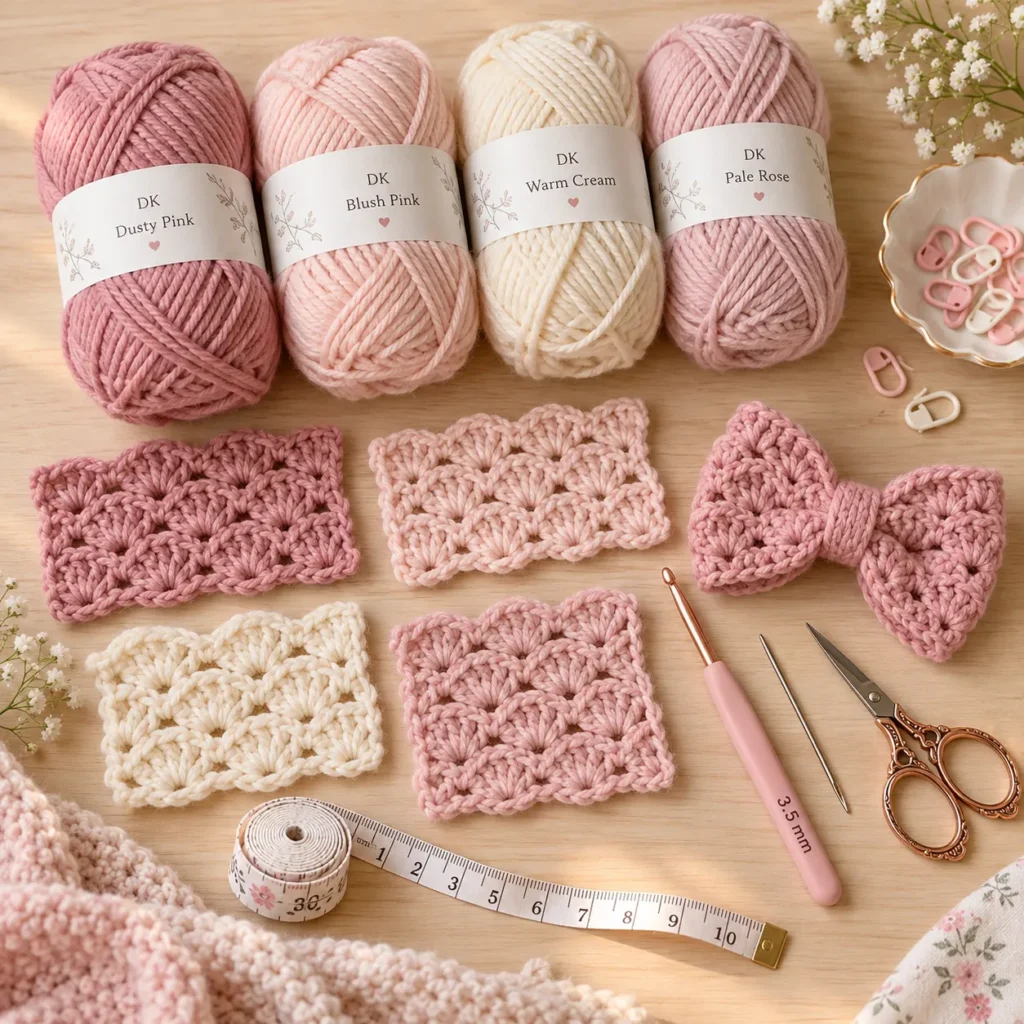
The dusty-pink palette also works beautifully with cream, blush, rose, oatmeal, lavender, or muted sage accents.
Materials
For a complete 3–6 month set:
- 550–700 yd dusty-pink DK yarn
- Small amount blush or pale rose yarn
- Small amount cream yarn if using contrast accents
- 3.5 mm crochet hook
- Yarn needle
- Scissors
- Stitch markers
- Measuring tape
Optional:
- Satin ribbon for decorative bows
- Small natural wooden buttons
- Blocking pins
Choose a yarn that is:
- Soft
- Washable
- Smooth enough to show stitch texture
- Comfortable against baby skin
Good yarn types include:
- Baby acrylic
- Cotton-acrylic blend
- Soft cotton
- Fine superwash merino blend
Crochet Abbreviations
| Abbreviation | Meaning |
|---|---|
| ch | Chain |
| sc | Single crochet |
| hdc | Half double crochet |
| dc | Double crochet |
| shell | Multiple dc worked into one stitch |
| sk | Skip |
| sl st | Slip stitch |
| inc | Increase |
| dec | Decrease |
| BLO | Back loop only |
| st / sts | Stitch / stitches |
| FO | Fasten off |
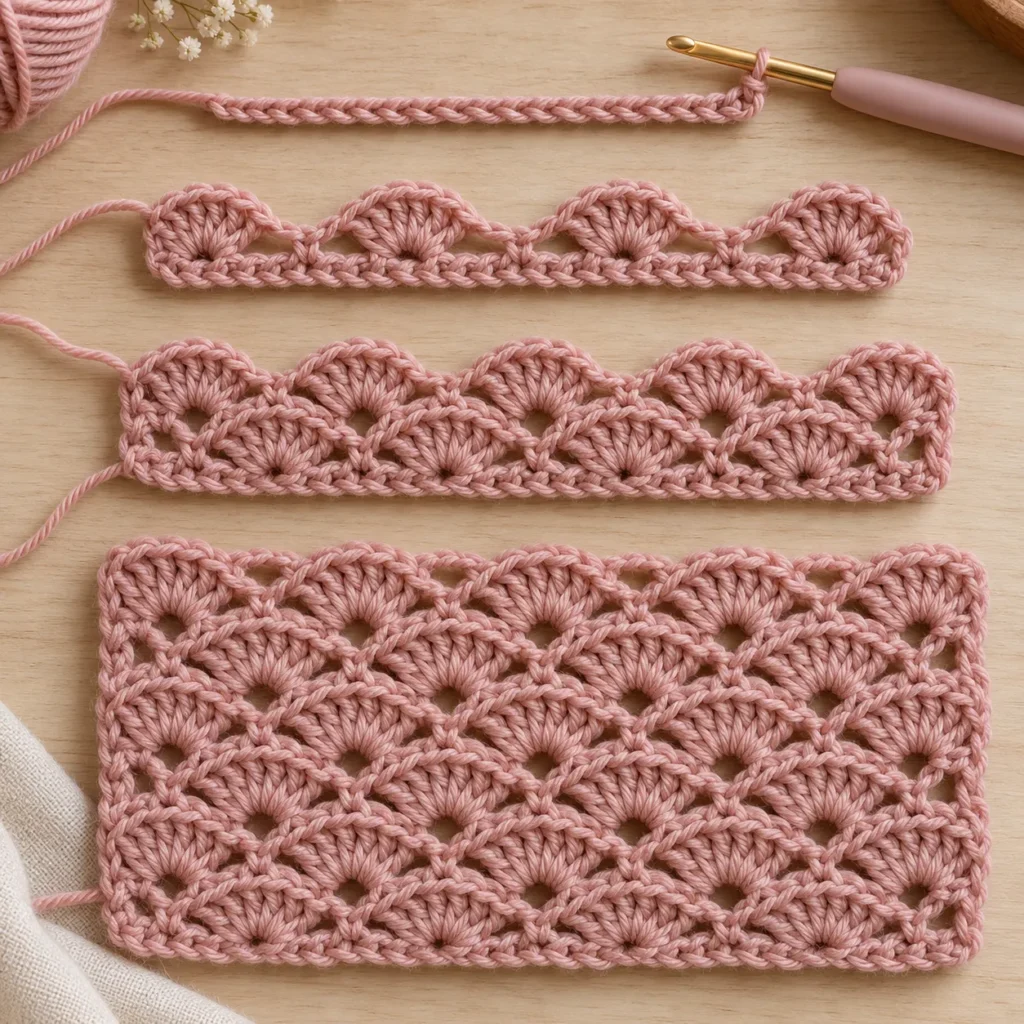
The Shell Stitch
The main shell motif is simple once you understand the repeat.
A basic shell can be worked as:
5 dc in the same stitch
Then:
Skip 2 stitches.
Sc in the next stitch.
Skip 2 stitches.
Work another:
5 dc in the next stitch
Repeat across.
This creates soft fan-shaped shells.
For a slightly tighter baby garment, you can use:
3 dc or 4 dc per shell
instead.
Make a Gauge Swatch
Before starting the cardigan, crochet a small shell-stitch sample.
Aim for approximately:
10 × 10 cm / 4 × 4 in
Wash and dry the swatch as you plan to care for the finished set.
Shell stitch can relax significantly after washing, so checking gauge first helps avoid an oversized cardigan.
Part 1: Crochet the Cardigan Back
The cardigan is worked from the lower edge upward.
Using dusty-pink yarn:
Ch enough stitches to reach the desired back width.
For a 3–6 month sample, aim for approximately:
22–23 cm / 8.5–9 in wide
Foundation Row
Work one row of sc.
Begin the Shell Pattern
Work shell repeats evenly across.
Continue until the piece measures approximately:
17–18 cm / 6.5–7 in
from the lower edge.
Shape the Armholes
At the beginning of the next rows:
Skip or decrease several stitches on each side.
Continue the shell pattern across the center section.
Work straight until the back measures approximately:
24–25 cm / 9.5–10 in
Fasten off.
Part 2: Crochet the Cardigan Front Panels
Make 2.
Each front panel should be approximately half the width of the back, allowing space for the center opening.
Start at the bottom.
Work the same shell-stitch pattern as the back.
When the panel reaches armhole height:
Shape the outer armhole edge.
Continue upward.
Shape the Neckline
Begin decreasing along the inner front edge.
This creates a soft open neckline.
Continue until the shoulder length matches the back piece.
Fasten off.
Repeat for the opposite front, mirroring the shaping.
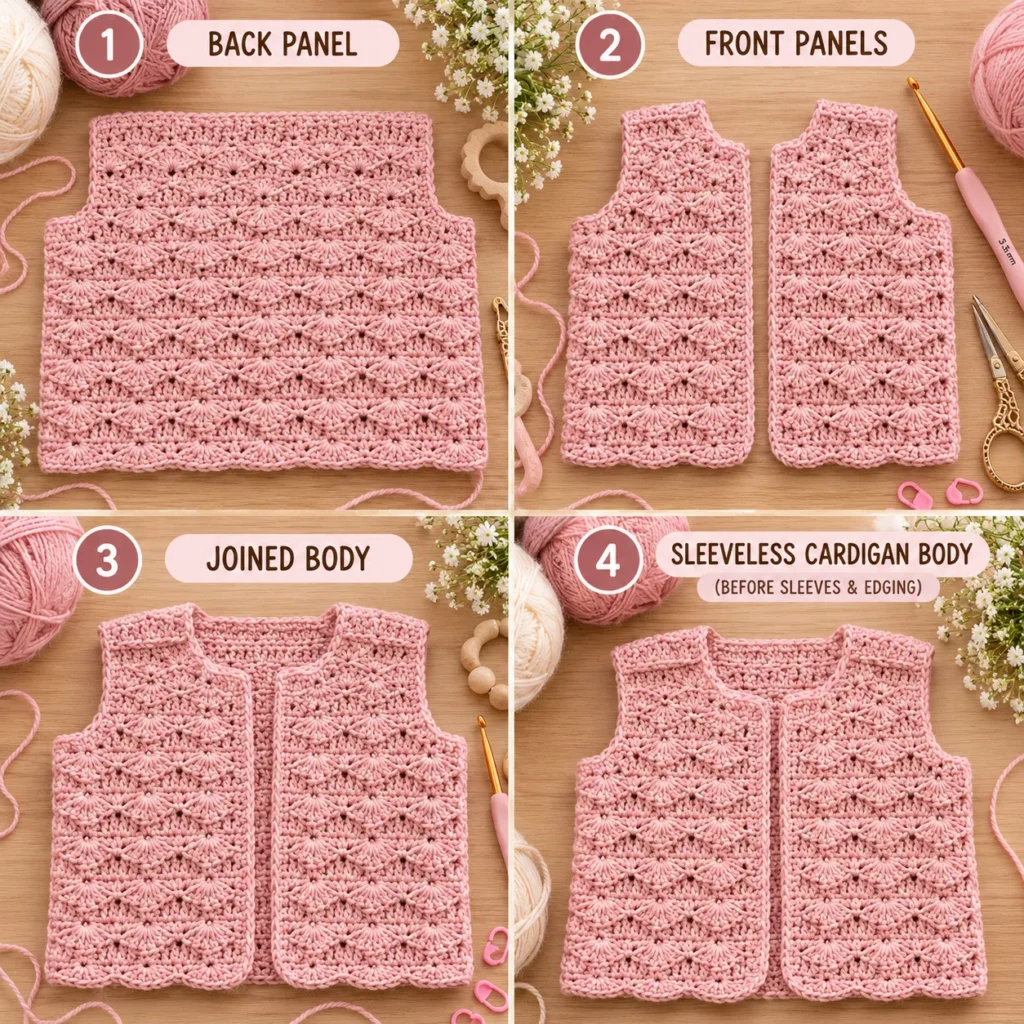
Join the Cardigan Body
Lay the pieces flat.
Join:
- Shoulder seams
- Side seams
Leave the armholes open.
Use mattress stitch or slip-stitch seaming.
Check that the shell rows line up neatly.
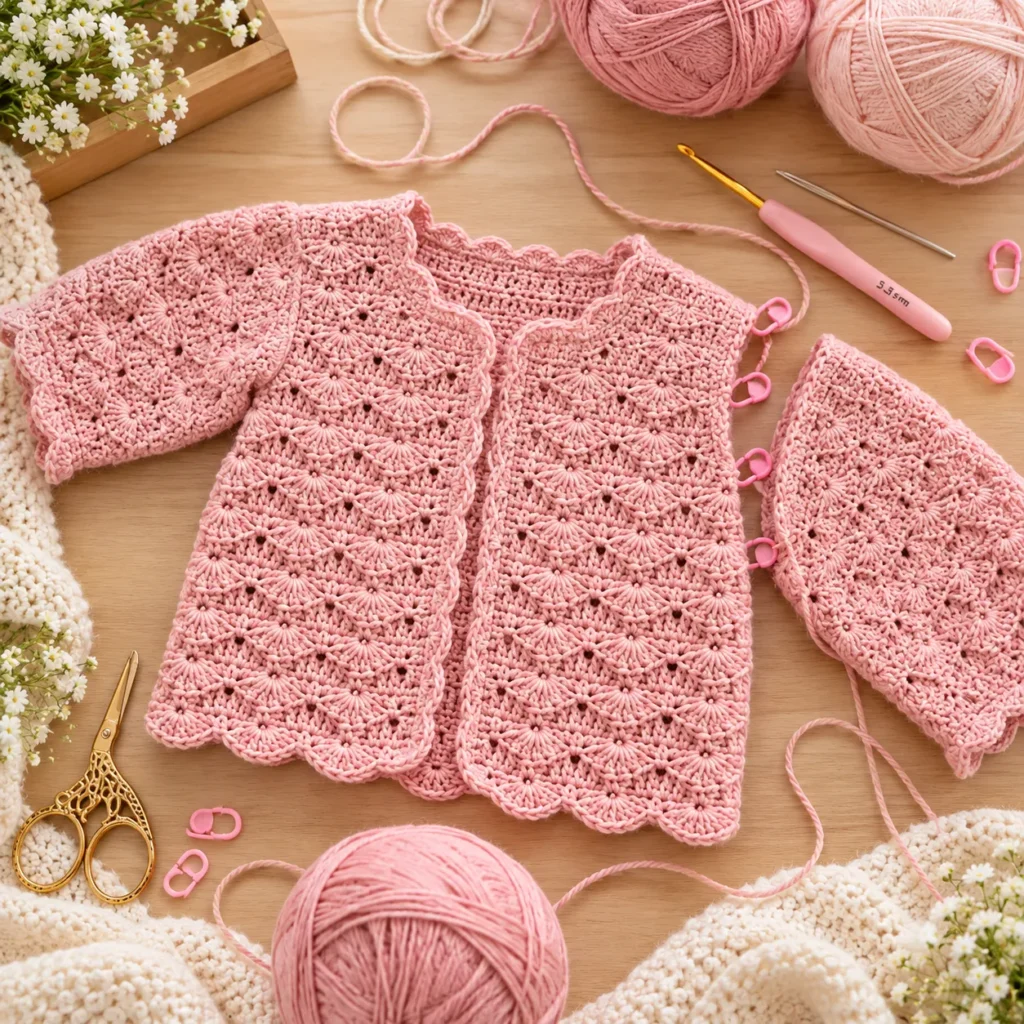
Part 3: Crochet the Sleeves
The sleeves can be worked flat and sewn or directly into the armhole.
For easier construction, work them flat.
Using dusty-pink yarn:
Ch enough for the upper sleeve width.
Work the shell pattern.
Gradually decrease toward the wrist.
Continue until the sleeve measures approximately:
18–20 cm / 7–8 in
for the sample size.
Finish with one plain row of sc.
Make the second sleeve identically.
Attach the Sleeves
Fold each sleeve lengthwise.
Sew the underarm seam.
Pin the sleeve evenly into the cardigan armhole.
Sew securely around the opening.
Repeat for the second sleeve.
Part 4: Add the Scalloped Cardigan Edging
Join yarn at the lower front corner.
Work sc evenly around:
- Front opening
- Neckline
- Opposite front
- Lower hem
For the decorative scalloped round, repeat:
Skip 1 stitch, 5 dc in next stitch, skip 1 stitch, sl st in next stitch
Adjust the spacing if necessary.
Repeat along the lower hem and neckline.
Keep the scallops small and balanced.
Add a Front Bow
At the neckline, attach either:
- A small crochet bow
- A securely sewn soft ribbon bow
If the garment is for a very young baby, sew the decoration firmly and keep the tails short.
You can also omit the bow completely.
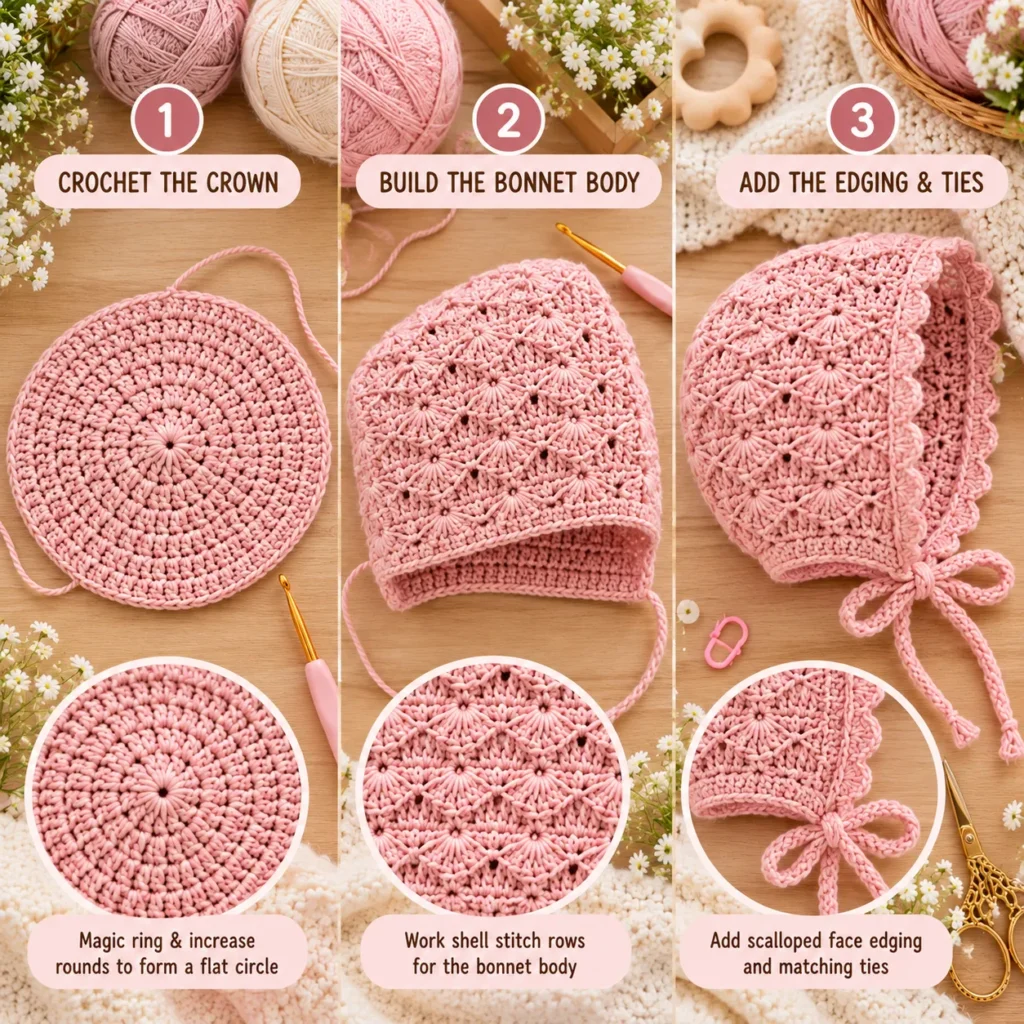
Part 5: Crochet the Matching Bonnet
The bonnet uses the same shell texture.
Crochet the Crown
Create a magic ring.
Work dc increases until you have a flat circle measuring approximately:
11–12 cm / 4.25–4.75 in
for a 3–6 month sample.
Build the Bonnet
Stop increasing.
Work the shell stitch over most of the crown.
Switch from rounds to rows, leaving the lower neck opening unworked.
Continue until the bonnet reaches the desired depth.
Add the Face Edging
Work one row of sc around the face opening.
Then add small scallops.
Add Ties
At each lower corner:
Ch approximately 35–40
Sl st back along the chain.
Or crochet a narrow tie in sc.
Keep both ties the same length.
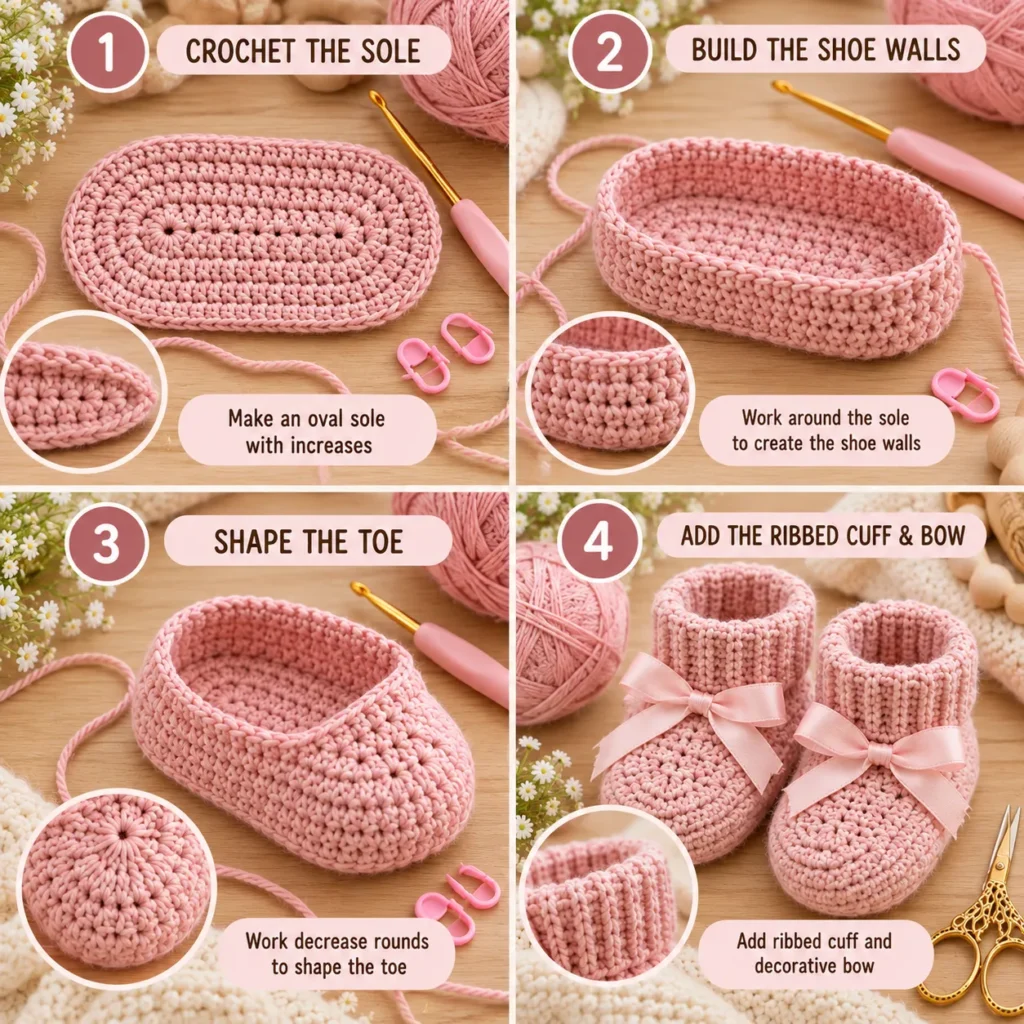
Part 6: Crochet the Baby Booties
Make 2.
The booties begin with a simple oval sole.
Using dusty-pink yarn:
Ch 11–12, depending on size.
Work around both sides of the foundation chain.
Increase around the toe and heel.
Continue until the sole measures approximately:
9.5–10 cm
for a 3–6 month size.
Build the Bootie Walls
Work one round:
sc BLO around
This creates a neat sole ridge.
Then work:
1 sc in each stitch around
for 1–2 more rounds.
Shape the Toe
Mark the center front.
Work several decreases evenly across the front section.
Continue until the toe becomes softly rounded.
Build the Ankle
Work several straight sc rounds.
The opening should remain wide enough to slip onto the baby's foot comfortably.
Part 7: Add the Ribbed Bootie Cuffs
For each bootie:
Join yarn at the ankle.
Ch 7–8.
Starting in the second chain:
Sc across.
Sl st into the next two ankle stitches.
Turn.
Work:
sc BLO across
Repeat around the whole ankle opening.
Join the first and final ribbing rows.
Fold the cuff outward.
Add Small Bows
Make two matching bows.
Attach one to the front of each bootie just below the cuff.
Use the same dusty-pink color for a monochromatic look or use a slightly lighter blush shade.
Optional Crochet Bow Pattern
Using pink yarn:
Ch 8.
Work:
sc across
for approximately 4 rows.
Fasten off.
Pinch the rectangle in the center.
Wrap yarn around the middle several times.
Secure tightly.
Leave a long sewing tail.
For the cardigan neckline, make a slightly larger version:
Ch 12–14
and work approximately 5–6 rows.
Alternative Ribbon Bow
If you prefer a satin-style look, sew a pre-tied ribbon bow securely to the finished garment.
For baby clothing:
- Keep bows small
- Keep tails short
- Sew through the bow center several times
- Check attachment regularly
Part 8: Finishing the Complete Set
Lay all three pieces together:
- Cardigan
- Bonnet
- Booties
Check that:
- Shell stitches match visually
- Pink shades are consistent
- Bows are positioned symmetrically
- Edging is even
- All yarn tails are woven in
Lightly block the cardigan and bonnet.
Do not overstretch the shell stitch.
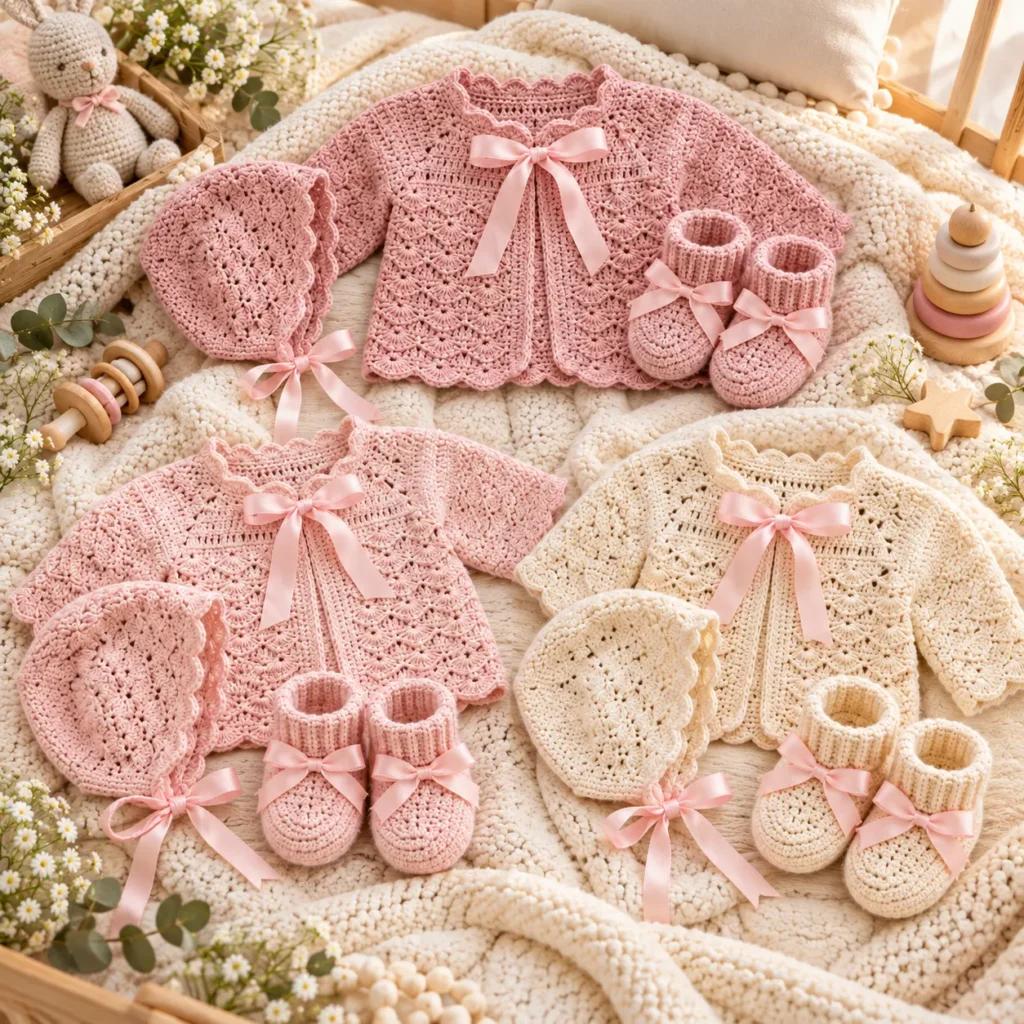
Color Variations
Classic Dusty Pink
Dusty rose
Blush bow
Ballet Pink
Soft blush
Cream details
Vintage Cream
Warm ivory
Dusty-pink bow
Lavender Heirloom
Soft lavender
Cream edging
Sage Heirloom
Muted sage
Warm cream accents
Powder Blue
Dusty blue
Ivory bow
Make a More Minimal Version
If you prefer a simpler look:
- Skip the bows
- Use plain sc edging
- Keep the cardigan one solid color
- Use only one shell-textured section
This creates a more modern baby set.
Add Pearl-Look Texture Without Beads
Avoid attaching beads to baby garments.
Instead, create small bobble stitches between shell rows.
This adds decorative texture while keeping the garment entirely yarn-based.
Add a Matching Blanket
Use the same shell stitch for a small stroller or nursery blanket.
Try:
Cream center + dusty-pink shell border
or:
Dusty-pink blanket + cream scalloped edge
This makes a beautiful coordinated gift set.
Add Matching Mittens
Use plain sc or hdc for the mitten body.
Finish the cuff with the same ribbing used on the booties.
Add one tiny bow to each wrist if desired.
Baby Shower Gift Presentation
Fold the cardigan neatly.
Place the bonnet above it.
Position the booties together at the bottom.
Wrap the set in:
- Cream tissue paper
- Dusty-pink ribbon
- Neutral gift box
Add a handwritten care card with washing instructions.
Tips for Beautiful Shell Stitch
Keep your tension relaxed.
Do not work shell stitches too tightly.
Count each repeat carefully.
Use stitch markers around shaping sections.
Maintain the same number of dc stitches in each shell.
Do not over-block.
Lay the garment flat while drying.
Baby Safety Notes
When making clothing for babies:
- Use soft washable yarn
- Secure every decoration firmly
- Avoid loose beads or charms
- Keep ribbon tails short
- Avoid long cords around the neck
- Check bows before each wear
- Remove bonnets before sleep
- Ensure garments fit comfortably
- Do not overdress babies
Any bonnet with ties should only be used while the baby is awake and directly supervised.
Frequently Asked Questions
Is the Soft Pink Shell Stitch Baby Set beginner friendly?
It is best for an intermediate crocheter or confident advanced beginner because the cardigan requires shaping and assembly.
What is included in the set?
The pattern includes:
- Cardigan
- Bonnet
- Booties
What yarn works best?
Smooth DK baby yarn works especially well because it shows the shell texture clearly.
Can I make the cardigan without sleeves?
Yes.
You can create a shell-stitch baby vest using the same body construction.
Can I use cotton?
Yes.
A soft cotton or cotton-acrylic blend gives beautiful stitch definition.
Can I replace the bows?
Yes.
You can use:
- Small crochet flowers
- Simple ties
- No decoration
- Contrast-color edging
How do I resize the cardigan?
Adjust:
- Starting width
- Armhole depth
- Body length
- Sleeve length
Make a gauge swatch before resizing.
Can I make newborn size?
Yes.
Reduce the dimensions and bootie sole length, while keeping the same construction method.
Save This Soft Pink Shell Stitch Baby Set Crochet Pattern
Save this Soft Pink Shell Stitch Baby Set Crochet Pattern to Pinterest for your next heirloom-inspired baby crochet project.
The delicate shell texture, scalloped cardigan, matching bonnet, tiny ribbed booties, and soft pink palette make it a beautiful project for baby showers, newborn photographs, handmade keepsakes, and classic nursery gifts.